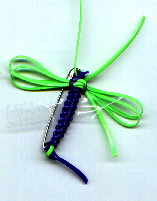
Note: Finished dragonfly will look better if you keep boondoggle untwisted throughout.
Dragonfly is worked on the back of the safety pin, so when its finished you can just pin it on.

Step 1: Tie two body pieces together, using an overhand knot and leaving about 1" tails. Thread long ends through round hole at end of pin - one from each direction. Pull tight.

Step 2: Fold antenna piece in half and place along the pin's back, with the fold under the body tails.

Step 3: Form body by working square knots around the pin back. (If you know how to macrame, the pin back is your filler cord.) Continue making square knots until pin back is almost filled - leave only the width of a piece of boondoggle empty. For me, this generally takes 4 square knots on a 1 inch safety pin.

Step 4: Form wings by folding boondoggle back and forth, making 2 wings on each side.

Step 5: Thread the body pieces through the hole in the head of the pin, one from each direction. Slide wings through the loops formed on top of the pin.

Step 6: Pull body ends tight, tie together at head of the pin, under the antennas. Double check that your knot is secure and then trim body ends close to the knot.
You can make larger dragonflies - just use a larger size saftey pin and adjust the length of the boondoggle pieces and the number of square knots in the body. For this #2 pin I used (2) 12 inch pieces for the body, an 8 inch piece for the antennas, and an 18 inch piece for the wings and 10 square knots in the body section.

HOME
Girl Scout Fun Center