So you wanna learn how to draw, huh? Well granted I'm no expert, but I'll do the best I can to help out the people out there who are interested in learning. The first and foremost thing to remember is to have Patience. Fustration comes with the territory, like many endeavours that demand fine attention to detail. Your computer WILL lock up, freeze, shut down, and you will sometimes lose files due to corruption or other computer technical burps. Save often, and use a numbering system to keep track. I use a nomenclature system that consists of the name of the project, and a number representing the particular version (i.e, Joanofarc3.1).
Materials/Equipment
Clean drawing paper is a must, as are quality pencils and pens. I use standard typing paper, nothing fancy. A good mechanical pencil with 5 mm HB (medium) lead is great for sketchwork, and a good ball point pen for final inkings. As for a scanner, a good 600 dpi flatbed is perfect. If you're like me, you'll be scanning simple black and white line drawings anyway, so something simple is suitable. As for a computer photo-editing program or graphics program, I personally use Adobe Photoshop, version 4.0. However, there are a myriad of other competent programs out there, such as Coreldraw (and even MSpaint) that can do the job. In my experience, Photoshop produces the best results.
Step 1: The Line Drawing
This is often the most difficult part of starting a project. Here you will lay the groundwork that will serve as the foundation for the rest of your picture. Using a pencil, roughly sketch in the lines of your character. Try to avoid "static" poses, such as simply standing straight up. Have your character in action, in mid-motion, or with personality. When you're satisfied with your sketch, ink it in, carefully.

fig 1.0 The line drawing of a character.
Step 2: Fleshing Out your Character
After scanning in your finished line drawing, you can now begin coloring your character. A little feature on Photoshop allows you to create layers - much like a transparent overlay. Using layers, you can add color to a part of your image without affecting what is drawn underneath in a previous layer. I like to start of each drawing by creating a separate layer and putting my colors that I want to use in the picture, in essence creating a color pallete. Having your colors easily referenced makes selecting color much much easier as you complete your project.
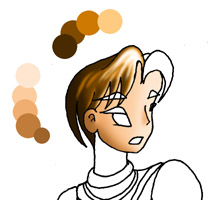
I personally like to begin with the face - as it is the most expressive and usually the most detailed part of any character. How you apply color and contrast here is critically important - it will set the mood and personality of the character you are trying to portray. As you can see, I use 5 different flesh tones to develop contrast between highlights and shadows on the character's face. Using the paintbrush tool, I selected the different colors from the pallete, and proceeded to color the face with approprriate lights and darks. This can be further accentuated by using the burn and dodge tools respectively. In order to stay within the black outline of the original line drawing, I use the magic wand tool to select the area I want to color, then create a separate layer to add the actual color. I often create upwards of 10 layers for different colors on the face alone, to make sure all the highlights and shadows are included. The hair is colored in a similar manner, here using only 4 tones. The highlights in the hair were achieved using a combination of paintbrush, erasure, and layers, and took nearly 3 months of constant experimentation to get to look decent. By adding continually lighter and lighter colors on separate layers and then blending, a few strands of hair can be accentuated with light, or highlighted, and give the character the "shiny" hair that is ubiquitous among Japanese anime-style drawings.
fig 2.0 Adding color.
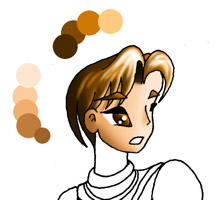
Probably the defining characteristic of any human being are of course, the eyes. In the simple formation of the eyes alone, in terms of how the eyelid covers them, the angle they make with the rest of the face, and their size all are critical components in determining the personality and mood of the person being depicted. In Japanese anime, this concept is magnified. Japanese characters have HUGE, expressive eyes. It's also what makes their characters so beautiful in my opinion. Whatever the case, add lots of depth to the eyes by making the highlights in the eyes pure white, and the pupils pure black. Varying from the eye color, add suitable contrast to the rest of the iris. The highlights in the eye (The reflection on the cornea of light from a source) also are very important, as they can also contribute to the personality of the character. Often times, a wavy, imperfect circle is used as a highlight when depicting sobbing female eyes.
In real life, human eyes are roughly the same size in either gender. However, in Japanese Anime, the eyes of females are usually much larger. Why this is done I'm not exactly sure, but I like it, so I stick to the concept. Furthermore, lashes can be added for further effect.
fig 2.1 Adding eye color.
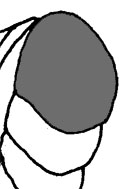
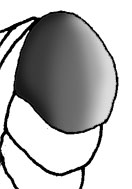
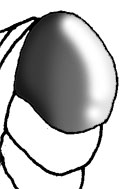
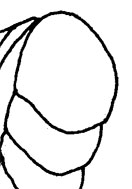
fig 3.0 - 3.3 The progression of adding contrasting colors and highlights to achieve metallic effect.
Step 3: Use of Color and Filters to Depict Textures
Photoshop comes with built in sub-programs called filters. These sub programs can be applied to selected images or areas of color to achieve a wide variety of effects. For instance, the gaussian blur filter can be used to uniformly blur the edges of a selection, giving a "hazy" effect. Used in conjunction with the burn and dodge tools, it can be used to achieve a slightly metallic shine, such as in plate armor.
Step 4: Finishing Touches
After much toil coloring, blending, and filtering, you will come to the competion of your project. Hopefully you like what you see, and you are ready to add the finishing touches. A drop shadow is a popular and extremely nice finishing touch, achieved by copying the character and pasting a duplicate behind it, then filling it black and blurring the entire shadow using a gaussian blur. Conversely, a "holy" glow can be created around the character using a similar technique.
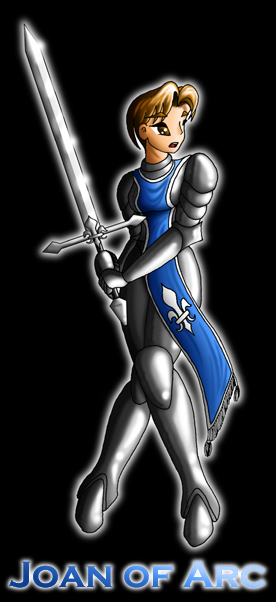
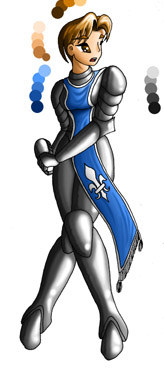
fig 4.0 Finished colored character.
fig 5.0 The finished product.
General Tips
The legs of females constitute roughly 2/3 of their entire height. For males, the ratio is about 1/2. Although this is incorrect in real life, in the realm of Japanese Anime secondary sexual characteristics (leg length, hair, etc) are always exagerated.
The distance between the eyes is rougly 1 eye length.
A woman's shoulder width is about twice the horizontal length of her face. For a male, shoulder width is about twice the vertical length of his face. (note: shoulder width is critical to portraying females correctly - make them too broad and they begin to look like men in drag).
Only in extreme cases are women as muscular as men. Reflect this fact in drawing.
Don't get stuck into the "boring" color range; experiment with bold color contrasts and shading.
Women in general have much softer features (less hard angles and lines), whereas men have more angular faces.
Please do not use any pictures on this website without my permission. You can
reach me via E-mail at Nancysliu@home.com