Right now this page is a catch-all for RealDoll topics concerning maintenance, upkeep, tips, or tricks. As this page develops I will likely reorganize (and rename) it.
![]()
Sarah’s Neck Repair
7/4/1998
AUTHOR’S WARNING: I am not an authority on RealDoll repair. What follows is a description of what was to be my FIRST effort at repair work on my doll. The final responsibility rests with you as to whether you attempt a repair. Matt, at Abyss Creations, is the expert on all matters concerning your doll and you should consult with him prior to attempting any repair, modification, etc. Also, make sure you read and follow all safety instructions on the materials you work with during a repair.
![]()
|
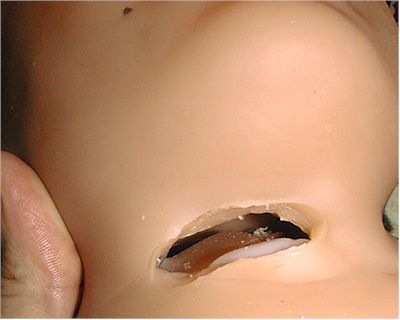
Click any of the images on this page to see a high res close-up image of the affected areas. Above, note the neck damage (tear open, tear closed) and the open seam. |


INTRODUCTION
In the following article I am going to describe how I repaired a tear in Sarah’s neck and a partially open seam under her left breast. At first I was fearful of doing the repair, but I have several years worth of woodworking experience and felt that I had the basic skills to do the job, though I had absolutely no experience working with silicone or any other type of rubber product. I had overall success, but also made some mistakes that I will also describe so that you can learn from them as well.
The tear in Sarah’s neck most likely developed due to the thinness of the material at the neck area and the fact that her head has "flopped backwards" several times while I repositioned her from a seated to a lying position. The open seam under her breast could have (and probably should have, in retrospect) been ignored, but I decided to repair it as well.
MATERIALS
|
I already had a caulk gun and some acetone, so the job cost me about $6. |
||||||||||||||||||||||

PREPARATION & REPAIR
I covered my office desk with two old beach towels (one on top
of the other) and put Sarah on the towels. It was then easy to
slide her all the way onto the table, as well as to reposition
her if necessary. The towels also acted as protection for my desktop. Because I
planned to sit her on the edge of the table, then recline her
back to a lying position, I supported her head and neck with a
pair of pantyhose tied around her (as shown in the photo to the
right...no larger image is available for this one) until I got
her moved into position. The body of the pantyhose was rolled
to provide a fatter neck support and the knot was positioned over
her stomach so that it would be easy to untie once she was lying
down. I then wrapped a cushion in an old towel and put it under
her knees so that she assumed more of a "seated" body posture,
which is least stressful on her.
The towels also acted as protection for my desktop. Because I
planned to sit her on the edge of the table, then recline her
back to a lying position, I supported her head and neck with a
pair of pantyhose tied around her (as shown in the photo to the
right...no larger image is available for this one) until I got
her moved into position. The body of the pantyhose was rolled
to provide a fatter neck support and the knot was positioned over
her stomach so that it would be easy to untie once she was lying
down. I then wrapped a cushion in an old towel and put it under
her knees so that she assumed more of a "seated" body posture,
which is least stressful on her.
To support her head (a critical function for this particular repair) I folded a towel to varying thicknesses until it provided the proper elevation of her head that allowed the tear to close completely, but not be compressed (which would force the sealant out of the tear thus "starving" the repair of sealant).
Now the hard part, I went out and bought the sealant and committed to doing the job.
Step One - Test the Sealant
The first step I took was to open the sealant and "play" with a small quantity of it to see how it handled.
MISTAKE #1: I cut the tip off the sealant, placed it in the caulking gun and gave the handle a vigorous squeeze...nothing...so I squeezed again...and a little sealant oozed out the BACK of the tube (I didn’t see it but I could smell it; the stuff stinks like strong vinegar). Oh well, throw out the tube, go back to the store and buy another. I didn’t know it but cutting the nozzle doesn’t break any seal on the tube; for that you have to drive an ice pick, or other long pointed instrument, down the nozzle and through a seal that is located where the nozzle joins the body of the tube. I discovered that by playing with the bad tube. I also played with the squeeze out from the bad tube and learned a little about the characteristics of the sealant. It is about the thickness of Vaseline. It "sets up" slowly, which means you have time to apply it, smooth it, whatever, before it starts drying in place. Also, smelling that sealant made me realize that I needed a lot of ventilation, or breathing protection. I have a paint spray respirator mask so I used that for the acetone cleaning and the repair work.
Matt recommended that I test the adhesion of the sealant on the doll’s head so, the night before doing the repair, using a toothpick, I dabbed a bit of sealant on the top of her head and let it dry overnight. It adhered well, so I knew the sealant would be okay for this job.
Step Two - Clean the Damaged Areas
Using the cotton swab and acetone (breathing protection on) I swabbed/flushed the affected areas generously and allowed them to dry.
Step Three - Apply the Sealant
The Neck
After getting an idea of the handling characteristics of the sealant, I decided to use a small disposable brush and toothpicks, if needed, for application. I bought a package of brushes for about $1.50. I took out one brush and trimmed the bristles with scissors so that they were short and came to a "chisel point" or 4-sided point, by trimming them left-to-right into a point, and the trimming front-to-back. I hope that makes sense. The net result was a nice stiff little pointy brush that turned out to be easy to work with.
Sarah’s head was tilted back a bit so that the tear opened a little. I had a bowl of water and rags standing by, as well as toothpicks, extra brushes, and anything else I could think of that I might need. I also had a flashlight at hand to help illuminate the work when necessary.
I squeezed a quantity of sealant the size of a marble into a styrofoam
bowel. Using the brush, I carefully "painted" sealant onto both
sides of the tear, using the flashlight once or twice to see that
all surfaces were covered. I then propped Sarah’s head up so that
the tear closed, made some final adjustments to ensure the tear
was closed properly, then cleaned away excess sealant by stroking
gently with moistened cloth. I was concerned about diluting or
disturbing the sealant that was in the tear, so I didn’t rub too
hard or too long on the repair. The result of that is that (as
you can see in the "after" photo)  there is sealant on the outside of the repair. It looks worse
in the photo that in person, but it is still there. Also, because
the sealant is quite thick, its own thickness adds to the structure
of the repair. By that I mean that, to a certain extent, it holds
the two sides apart by its own presence. The neck is thin material
and I didn’t want a poor seal, so I probably got the sealant on
a bit too heavy. Hard to say right now as I still don’t know if
the repair will stand up to normal use.
there is sealant on the outside of the repair. It looks worse
in the photo that in person, but it is still there. Also, because
the sealant is quite thick, its own thickness adds to the structure
of the repair. By that I mean that, to a certain extent, it holds
the two sides apart by its own presence. The neck is thin material
and I didn’t want a poor seal, so I probably got the sealant on
a bit too heavy. Hard to say right now as I still don’t know if
the repair will stand up to normal use.
The Torso
Because of the way the RealDoll is made, there can be areas around the breasts where there is not a perfect glue joint. Sarah has one under her left breast. I refer to it as an open seam. The "before" photo at the top of this article shows me holding this seam open in order to illustrate how deep it is.
Applying sealant and cleaning the area afterwards was very similar to doing the neck, though less nerve wracking.
MISTAKE #2: It had always been the case that when Sarah was sitting up, the seam closed. When she was lying down the seam would open up a bit, maybe 1/8". I decided to do the repair with her lying down, which had the net effect of "filling" the gap rather than closing it. The "after" photo shows this quite well. Because of the way I chose to do this Sarah now has a clear silicone "scar" which is quite apparent and also interferes with the subtle shape of her ribcage on that side. This, again, is not so terrible, but I could have done it much better by waiting for the neck repair to be completely finished, then sitting her up and doing the torso repair.
 
|
| Two views of this repair show its "heavy handedness" well. |
Step Four - Let Cure Overnight
I was pretty nervous about getting the neck done right, so I left her in place for two days. You should have seen me paying bills working around her elbow, head, hip, etc....I’d place things on her stomach, "Sarah, would you hold this a minute?" Of course, that (the paying bills thing) was after 24 hours.
Lessons Learned
Overall, this was not as bad or difficult as I thought it would be. I think the repairs are not that bad, cosmetically. Structurally, I hope they are solid, time will tell. The silicone sealant is not that tough to work with and is pretty forgiving, that is a big relief. I’ll update this report if I get a tear in the repair or have other problems with it.
I hope this has helped. Let me know what you think. Your questions, comments, or suggestions, especially if you have knowledge that could help my next repair go better, will be greatly appreciated. eg
![]()
![]()