
Composite PhotoShop Image
Composite PhotoShop Image
After we retired, my wife and I moved from Westlake Village, which is located on the border between Los Angeles and Ventura counties, to Pleasanton in the year 2000 to be closer to our children who are working in the San Francisco Bay area. We bought a home in a new housing tract called Bridle Creek, which is the reason for the white rail fences that line the main street of the tract. The rail fences are really made of concrete that is cast to simulate wood and painted white. You can see the rail fence in front of my house.
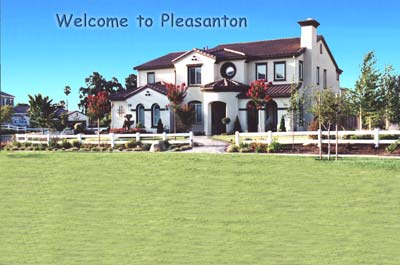
A requirement imposed upon us by the builder was to submit a landscaping plan to a so-called architectural committee that must approve our plan before we can even start landscaping. I dont think theres any architects on the committee. Theyre really a bunch of bean counters whose job is to make sure you abide by the CC&Rs (Covenants, Conventions and Regulations), which is a group of nit-picking rules, some of which makes sense but most dont. Anyway, I drew up a landscaping drawing on my PC using ClarisDraw that used to be MacDraw but is no longer supported by Apple or Adobe. Not being a landscape architect, I meant to use this as a notional drawing to convey to the landscape contractors what we wanted. After a few months of interviewing contractors we selected one whose work in the neighborhood we most admired. The result is shown in the composite above which is intended to show the major features of our front and backyards in one image. Also shown are three images of Tyler, the older of my two grandsons, when he was about 1 1/2, 2 and 3 years old, from left to right in the composite.
I signed up for two Barnes & Noble University home-study courses during April 2003. They are 'Web Pages made Easy' and 'Photoshop 6.0: Basic Skills 1'. I learned a lot because I've never created a webpage nor used PhotoShop before. In less than a month, I was able to create this webpage with the composite image shown at the top of the page. The composite was created with PhotoShop 7.01, which I found easy to use once I learned the basics. When I started the course, I had no idea what I could do with PhotoShop, which I thought was used just to touch-up photographs. I came up with the idea of creating a montage only after collecting the photos shown below as candidates for a class project.
This webpage was optimized for a 1280 x 1024 display monitor. It has been checked out for Netscape 7.02 and IE 6.0 on a PC with Windows XP Home Edition only. If you have problems viewing this page, please let me know.
PhotoShop Layer: background; Olympus IS-10 35mm SLR camera, scan: 300 dpi
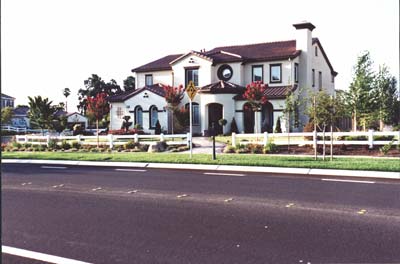
This is the unretouched photo of the front view of house from across the street. It was overcast when this picture was taken, so note the very light gray sky. Note also the traffic circle street sign and a black mailbox at the center of the photo near the curb.
Some PhotoShop terminology that's used in the text below:
Layer - A pixel array that is manipulated and used like an overlay over another image.
Selection - To 'cut' out a section of an image for processing later.
Cloned - To use the Clone Stamp tool to duplicate parts of an image. I found this is one of the most powerful PhotoShop tools that I can use to remove objects, such as unwanted shadows and street signs, and also to cover large portions of an image with grass or a blue sky with gradation.
PhotoShop Layers: title / sky / background
A sample of grass was taken from the area between the sidewalk and curb and cloned to cover the curb and the street. The traffic circle street sign and black mailbox near the curb was removed mostly with the Clone Stamp tool and retouched slightly by the Paintbrush tool. The sky was changed to sky blue that lightens as it approaches the horizon. This sky color was cloned from the gazebo photo described below. Lastly, the title 'Welcome to Pleasanton' was added. Now I'm free to add landscaping features to the artificial turf.

PhotoShop Layer: gazebo; Olympus IS-10 35mm SLR camera, scan: 300 dpi
The 8-foot octagonal gazebo was constructed from a kit from Sam's Gazebos of Gardena, California. It required about one month to apply one coat of primer and two coats of paint, and one week to assemble the gazebo. This photo was taken during construction with a 1 1/2 year old Tyler standing inside. Seats and rails were added to the gazebo a few days later. Two ladders, a wooden fence, a neighbor's house and the surrounding landscape were removed by selection. Windows were then cut in the selection so that you can see the background in the composite past the columns of the gazebo. Unwanted shadows from plants in the foreground were removed with the Clone Stamp tool. In the composite, you can also see the gazebo's shadow projected on the grass and fountain.
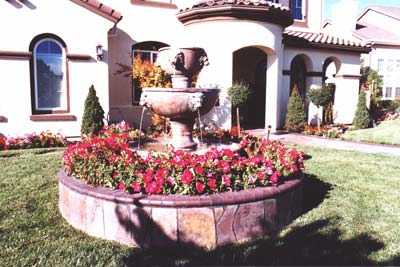
PhotoShop Layer: fountain, Olympus IS-10 35mm SLR camera, scan: 300 dpi
The two-tier lion fountain is manufactured by A.Silvestri of San Francisco. We thought the fountain would look lost sitting by itself on the lawn. So we decided to have the fountain mounted in a round planter that's lined with Rajah flagstones and trimmed with Endicott bullnose bricks same as with all our walkways. The petunias are replanted with different colors every year and blossom between May and November. Note that a shadow cast by a flowering cherry tree has been removed from the composite. Instead I have the fountain's shadow projected on the front walkway. The fountain is in the front yard and is partially hidden behind the left columns of the gazebo in the composite. I moved the fountain to the foreground behind the gazebo and pond.

PhotoShop Layer: tyler, Olympus IS-10 35mm SLR camera, scan: 300 dpi
This photo of Tyler was taken when he was about two years old. In the composite, I moved him outdoors to the walkway in front of the gazebo. I used the Burn tool to darken the right side of his face and body to make it look like the sun is shining from the left. I also created a shadow that is cast on the walkway.
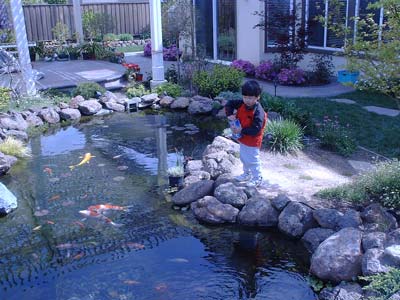
PhotoShop Layer: pond, Argus DC3550 2.1 megapixel digital camera
This photo was taken with a digital camera on an overcast day. I was disappointed with the color and resolution of this image even though I used the Large and High Quality settings, which should provide the maximum resolution for this camera. Note the left post of the covered patio is leaning noticeably to the left. This is a very inexpensive camera, less than $100, so the lens is not of the best quality. I'm waiting for the technology to improve and the price reduced before I invest in a 4 megapixel or better camera. For the composite, I flipped this image horizontally. To lighten Tyler so that it looks like the sun is shining on him, I created another layer called pond-tyler. I then used the Screen blending mode with some adjustment to the opacity to get the desired effect. I also used the Burn and Eyedropper tools to get the desired shadow and coloring. In spite all this, I think this part of the composite is the least realistic.

For the benefit of PhotoShop aficionados, the layers are arranged as follows from top to bottom:
Tyler Set: levels adjustment / tyler / tyler shadow (50% opacity)
Gazebo Set: gazebo / gazebo shadow (65% opacity)
Pond Set: pond-tyler (screen, 40% opacity) / pond-tyler shadow (44% opacity) / levels adjustment / pond
Fountain Set: levels adjustment / fountain / fountain shadow (60% opacity)
Background: title / sky / background (locked)
 California