On a dark and stormy night about 5 years ago, I was driving my Mustang GT on a freeway in Southern California, trying to see my way with the stock headlights. At one point, I turned on the fog lights, which helped somewhat. About half an hour later, the lights suddenly shut off all by themselves, leaving me in the dark as I was going through a curve in the road at about 60 mph. The lights returned a few seconds later, only to shut off again soon after. In fiddling with the headlight switch, I noticed that it was very hot, and the lever was very loose.
I later discovered that the fog light was drawing its power through the same circuit as the headlights, which caused the headlight switch and associated wiring to heat up. The headlight switch has a thermal shut-off to protect itself (but it's OK to leave the driver in the dark just when he most needs the lights). But as it turned out, it did not protect the switch; the headlight switch was burned out.
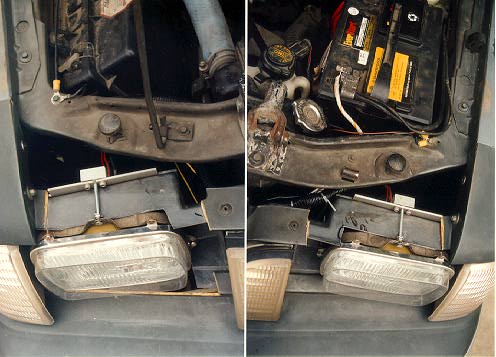
I got a new headlight switch, but I did not want this blinking out to happen again, so I decided to upgrade the wiring. I installed a relay into each of the light circuits; low, high, and fog. I ran heavy gauge wires from the positive terminal on the starter solenoid through in-line fuses to the relays. The relays were actuated by the wires from the light switches. As luck would have it, the Mustang's wiring harness runs by the battery and starter solenoid with a set of junction connectors near the battery tray. I was able to mount the relays under the tray, and run heavy duty wires to the lights from there.
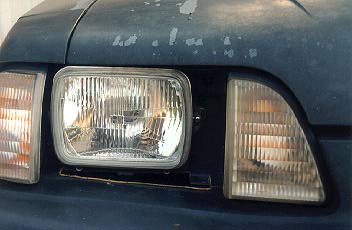
With the wiring taken care of, there was still the problem of the performance of the stock lights themselves. The Mustang uses aerodynamic housings made of polycarbonate, which can deteriorate with age and irradiation by the heat of the lamps and the sun. In my case, the lenses had turned almost opaque, and it leaked so badly that whenever the rain fell, the lights would look like fish bowls.
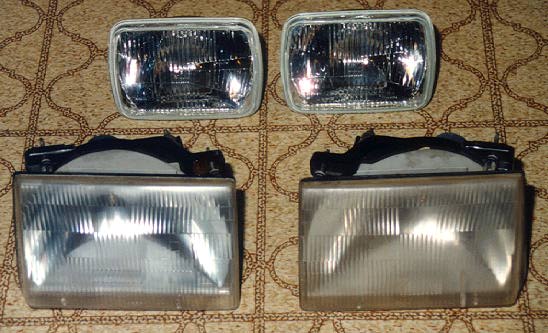
One day, my brother Howard told me that he was upgrading the stock lights on his Probe GT with some European specification lights. These lights are claimed to have much better dispersion patterns, and use the H4 halogen bulbs that are more efficient than the standard US DOT spec bulbs, which were the 9004 series in my case. I was impressed enough with his results that I began considering it for my car. But these lights were only available in the old standard sizes 5.25" and 7" round or 6.25" and 7.875 rectangular, so none of them would directly fit my Mustang. So I had to do some construction work to make one of these lights fit. The following sections describe the installation in more detail. But in brief, I chose the 7.875 (200 mm) wide rectangular light housings because that best filled up the headlight bucket in my car. I'd like to thank Dan Stern of Stern Lighting for his recommendations and invaluable information on this topic. (Disclaimer: Both my brother and myself purchased our lights from him, but we do not work for him or any organizations he's affiliated with, nor do we represent him in any way shape or form.)
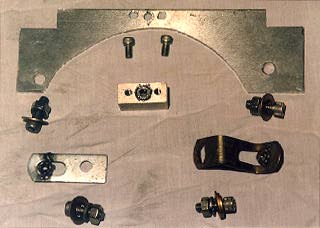
The first step was in determining how to mount the new lights into the old buckets. After a couple of iterations of measurements and sketches, I figured out the mounting hardware I needed to fabricate. I also needed the cups that the light housings sat in, so I picked up a set at the local scrap yard.
What this picture does not show (and I didn't take any, unfortunately) is that there is a number 10 washer tack welded to each of the ears of the headlight cup, which keeps the screws in place. The backside of the screws have a split ring lock washer snugged up with jam nuts with just enough pressure to hold them in place but still allow them to turn for adjustment.
This particular headlight cup is from a Nissan Sentra. It is lighter and shallower than one from a Ford using the same light. If I were to do this again, I may use the Ford version, as its depth is formed by the spherical part of the cup. It may actually pivot nicely against the round spherical part of the stock fiberglass structure. It would require a more traditional fastening system. The Nissan cup is completely reversible; it has mounting ears for the fastening/adjusting screws on both the left and right side, and only one is used. It also had an ear at each of the lower corners for the tension springs, which I cut off for clearance. Also, the screws for attaching the light housing retainer are at the same locations at the top and bottom. The Ford units are symmetrical; there is a discrete part for the left and the right. And, the screws for the light housing retainer are closer together on the top than on the bottom. To use the Ford headlight cup, I would have used only two fastening/adjustment screws and the tension spring. I would have had to use all that space that I cleared out by butchering the bumper cover and the fiberglass structure. It turned out that almost none of it was necessary in this installation.
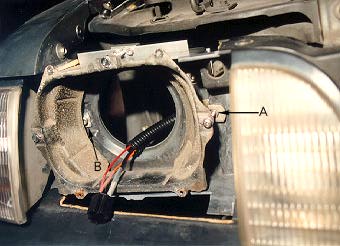
Also note the 8 gauge cable attached directly to the negative bettery terminal. This cable is routed to a part of the frame below the radiator where it is attached to a stud that forms the grounding point for all the lights. (Unfortunately, no picutre.) This was part of an earlier project; the grand re-wiring of the headlights and fog lights.
Click here to see old vs new beam patterns
This question will decide whether all that surgery was worth the effort; Can I see better now with the new lights? The answer can be easily inferred from the pictures of the before and after patterns, even though the pictures don't come close to doing them justice. The shots of the old patterns were taken on a different night than the new patterns, but I made sure that the exposures were set the same way. This is still not a very scientific comparison, as the photolabs usually make adjustments for color compensation. Even so, it's pretty obvious that the new lights appear whiter and have better patterns. Their low-beams have a much better fill in the near range, and have a sharper cut-off so as not to offend people in front of you. With this pattern, the stock fog light (or any fog light) becomes totally superfluous. The new high-beams are also better spread than the stock lights. I have gone through aiming procedures with both lights at another wall, and this was the best I could come up with for both lights. (The slant of my driveway shows here.) Note also that the stock lights are using 45/65 9004 halogen bulbs, while the new lights are using 55/60 H4 halogen bulbs. So with the high beams, I'm actually getting better visibility for a little less power.
A note about higher powered bulbs:
By now, it is possible to get higher powered versions of just about any kind of automotive headlight bulbs. You should proceed with caution. Higher powered bulbs will generate more heat, so the lights using plastic housings WILL melt if you use too high of wattage. The Bosch lights have a metal reflector and glass lens, and have been used with 90/110 watt bulbs with no problem. I don't have these yet (as of 8/99), but I'm thinking about them.
There are some bulbs that use a higher powered low beam filament, but the same high beam filament. Those should be safe for plastic housings, as they do not exceed the maximum bulb power for the light.
There are some companies selling a wiring harness that allows the low beams to stay on with the high beams, to give you the feeling of really bright lights. DO NOT USE THESE! There are two problems with running your lights this way. First is same issue with insufficient wiring harness to support the current drawn by both filaments at the same time. Second, if you have dual filament bulbs, such as the 9004, 9007, or H4 (9003), the filaments can not withstand the higher running temperature, and one of them, usually the low beam, will burn out very quickly.
I would also strongly advise AGAINST using those bulbs that have been dipped in blue paint to simulate the look of the HID lights. They need a higher wattage filament to produce the same amount of visible light as a standard bulb, so they will generate much more heat than a clear bulb of a higher power rating. I've seen at least two cases where these bulbs actually melted not only the plastic housing, but also the glass envelope of the bulb itself. What's really bad about these bulbs is that they do not generate their light at the designed focal point of the housing. They spray light everywhere, so not only do they reduce your visibility, they generate more glare for the people in front of you.
Finally, there are companies offering "drop-in" HID replacements for your normal lights. They use some kind of adapter to install an HID bulb into the standard housings. While I'm all for putting out more light more efficiently, and I really love those HID lights, I would advise caution here as well. A lot of times, the adapters are not very well made, and the bulb is again not put into the proper focal point, so the light dispersion is poor. In addition, the HID light has only one setting, so you can only get it for either high beam or low beam, but one of them can not give you both beams like a dual-filament bulb can. If your car has separate high and low beam housings, you can get both types of HID replacements. But they are very expensive to begin with, so buying twice as much light will be very costly.
Again, for more information on automotive lighting and bulbs, see Dan Stern's lighting pages.
Update 1/2003...HID replacements!
Well, I was looking at the various sources, and finally decided to get the HID drop-in replacements for my H4 lights from Phoenix Micro-Lite in El Segundo, CA. (Note, they don't seem to exist anymore, but I think this type of drop-in replacements can be found at many places.) These are the standard D2R bulbs with masks for low beam patterns, powered by a Philips electronic balast. Phoenix supplied an aluminum adapter for the base to mount it to a standard H4 housing. The housing puts the arc at about the same place as the H4 filament, so it should have the same dispersion as the H4 bulb. However, the radiation pattern of the arc is different, and the light pattern produced using the Bosch reflectors and lenses was not very uniform. Phoenix also supplied some housings made by Maxtel with the lights, and they included the properly sized and shaped gaskets. While they have an inferior pattern when used with the H4 bulbs, they have a much more uniform pattern with the HID bulbs.
Mounting them in the Mustang was not too hard. I found some space in front of the inner fender area to mount the balasts. I then rewired the relays I had installed earlier to always keep the low beams on when the high beams were activated. Otherwise, the HID bulbs will go through a restart cycle each time they are turned off and on. The balast is designed to provide instant lighting, while the HID bulb requires a few seconds to stabilize, and fully warms up in about 30 seconds. While the bulb is warming up, it gives off an interesting spectrum of colors that would normally look quite dazzling. However, the bulb also contains enough xenon gas to work like a continuous flash bulb while the halogen salts are vaporizing during the warm up so that the light appears mostly white.
The HID bulbs made in the recent years have a new salt added to the gas mix which adds a yellow color to the light. This makes the light appear less violet than before, which is an effect all the blue-dipped halogen bulbs attempt to (but fail to) mimic. The Phoenix lights come with these modified HID bulbs, as will all future lights that use them. So they now appear just very white and intensely bright, with almost no trace of the purple cast of the earlier bulbs.
I also installed some auxillary driving lights to serve as the new "high beams", though their effect are quite minimal compared to the HID low beams. See the new pattern. I had to reduce the exposure time on the camera because the lights were so much brighter than the halogen lights.
In order to install the "high beams", I had to remove the stock turn signals. For some reason, Ford put these towards the center of the car, INSIDE of where the headlights are mounted. In the corner, the marker lights are low powered amber bulbs. My turn signal light housings were getting foggy as well, so I made a modification to move the turn signals into the corner marker housings. I used a hole saw to cut out the part of the housing that formed the bayonet mount for the bulb socket. I then trimmed the mounting holes on the corner marker housings to accept the larger socket of the turn signal bulbs. I then epoxied the mount piece that I cut out of the original turn signal housing to the corner marker housing.
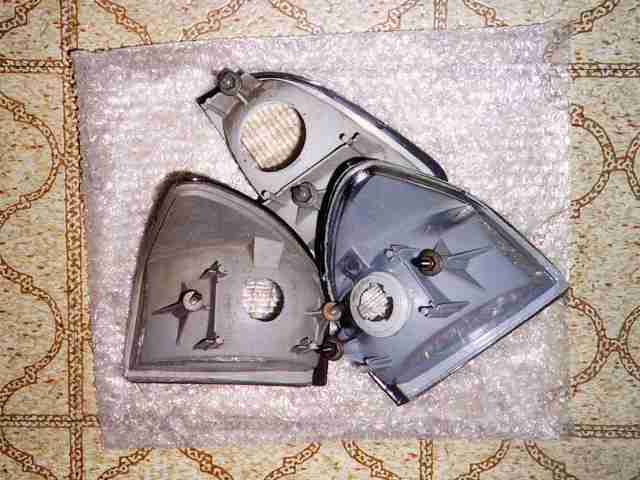
A little change in the wiring harness brought the dual-filament marker/turn signal bulb out to the corner. So now, my front turn signals are on the corners, where they have a much better chance of being seen by drivers on my sides.