| |
0. Introduction
At AU$245 (or US$115), an Adire Audio Shiva
driver unit is really not that heavy on the budget
until I remember that I'm a jobless, fulltime student,
which makes a DIY subwoofer all the more practical.
Besides, after having read a lot about loudspeakers,
I refuse to spend my savings on retail loudspeakers;
much less retail subwoofers.
I had planned to make the construction
significantly easier by using Formatube/Sonotube as
the enclosure. But I changed my mind when I found out
it would cost AU$60 to have the tube delivered. I
decided the money would be better spent on a cordless
drill since I haven't got one yet. So, the enclosure
is of vented-box type.
1. Project Goals
a. Minimal wood cutting
- I started this project without any power
tools; a jigsaw and a cordless drill was all my
budget could allow for. So I had to come up with
enclosure parts dimensions which would require
minimal cutting of pre-cut wood panels.
b. Possibility of recycling materials
- Realizing my budget only allows for a box
that is 16mm thick, I did not bother putting
cross braces so that it could be recycled easier.
The box itself is large enough that when torn
down, it can be recycled into, say, a pair of
bookshelf enclosures. In the near future,
Sonotube/Formatube will be used.
c. Highest possible performance
- Of course, reasonable performance is a
design goal.
2. Alignment
I decided that bass extension was important,
therefore I used the EBS alignment. Adire Audio
recommends a box volume of 143l
tuned to 18Hz, which is rather awkward to realize
when quality
flared ports are not available locally.
3. Enclosure
| Internal Box Dimensions |
| Depth |
|
568mm |
| Width |
|
390mm |
| Height |
|
900mm |
When I started this project, I knew I wouldn't
have enough savings left to purchase a circular saw,
so I chose box dimensions that would minimise wood
cutting, which in turn minimises wobbly panel edges
when only a cheap jigsaw is available. Luckily, 600mm
by 900mm MDF panels are available at our local
hardware store. Two of such panels made for the sides
of the enclosure, while I only had to use my jigsaw
four times to cut the front, back, top and bottom
panels. Twelve 42mm by 42mm pine sticks make up the
corner braces, which in turn were glued and screwed
to the MDF panels. If you're reading this and looking
for a cheap jigsaw, STAY AWAY from the NRG Jigsaw --
yes it's cheap, but the blade wobbles by as much as 2mm
side to side!
4. Ports
As was already mentioned, quality flared ports are
difficult to find here down under, so I had to use
cardboard mailing tubes for ports. 4-inch flared
ports are available at Jaycar Electronics, but I
wouldn't pay more than AU$2 for their ports. To
minimise port noise and resonance, I settled for two
25-inch long ports each of which are 90mm in diameter.
Both ports tuned the box to 17Hz (+/- 1Hz).
5. Quick Simulation (anechoic)
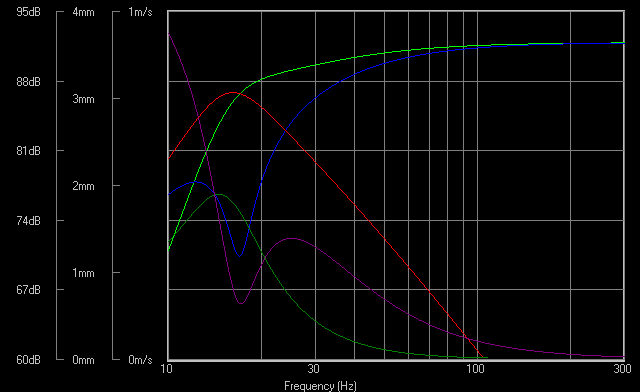
Color Legend:
| Lime |
|
total SPL |
| Blue |
|
woofer's output |
| Red |
|
Port's output |
| Purple |
|
Cone excurssion |
| Green |
|
Air velocity (assuming 5" port
diameter) |
|
|
Input Parameters
| Revc |
|
2.8 |
|
ohms |
| Fs |
|
21 |
|
Hz |
| Vas |
|
0.151 |
|
cu.m |
| Qms |
|
6.7 |
|
|
| Sd |
|
0.0481 |
|
sq.m |
| Bl |
|
10.5 |
|
T.m |
| Input Voltage |
|
2.83 |
|
Vrms |
|
6. Measurements
soon, I hope!
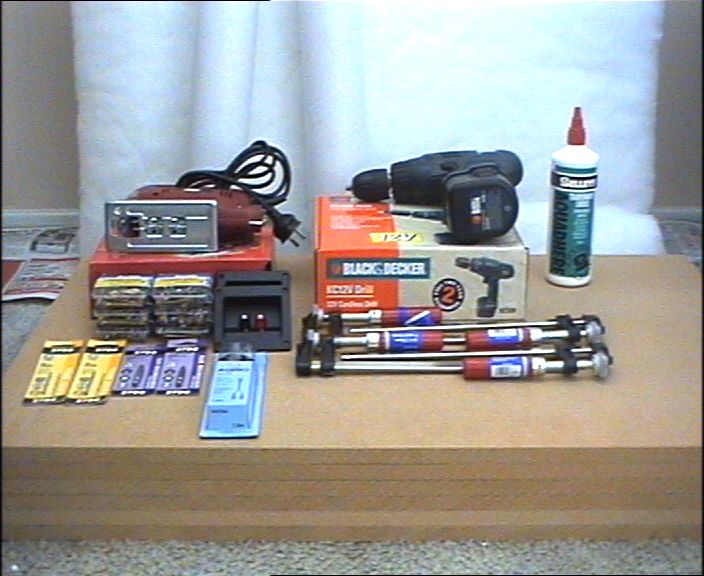
7. List of materials

| |
| Polyester sheets |
4 sheets |
| 90mm diameter by 850mm mailing tubes |
2 tubes |
| NRG Jigsaw (disappointment!) |
1 |
| Black & Decker cordless drill |
1 |
| 500ml Selley's Tradesman's Choice wood glue |
1 bottle |
| pack of 25 pieces of 8g x 45mm wood screws |
6 packs |
| speaker binding posts |
2 |
| wood clamps |
4 clamps |
| 2mm drill bit |
1 |
| 2.5mm drill bit |
1 |
| 3mm drill bit |
1 |
| no. 1 philips head screw bit |
1 |
| no. 2 philips head screw bit |
1 |
| 1 RCA socket to 2 RCA sockets (Y-cable) |
1 |
| 600mm by 900mm by 16mm MDF panels |
6 panels |
| 42mm by 42mm by 1m pine sticks |
12 meters |
| |
|
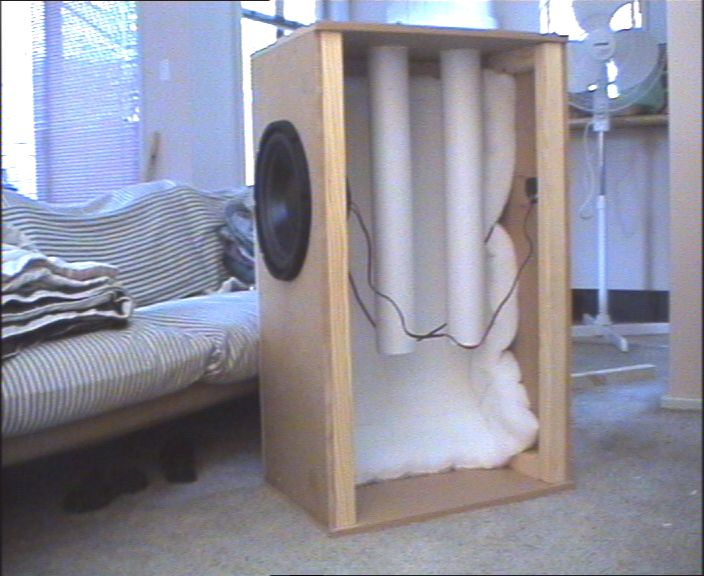
8. Pictures
| |
 |
|
| |
Here is a picture with the top
panel in place but not glued yet. The final box
houses 3 Polyester sheets instead of the planned
4 sheets to give the ports some room to breath. |
|
| |
 |
|
| |
The box can be positioned in any
way so long, of course, as the speaker terminals
are not visible. |
|
| |
 |
|
| |
I know I should have given the
screws some pine or plywood to bite on to, but
this box won't last a couple of months anyway, so
I didn't bother. |
|
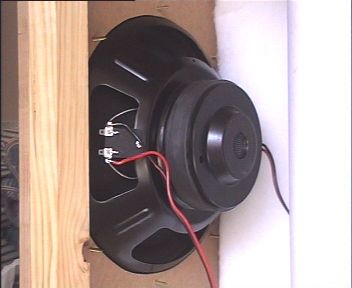
| |
 |
|
| |
|
|
| |
 |
|
| |
I didn't have to brace the ports
since they were light and strong enough to be
mounted just like so. |
|
| |
 |
|
| |
Port noise is inaudible, although
I haven't really tried pushing the Shiva to its
mechanical limits. |
|
| |
 |
|
| |
|
|
| |
|
|
|
|