The Stages of Pipe Drilling
Drilling the stock pipes is the most popular modification among ‘Star owners. The stock pipes are very restrictive and quiet, primarily in order to meet the strict guidelines in some of the states that the bikes are sold. Of course, we all want sound and performance. Aside from investing several hundred dollars in a quality set of aftermarket pipes, this is the most effective way to get there. “Staging” will also allow you the flexibility to tune the sound to your liking.
Below are the stages and how they are done:
Stage 1
Introduction
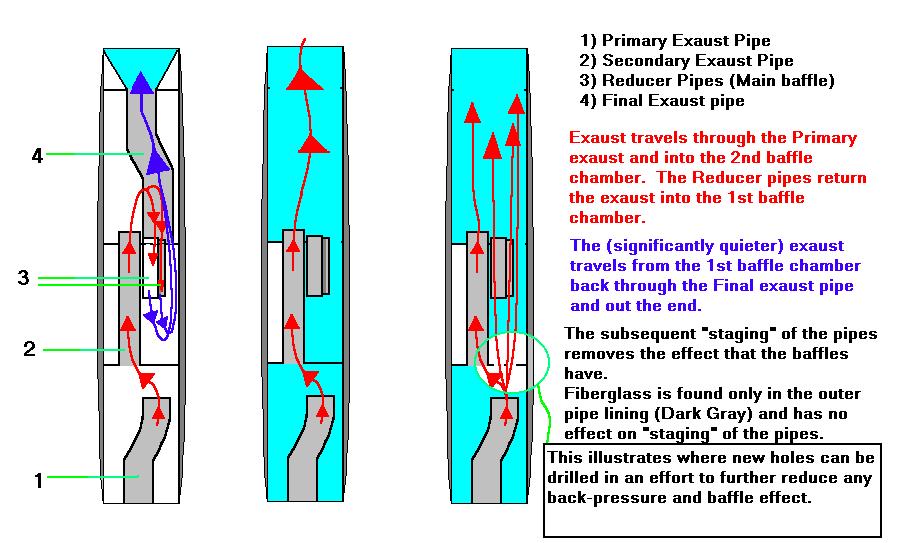
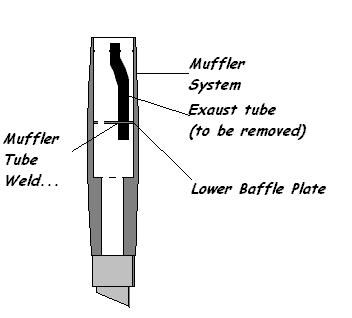
Stage 1 involves removing the cone from the back of the muffler, or “slip-on” portion of the exhaust system. This exposes the plate that holds the final exhaust tube in place. The plate also serves to re-route the exhaust through the final baffle system. Drilling holes in this plate frees up the system and significantly changes the tone and volume. This is the idea behind Stage 1.
It is best to perform the following procedures with the muffler set removed from the header pipe and taken off of the bike.
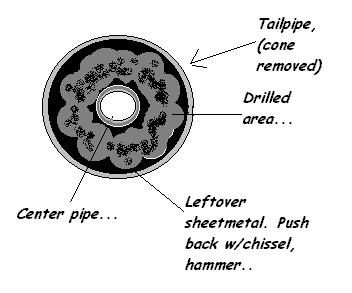
1. Use a ‘Dremmel’ type tool to cut the weld that holds the tailpipe cone to the exhaust pipe. This will completely free the cone. The cone can now be removed from the muffler. This can be tricky. If you like, tap a sheet metal screw into the surface of the cone, which gives you a grab point. Once removed, the cone is useless, so looks aren’t important, however you will want to minimize the damage to the center pipe, because with stages 1 & 2 the pipe remains where it is.
2. Once the cone is removed, use a punch to mark where your holes will go. Start at 12:00/3:00/6:00/9:00 and drill ˝” holes.
3. Reinstall the mufflers and start the bike. If you are happy, you are done. Most will probably want to drill additional holes at the mid-point between the holes you just drilled, giving you a total of 8 holes in the baffle plate. This tends to reduce the “fluffing” sound that only 4 holes will give you.
Stage 2
Introduction
Stage 2, as this is generally referred to, is the process of drilling “blindly” into the lower baffle plate. This is accomplished using a long drill bit and drilling through the holes that you drilled in the first baffle plate and into the second baffle plate. The effect is a slightly louder exhaust.
Again, it is recommended that you remove the mufflers from the head pipe, and take them off the bike.
1. Using an 18” long drill bit, enter the holes that you drilled for Stage 1. Find the second baffle plate and drill random holes in the plate.
*Note... The effect that stage 2 has is minimal. Generally speaking, if Stage 1 has grown old, or if it does not provide the desired sound, you should skip Stage 2 and go to the Stage 3 modification.
Stage 3
Introduction
The Stage 3 modification seems to be the most popular. In fact I have done 3 sets of Stage 3 pipes without ever stopping at Stage 1 or 2. The process essentially defeats the 1st and 2nd baffle chambers and uses only reduction and re-direction as the means of baffling the sound. The modification is reasonably simple and once Stage 1 is complete, you’re half way there!
1. Using a 1” hole saw, drill out the first baffle plate in an overlapping fashion, essentially eliminating the baffle plate entirely. You will leave jagged edges, and a center pipe that is no longer supported.
2. Using a hammer and chisel (or comparable tool) push the jagged edges that are attached to the center pipe back out of the way.
3. Using the same method, push the jagged edges back that are around the outside edge (attached to the inside wall of the exhaust) of the muffler. You can also grind or cut them off, although this is time consuming and the net effect is the same.
4. Insert something sturdy into the center pipe. Whatever it is, it should fit inside the pipe tightly, and give you a firm area to grip. You will then twist and turn the center pipe, using as much force as possible, until you feel the weld in the bottom of the pipe give way. Continue working the pipe until it comes completely out of the muffler.
5. All that is left is to clean up the inside of the pipe by working with the leftover edges and using some flat black spray paint.
It is strongly recommended that you re-jet the carburetor at Stage 3. A Dyno-Jet kit using a 165 to 170 main should be sufficient. You do not want to run too lean and because the stock setup tends to run lean already, allowing exhaust to exit easier tends to exaggerate the condition.
The end result will be a better running, better sounding bike, no matter which stage you choose.


Home