FatBike... Fat Tire!
![]()
Since posting the new photo's of my bike with the new, lower and fatter rear end, I have been getting lots of letters from people, asking me to outline how the project went. Due to popular demand, here are the details.
Swapping the stock rear tire for a larger tire requires
little more than a few fairly simple modifications and some spare time.
The result is very desirable. The
fender area screams for more tire and wheel and this combination accomplishes
that in spades!
I chose the RC “Smoothie” rear wheel.
I like the look, and the stock pulley and rotor bolt right up.
There were no spacers needed, and other than the modifications outlined,
the installation went without a hitch.
I used a 180/55-17 Dunlop ‘Elite’ tire on the 17” RC
wheel. This is the largest
wheel/tire combination that can be installed on the bike using these
modifications. Larger combinations
can be installed, but require custom fenders and the removal of the mount that
holds the caliper and bracket in place. The
modifications were as follows…
Swingarm- 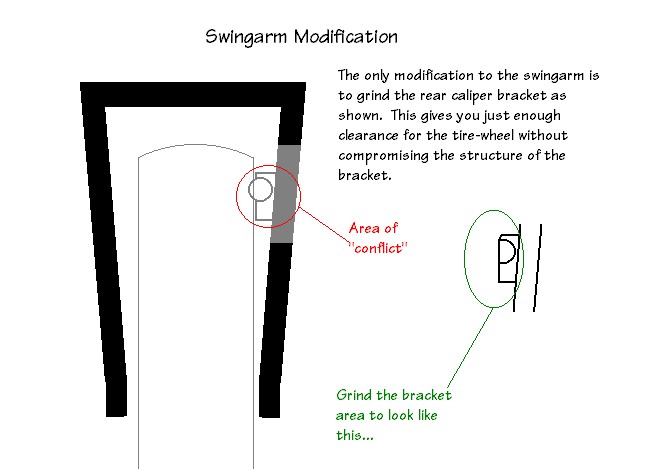 (Click on image for a larger view)
The disc brake caliper bracket mount needed some grinding
to increase the distance between the tire/wheel and the bracket.
The mount is actually 2 pieces; A block that is welded to the swingarm,
and a round, threaded piece that is welded to the block.
Upon examination, you will notice that the round piece overhangs the
block (toward the tire) somewhat. That
overhang is what needs to be ground away. It
should be as close to flush with the block as possible.
The forward edge of the block should also be rounded somewhat.
You may need to reinstall the new wheel/tire and check for clearances.
You won’t get much… maybe a quarter inch or so, but that is
sufficient.
Fender-  (Click on image for a larger view)
Look at the front left side of the fender (the belt
side…) and you will notice a bend in the design that jogs the form of the
fender away from the belt guard and toward the tire.
That area needs to be reshaped toward the belt guard and away from the
tire. Basically, you are decreasing
the clearance tolerance between the belt and the fender, but not by much.
What you really need to do is decrease the bend angle closest to the
tire. When you look at the fender
as it relates to the tire, this will make sense.
This modification can be done by hand.
Be aware that the lower edge of the fender in this area runs close to the
belt. If you hear a rubbing, or low
speed squealing, chances are that the fender and belt are coming together.
Some slight reshaping will generally do the trick, and chances are that
you won’t need to remove the fender or tire once the initial reshaping is
done.
Fender Support- 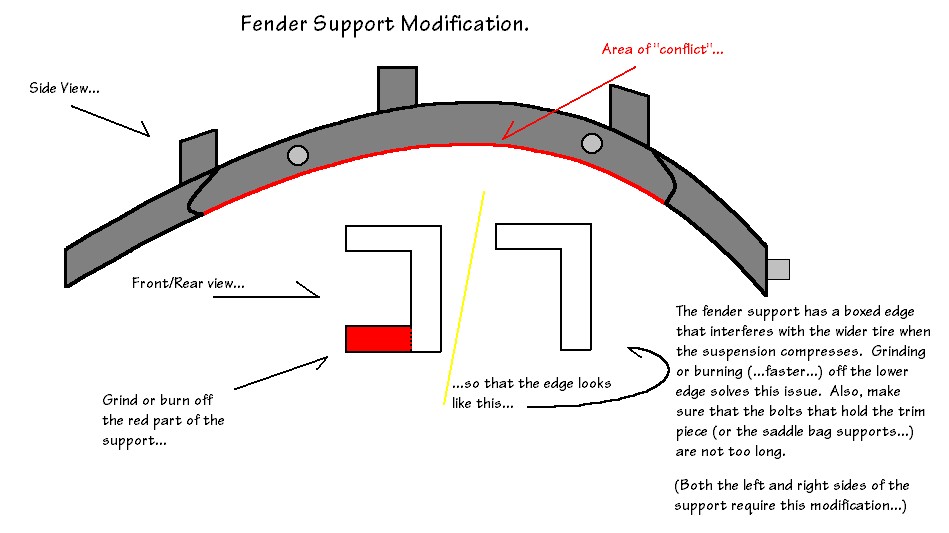 (Click on image for a larger view)
By now you probably are aware that the rear fender consists
of an outer ‘shell’ (the painted part…) and a ‘skeleton’, which
actually holds the shell in place and offers passenger support. The fender support consists of the side rails, and the ribs
that connect the left and right sides to one another. The side rails have an upper and lower ridge that form a
‘C’ shape. It’s the lower
ridge that can potentially come in contact with the wider tire, particularly
when the suspension compresses. That
ridge must be ground, or (for those of you with access to a torch…) burned
almost completely off. This
provides the clearance necessary for the wider tire.
You will also want to shorten the bolts that hold the decorative rails or
the saddlebag supports to the fender. A
bolt that is too long will also risk coming in contact with the tire during
compression of the suspension.
These three modifications are all that I found were
necessary to achieve the proper clearances for the new tire.
Also worth noting… my bike is 2 ½ inches lower in the rear than stock, making clearances more of an issue.
Despite lowering the rear end (…accomplished by reversing
the relay arm…), (Click on image for a larger view) once I did the
modifications outlined above, I have no clearance issues, even 2-up.
(…Total weight 2-up is 325 lbs, 125 lb passenger…)
(Click on image for a larger view) once I did the
modifications outlined above, I have no clearance issues, even 2-up.
(…Total weight 2-up is 325 lbs, 125 lb passenger…)
 Home
Home