
4 cyl. engine replacement from the top. |
|||||||||||||||||||||||||||||||||||||||||||||||||
My 84 SE 4cyl had
a knock in the engine when I bought it. I had an excellent running
2.5 4 cylinder that I had removed from a donor fiero. I really didn't
feel like removing the engine cradle, so I figured I'd try going through
the top. |
|||||||||||||||||||||||||||||||||||||||||||||||||
 |
|||||||||||||||||||||||||||||||||||||||||||||||||
#1 |
|||||||||||||||||||||||||||||||||||||||||||||||||
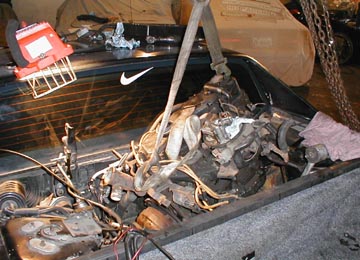
Out with the old |
|||||||||||||||||||||||||||||||||||||||||||||||||
First I removed the
decklid, next is the coolant hoses and the A/C manifold line from
the compressor.Then I unplugged all wires that were attached to the
engine such as: A/C compressor, alternator, starter, sensors. |
|||||||||||||||||||||||||||||||||||||||||||||||||
 |
|||||||||||||||||||||||||||||||||||||||||||||||||
#2 |
|||||||||||||||||||||||||||||||||||||||||||||||||
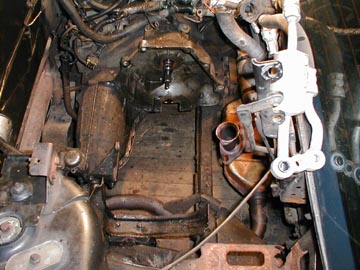
The old engine now removed |
|||||||||||||||||||||||||||||||||||||||||||||||||
I left the following
attached while removing: |
|||||||||||||||||||||||||||||||||||||||||||||||||
 |
|||||||||||||||||||||||||||||||||||||||||||||||||
#3 |
|||||||||||||||||||||||||||||||||||||||||||||||||
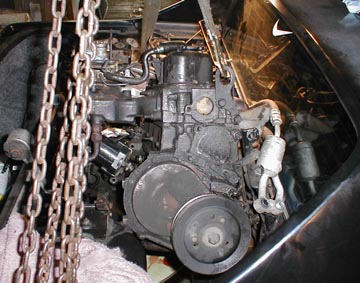
The new engine |
|||||||||||||||||||||||||||||||||||||||||||||||||
Here's the better
engine sitting on its original cradle. Before installing the new engine
I removed the following to make for a smoother install. |
|||||||||||||||||||||||||||||||||||||||||||||||||
 |
|||||||||||||||||||||||||||||||||||||||||||||||||
#4 |
|||||||||||||||||||||||||||||||||||||||||||||||||
Getting ready for install |
|||||||||||||||||||||||||||||||||||||||||||||||||
Before squeezing in the "better" engine, I reinstalled the engine mount and hardware. The transmission to engine bracket is also reinstalled. |
|||||||||||||||||||||||||||||||||||||||||||||||||
 |
|||||||||||||||||||||||||||||||||||||||||||||||||
#5 |
|||||||||||||||||||||||||||||||||||||||||||||||||
In with the new |
|||||||||||||||||||||||||||||||||||||||||||||||||
Now in the famous
words of all Haynes and Chiltons repair manuals: "Install is
the reverse of removal". |
|||||||||||||||||||||||||||||||||||||||||||||||||
| Return to Links menu | |||||||||||||||||||||||||||||||||||||||||||||||||
This site has been created for Fiero Warehouse. All material from Fiero Warehouse.Com is ©Copyright 2003, Fiero Warehouse. All logos and images are reserved. Fiero Warehouse | Wheeling, WV 26003 304 845 4769 | contact@fierowarehouse.com Site Design and maintained by: Reality Graphics |