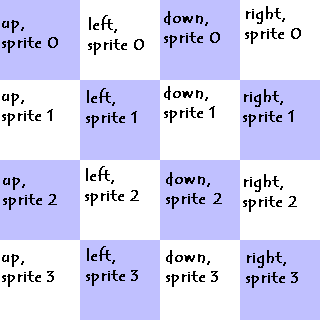
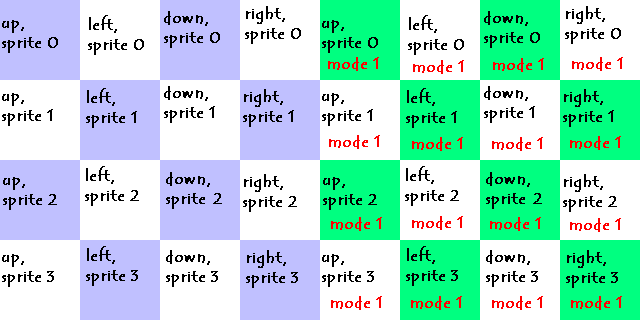
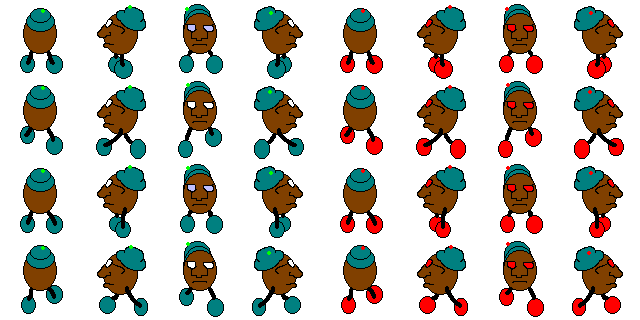
| CREATING A MULTI-IMAGE NPC * Description: Many NPC's are scripted which create animated, custom baddies or new "forms" for the player to appear in. An example of such a "form" is the Marro NPC that is posted for download on the Graal Downloads page. On non-p2p servers, these NPC's cannot be animated through use of Gani files. This leaves scripters with basically 3 options: #1 Create animated .gifs or .mngs to show the animation. #2 Create a single, self-contained image for each frame or sprite of the NPC. #3 Create a multi-image gif or png with each sprite (and direction) represented as a tile in the image. To be brief, choice #1 has many limits on what you can do with it, and it also tends to lag in online play. Choice #2 requires the player to download a new image every time the NPC does something new, causing the NPC to disappear unexpectedly while the image loads. Choice #3 has more versatility than #1 and, unlike #2, uses only a single image. This is the option I explain below. * Process: First, you need to decide how big (in pixels) you want the NPC to be. Start drawing in your graphics program to get a feel for how to design the graphics within those size limits. -- I would recommend that the image pixel size be a multiple of 16. This makes the image much easier to place within the game. If you must, you may leave a little extra space around the image to make this work. Second, decide how many frames or sprites you want for each animation. For example, a baddie might have one sprite (per direction) for standing still, 4 for walking, etc. (I find that for simple scripting - and smaller image size - 4 sprites for walking is good enough to make a reasonable smooth animation. Also, you might leave out the standing-still images and simply use a walking sprite instead.) Remember to include a sprite set for each action you want the NPC to perform - including dying. Third, create a blank image file with the following proportions: WIDTH: 4 times the width of each frame HEIGHT: Total number of sprites times the height of each frame **IMPORTANT** EACH frame must be the same size in order for my instructions to work properly! That means make EACH ONE the size of the LARGEST image!!! Note: someone pointed out that making all the images the same size isn't necessary. But it makes it a WHOLE lot easier to script, and the system I use here requires it. Fill the image with a checkerboard-like pattern, each block the size of one frame, to make the individual frames easy to draw correctly. For an example, click here. In my example, I have each block on the "checkerboard" labeled to show where each frame should be placed. NOTE: If you want the NPC to have more than one "mode" which will use the same sprites, but different (or altered) images, double the width of the image and continue the checkerboard pattern. For an example, click here. Fourth, draw the actual frames. Try to make the images in each column line up. If you don't, the NPC will appear to jump or wobble left and right as it moves. Also try to keep the spacing more or less constant between the top of the image and the top of its frame, else the NPC will seem to "bounce." Of course, deliberately controlling this bounce may make walking, etc, seem more natural-looking. The last step in creating the image is to remove the checkerboard pattern and surround the images with a color which can be set "transparent" by your gif or png editor. Check your editor help files if you don't know how to do this. For an absurd example of a finished image (which will never make it on Graal) click here. The reason I had you set the image up in this way is to make scripting simpler. The next page explains how to script this NPC. |
 |
| Let me know how you like my tutorials, and feel free to suggest corrections or new topics..... |
| AIM: Aylad2001 |