Introduction |
I've heard them called various names from firechains, fire twirling, fire dancing through to poi, but basically they're two lengths of chain with fire on each end, which are swung in patterns around your body. It's something that I was introduced to by a couple called Ben and Jo whilst living on Lamma Island, Hong Kong in 1997. Before we started work at the Deli, we'd often go down to the beach for a few hours, and it was here that Ben taught me a few of the basic moves. It looks pretty impressive at night, especially on a beach or out in the country away from urban streetlights. This page summarises what I've learnt so far, but be aware that there will be many other moves and styles out there which other folk have developed. Poi is an art of twirling that was performed by Maori men and women in order to keep themselves supple and agile. The moves used by firechains have many similarities to those of poi, apart from the fact that the balls used in traditional poi were not lit.
|
|||
Basic Information |
Imagine standing inside a cube. There are four walls around you - one to the front, one behind, and one to the left and to the right. There is also the roof above you and the floor below you. Now these six walls form the planes that your chains will move in. | |||
| Positions |
The first moves with firechains utilise a simple circle. There are two basic swinging positions to learn:
For example: if you twirl the chain at your left side, you create a circle parallel to the left wall of the cube mentioned above. Twirling your right one, you create a circle parallel to the right wall of the cube. | |||
| Timing |
There are two speeds:
| |||
| Directions |
The chains can be swung:
A Word About Directions... |
|||
| Basic Moves |
Listed below are seven basic twirling positions. It's a pretty good idea to get really familiar with these as they form the basis to many other moves. Note that you should practice twirling the first five moves in two directions - both forwards and backwards.
I'm assuming that if you've made it this far, you've either seen or practiced firechains and have a working knowledge of these basic moves. As they're fairly simple, I'm not going to go into them in any great detail except to list them for guidance. Being familiar with these moves is really useful when it comes to learning the advanced moves. Don't forget to practice these moves backwards as well as forwards - you'll need the familiarity with them later.
|
|||
Cross-Overs |
The essential difference between basic and advanced moves is the use of a cross-over, so learning cross-overs is pretty handy. A cross-over is exactly what its name implies - your hand crosses over from one side of your body to another side. Typically, a cross-over links a circle on your right side with a circle on your left side, or a circle in front of you with a circle behind you. A cross-over makes a figure-of-8 pattern, and is composed of two linked circles. An example is shown below. Note that the direction you started twirling in will be reversed when the chains cross over. Remember that imaginary cube around you that I mentioned at the beginning of the basic moves section, and how you learnt spinning at your sides and in front of yourself? Well, when using cross-overs, you can also twirl behind your back, which is parallel to the rear wall of that imaginary cube. |
|||
| Types of Cross-Overs |
The simplest cross-overs can be performed in:
Instead of being performed as vertical circles, cross-overs 3 and 4 can be flattened out so that they're parallel with the ground. This method is used when you're moving from front to back with the corkscrew. As you practice and become more fluent with these moves, you'll find that you can place them in slightly different places around you're body, such as higher or lower, or at an angle. Remember that this list is only for the right hand, and that you should also practice these moves in reverse with your left hand. | |||
Basic Turns |
A turn is made using a cross-over (see previous section), either to your left or to your right, and allows you to move in circles in a variety of ways. As you turn, the direction that you are twirling in will be reversed. |
|||
| Types of Turns |
There are many variations that you can make up using turns, as there are quite a few variables involved. Think about these possibilities...
|
|||
| Examples: Turning in a Circle |
With the chains in time and at your sides, you can turn around in rhythmic circles to your left and right.
For example
Once you're able to do these moves, you should be able to put them together and turn in a complete circle, either to the right or the left without breaking your rhythm. You build upon these turns when you do the circular chase and the circular windmill - turning around in circles whilst changing the direction the chains are twirled in, without breaking the fluid rhythm. |
|||
| Over-the-shoulder turn: (aka High Turn) |
It's a turn which can be performed over your shoulders, turning to the left or the right.
It's a funky little joining move, useful for when you want to change direction but make something out of the change too.
|
|||
Move Guides |
A bunch of the most common moves are listed on the Move Guides page. Here you'll find simple animations of moves, a pictoral step-by-step breakdown of how to learn the moves and a collection of variations associated with each move. Most of the pages also have a photo to the move being performed with fire, to give you an idea of how it'll look to your audience. |
|||
Tips |
I've listed some ideas below for anyone starting out with firechains.
[ ] |
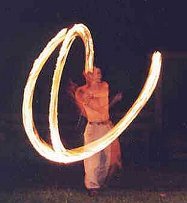
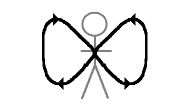 Here, the performer begins by twirling the right chain forwards at his side. He then crosses to his left side and twirls backwards on his left side. The arrows indicate the path followed by the wick.
Copyright © S.M. 1999
All rights reserved.