
Reverberation Wallpaper Tutorial
By: WIT1MI/Tabuna
I was given permission by WIT1MI to post this on my site. If you have any questions regarding this tutorial please direct them to her by clicking the link above.
Intermediate to Advanced skills needed
Hints and tips at the bottom of this tutorial
Open a 500 x500 to start making this wallpaper. We will transfer everything to the 800x600 later.
This is the background that I will be using.

Now what I do make a copy of the original so I don't ruin it.
Go to selection []tool and choose eclipse. Making a fat oval

Now I copy and paste that to a new 800x600 image.
Copy and paste it 2 more times till it looks like this and merge visible.
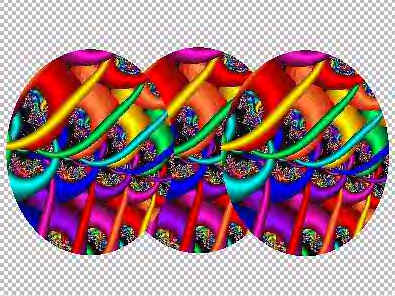
Go to Image>Deformation>circle and it will turn out similar to this
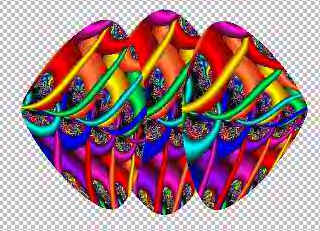
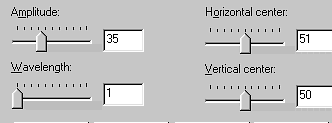
Now go to Image>deformation>ripple and chose the following
This is the setting I chose for this tut. As long as the wavelength is 1 you can chose what ever Amplitude you want.
This is what you end up with

Copy and paste this to a new 800x600 image that has a black background or another very dark color (black is best) Now copy and paste it again. You are going to apply the deformation ![]() tool to it after you add the girl and the bubble tube...just hang on and you will see what I mean.
tool to it after you add the girl and the bubble tube...just hang on and you will see what I mean.
Now copy and paste as a new layer the following tub
![]()
I very carefully clean the edges of the flower with the eraser.
Now copy and paste as a new layer the ![]()
Now using the layer pallette locate layer#2 (that is the second reverb pic)
apply the deformation ![]() tool to make it fit inside the globe. Erase any tiny over hang.
tool to make it fit inside the globe. Erase any tiny over hang.
It will look like this. I hope that you can see that layer. In the end pic you will see a difference.

Now it looks Like this

Remember this is 1:2 ratio size right now so it might not look the greatest. View it at normal size to see the true beauty of the PIC
Now we add the base of the globe and decorate it.
You can adjust the layers as you please to get the affect you want.
Copy and paste the base ![]() now and then use the deformation
now and then use the deformation![]() tool to make it fit how you want it.
tool to make it fit how you want it.

Now copy and paste to layer in order the following:
Add the ![]() and then add the
and then add the ![]() this last tube
this last tube ![]() I added them used the deformation tool and changed the size. Using the layer palette sharpen as needed.
I added them used the deformation tool and changed the size. Using the layer palette sharpen as needed.
This is what you end up with :)

I hope that you enjoy creating your own wallpaper.
Let me know how you do!!!
Happy Creating!
Linda
Tips and tricks
1.Everything that I do I copy and paste. This way I can adjust the layers and do anything that I want to do to them.
2. Everyone's reverberation is going to be different. It all depends on the background that you use and the settings you use.
3. Play with different backgrounds when making the reverb part of the background and try different setting. See what you come up with I would love to see them!
FWPSP Website DISCLAIMER
EVERY effort is given by this club and its members, to keep the tutorials AND credits intact and given to the assumed to be ORIGINAL author of the tutorials we place on our web site. We can assure you that it is none of our members who has changed any authors name, or tried to take credit for tutorials that are not their original creation. Due to the amount of cutting and pasting that happens on all of the Internet, we cannot be POSITIVE that the names of the authors is correct, we have to assume that the names and credits are correct. We have made every effort to give correct credit, where credit is due on all entries put on our web site. We make all effort to contact all known authors to get permission to place their tutorial on our site. We are NOT responsible for posting tutorials that may have been unknowingly pirated and sent into our group OR for tutorials whose true authors name changed to give credit to someone to whom it does not honestly and legally belong to. Many of our members are also members of other PSP groups and get a tutorial from the other groups, then if they like it, they share it with our group...We DO give credit in all instances where that credit is known. We assume the same happens with all PSP groups. We have seen identical tutorials come thru with VARIOUS different names claiming to be the their authors. We have no control over this.
This web page is in place for the enjoyment of those interested in PSP, learning how to use their program and make tags and various things available with it. Please keep in mind that it is out of our control if someone, prior to our group, has pirated pieces and changed who the author is.
NOTE: we received a nasty letter from someone who claimed to be the author of one of the tutorials on our site, the ACTUAL author is a longtime KNOWN friend of one of our authors.
Copyright 2000 Dazee's Attic of Treasures ©. All rights reserved
Back to Tutorial Index { Home { Site Index