
Simple design using Dragonfly/sinedot
by: BHayes3644@aol.com
You will need Dragonfly/Sinedot for this tutorial ~ You can get it here.
Please do not copy this tutorial to any web site without my written permission as I, BHayes3655, own this tutorial. I don't mind if you share in online groups to learn PSP as that's what I write them for ~ Enjoy If you have any questions
please email me at the address above.
Some of you had written asking me for a tutorial regarding one of the tags I sent in for my creations. Well, admittedly, a tutorial maker I'm not, but here is an attempt. If you get confused, don't hesitate to contact me. This is just how I did this one picture, cuz each time I play I do something different and it is hard to remember everything.
K, here we go...
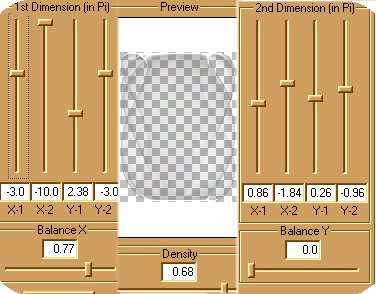
Open a 4 x 4 image. Begin by going to Layers and adding a new one. (I am layer crazy). Add a fill color and another layer, but remember the fill will show through somewhat. Now, go to Effects and select Dragonfly (sinedot). For this tag I used these settings...and, if you want this effect, you will have to use each setting exactly as shown.
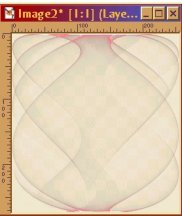
You should see something like this: (these pictures have been reduced to help uploading time) But...give it a few seconds...sometimes it takes that long for sinedot to place the effect on your image.
Then go up to "colors" on the taskbar and select "colorize." Select whatever color you want...for the color above I chose red. Go to "layers" and add a new one.
Go to Effects, Dragonfly (sinedot) and use almost the same dimensions (they should still be there), except for the BALANCE X...reduce that by 3 or 4. Select OK.
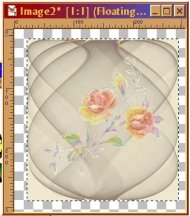
Now go back to Color, select colorize and select a different contrasting color. Add new layer. If you want something in your picture, where I put flowers, I did it at this point. I put a tube of flowers in it. Now, add another layer and repeat the process of Sinedot one more time, remembering to adjust the Balance x by 3 or 4 each time. Add new layer.
 
Now MERGE all layers visible.
Go to edit, and select cut. Now go to edit and select paste as a new image. Now return to the empty image go up to IMAGE on the task bar and resize it a little.
Now, you can go back to edit and paste (re-paste) your image back in this empty one. This provides you with outside room to work.
Now as you can see in the next image, I took my magic wand. feathered at 2, and clicked on my outside color fill...see below and then went to edit to cut.
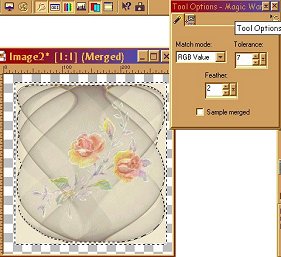
Now merge all layers and you should come up with similar to mine below:

Have fun...be creative.
To use plugin, make a new folder in your plug-ins and call it Dragonfly or sinedot, or both. : ) Unzip the program and then find the folder. Open it and install sinedot to your newly created folder. PSP has to be closed when installing this, as with many
plug-ins.
FWPSP Website DISCLAIMER
EVERY effort is given by this club and its members, to keep the tutorials AND credits intact and given to the assumed to be ORIGINAL author of the tutorials we place on our web site. We can assure you that it is none of our members who has changed any authors
name, or tried to take credit for tutorials that are not their original creation. Due to the amount of cutting and pasting that happens on all of the Internet, we cannot be POSITIVE that the names of the authors is correct, we have to assume that the names and
credits are correct. We have made every effort to give correct credit, where credit is due on all entries put on our web site. We make all effort to contact all known authors to get permission to place their tutorial on our site. We are NOT responsible for
posting tutorials that may have been unknowingly pirated and sent into our group OR for tutorials whose true authors name changed to give credit to someone to whom it does not honestly and legally belong to. Many of our members are also members of other PSP
groups and get a tutorial from the other groups, then if they like it, they share it with our group...We DO give credit in all instances where that credit is known. We assume the same happens with all PSP groups. We have seen identical tutorials come thru with
VARIOUS different names claiming to be the their authors. We have no control over this.
This web page is in place for the enjoyment of those interested in PSP, learning how to use their program and make tags and various things available with it. Please keep in mind that it is out of our control if someone, prior to our group, has pirated pieces
and changed who the author is.
NOTE: we received a nasty letter from someone who claimed to be the author of one of the tutorials on our site, the ACTUAL author is a longtime KNOWN friend of one of our authors.
Copyright 2000 Dazee's Attic of Treasures ©. All rights reserved
Dazee's Attic of Treasures©

Back to Tutorial Index { Home { Site Index
|