| Basic Electronics Tutorial |
Basic
Electronics
1 Basic
Definitions and Concepts
2 Basic
Components
3 Finding the
Value of a Resistor by Color Codes
3.1
Resistor Color Codes
3.2
Resistor Rules
4 Finding
Voltage and Current Using Ohm's Law
5 Using a
Bread Board
6 Transistors
and LEDs
6.1 The
Transistor
6.2
Introduction to Digital Devices - The Inverter
7 Oscillators,
Pulse Generators, Clocks... Capacitors and the 555 Timer IC
7.1 The
Capacitor
7.2 The 555
Timer
Basic
Electronics
1 Basic Definitions and
Concepts
Introduction
Welcome to the exciting world of electronics. Before we can
build anything we need to look at a couple of concepts. Anytime you have an
electrical circuit, you have voltage and current. We build circuits to control
voltage and current.
Current
Current is what flows through a wire. Think of it as water
flowing in a river. The current flows through wires from one point to another
point just like water in a river. Current flows from points of high voltage to
points of low voltage. Current can be shown in circuit diagrams by using arrows
as in Figure 1. The arrow shows which way the current is flowing. An I is
included beside the arrow to indicate current.
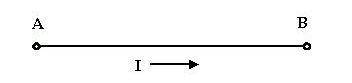
Figure 1
The unit of measurement for current is the Ampere, or Amp for short, and
abbreviated as A. Common currents are 0.001 Amps (0.001A) to 0.5 Amps (0.5A).
Since currents are usually small, they are often given in the form of milliAmps
(abbreviated mA.) The milli means divided by 1000, so 0.001 Amps equals 1
milliAmp (1 mA) since 1 / 1000 = 0.001. Also, 0.5 Amps equals 500 milliAmps
(500mA) since 500 / 1000 = 0.5.
Voltage
Voltage is a measure of how much electricity is at a point. If
we continue the river comparison, a point at the top of a hill would be at a
high voltage level and a point at the bottom of a hill would be at a low voltage
level. Then, just as water flows from a high point to a low point, current flows
from a point of high voltage to a point of low voltage. If one point is at 5
volts and another point is at 0 volts then when a wire is connected between
them, current will flow from the point at 5 volts to the point at 0 volts.
(Voltage is measured in volts.)
A measurement of voltage is much like a measurement of height.
It gives you the difference in voltage between those two points. If point A is
at 10 volts and point B is at 2 volts then the voltage measured between A and B
is 8 volts (10 -2). This is similar to measuring height. We measure the height
of hills the same way. We say the sea level is at zero feet and then compare
other points to that level. On top of Mary’s Peak you are 4000 ft high (compared
to sea level). In the same way we call the lowest voltage in a circuit zero
volts and give it the name ground. Then all other points in the circuit are
compared to that ground point. Rivers always flow towards sea level and currents
always flow towards ground.
A battery is similar to a dam. On one side is a lot of stored
up energy. When a path is formed from that side to the other side then current
flows. If there is no path then current does not flow and the energy just stays
there waiting for a path to form to the other side. The path can be a big path
with lots of current flowing or a small path with just a little bit of current
flowing. With a dam, a little bit of water flow could go on for a long time, but
flow through a big path that lets all the water go at once would only last a
short while. A battery is the same. If there is a big path from the high voltage
side to the low voltage side then the battery will not last long.
Open Circuit
An open circuit is when two points are not connected by
anything. No current flows and nothing happens. If a wire in your vacuum cleaner
breaks it can cause an open circuit and no current can flow so it does not do
anything. There may be a voltage between those two points but the current can
not flow without a connection.
Short Circuit
A short circuit (or short) is when two points with different
voltage levels are connected with no resistance (see resistors) between two
points. This can cause a large amount of current to flow. If a short circuit
happens in your house, it will usually cause a circuit breaker to break or a
fuse to blow. If there is nothing to limit the current, the wires may melt and
cause a fire. This situation is something like a dam breaking. There is a large
amount of energy suddenly free to flow from a high point to a low point with
nothing to limit the current.
There are two basic ways that components can be connected. One
is in series and the other is in parallel. We will refer to these
types of connections later when we are building circuits.
Series Connection
A series connection is when two components are joined together
by a common leg and nothing else is connected to that point as shown in Figure
2.

Figure 2
Parallel Connection
A parallel connection is when two components are joined
together by both legs as shown below.
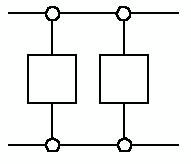
Figure 3
2 Basic
Components
Resistors
Resistors are components that have a predetermined resistance.
Resistance determines how much current will flow through a component. Resistors
are used to control voltages and currents. A very high resistance allows very
little current to flow. Air has very high resistance. Current almost never flows
through air. (Sparks and lightning are brief displays of current flowing through
air. The light is created as the current burns parts of the air.) A low
resistance allows a large amount of current to flow. Metals have very low
resistance. That is why wires are made of metal. They allow current to flow from
one point to another point without any resistance. Wires are usually covered
with rubber or plastic. This keeps the wires from coming in contact with other
wires and creating short circuits. High voltage power lines are covered with
thick layers of plastic to make them safe, but they become very dangerous when
the line breaks and the wire is exposed and is no longer separated from other
things by insulation.
Resistance is given in units of ohms. Common resistor values
are from 100 ohms to 100,000 ohms. The letter k is often used with resistors to
mean ‘1000’. For example, a 10,000 ohm resistor is written as 10k ohms. Each
resistor is marked with colored stripes to indicate it’s resistance. To learn
how to calculate the value of a resistor by looking at the stripes on the
resistor, go to the resistor values tutorial, Section 1.3, which includes more
information about resistors.
Variable Resistors
Variable resistors are also common components. They have a dial
or a knob that allows you to change the resistance. This is very useful for many
situations. Volume controls are variable resistors. When you change the volume
you are changing the resistance which changes the current. Making the resistance
higher will let less current flow so the volume goes down. Making the resistance
lower will let more current flow so the volume goes up. The value of a variable
resistor is given as it’s highest resistance value. For example, a 500 ohm
variable resistor can have a resistance of anywhere between 0 ohms and 500 ohms.
A variable resistor may also be called a potentiometer (pot for short). No
variable resistors are included in this kit.
Diodes
Diodes are components that allow current to flow in only one
direction. They have a positive side (leg) and a negative side. When the voltage
on the positive leg is higher than on the negative leg then current flows
through the diode (the resistance is very low). When the voltage is lower on the
positive leg than on the negative leg then the current does not flow (the
resistance is very high). The positive leg of a diode is the one with the line
closest to it.
Usually when current is flowing through a diode, the voltage on
the positive leg is 0.65 volts higher than on the negative leg.There are no
standard diodes in this kit but a special kind of diode called an LED is
included.
LEDs
Light Emitting Diodes are great for projects because they
provide visual entertainment. LEDs use a special material which emits light when
current flows through it. Unlike light bulbs, LEDs never burn out unless their
current limit is passed. A current of 0.002 Amps (2 mA) to 0.02 Amps (20 mA) is
a good range for LEDs. They have a positive leg and a negative leg just like
regular diodes. To find the positive side of an LED, look for a line in the
metal inside the LED. It may be difficult to see the line. This line is closest
to the positive side of the LED. Another way of finding the negative side is to
find a flat spot on the edge of the LED. This flat spot is on the negative side.
Also, the positive leg is usually longer than the negative leg (this is true for
the LEDs in this kit).
When current is flowing through an LED the voltage on the
positive leg is about 1.4 volts higher than the voltage on the negative side.
Remember that there is no resistance to limit the current so a resistor must be
used in series (see Series Connection in Section 1.1) with the LED to avoid
destroying it.
Switches
Switches are devices that let you control whether two points in
a circuit are connected or not, depending on the position of the switch. For a
light switch, ON means connected (current flows through the switch, lights light
up and people dance.) There is practically no resistance through the switch when
it is turned on. When the switch is OFF, that means there is an open circuit (no
current flows, lights go out and people settle down. This effect on people is
used by some teachers to gain control of loud classes.)
When the switch is ON it looks and acts like a wire. When the
switch is OFF there is no connection.
3 Finding the Value of a
Resistor by Color Codes
To calculate the value of a resistor using the color coded
stripes on the resistor, use the following procedure.
Step One:
Turn the resistor so that the gold or silver stripe is at the
right end of the resistor.
Step Two:
Look at the color of the first two stripes on the left end.
These correspond to the first two digits of the resistor value. Use the table
below to determine the first two digits.
Step Three:
Look at the third stripe from the left. This corresponds to a
multiplication value. Find the value using the table below.
Step Four:
Multiply the two digit number from step two by the number from
step three. This is the value of the resistor in ohms. The fourth stripe
indicates the accuracy of the resistor. A gold stripe means the value of the
resistor may vary by 5% from the value given by the stripes.
3.1 Resistor Color Codes
(with gold or silver strip on right end)
| Color |
Color |
First Stripe |
Second Stripe |
Third Stripe |
Fourth Stripe |
| Black |
 |
0 |
0 |
x1 |
|
| Brown |
 |
1 |
1 |
x10 |
|
| Red |
 |
2 |
2 |
x100 |
|
| Orange |
 |
3 |
3 |
x1,000 |
|
| Yellow |
 |
4 |
4 |
x10,000 |
|
| Green |
 |
5 |
5 |
x100,000 |
|
| Blue |
 |
6 |
6 |
x1,000,000 |
|
| Purple |
 |
7 |
7 |
|
|
| Gray |
 |
8 |
8 |
|
|
| White |
|
9 |
9 |
|
|
| Gold |
 |
|
|
|
5% |
| Silver |
 |
|
|
|
10% |
Follow the procedure above with the examples below and soon you
will be able to quickly determine the value of a resistor by just a glance at
the color coded stripes.
Example 1:
You are given a resistor whose stripes are colored from left to
right as brown, black, orange, gold. Find the resistance value.
Step One: The gold stripe is on the right so go to Step
Two.
Step Two: The first stripe is brown which has a value of
1. The second stripe is black which has a value of 0. Therefore, the first two
digits of the resistance value are 10.
Step Three: The third stripe is orange which means x
1,000.
Step Four: The value of the resistance is found as 10 x
1000 = 10,000 ohms (10 kilo ohms = 10 k ohms). The gold stripe means the actual
value of the resistor mar vary by 5% meaning the actual value will be somewhere
between 9,500 ohms and 10,500 ohms. (Since 5% of 10,000 = 0.05 x 10,000 =
500)
Example 2:
You are given a resistor whose stripes are colored from left to
right as orange, orange, brown, silver. Find the resistance value.
Step One: The silver stripe is on the right so go to
Step Two.
Step Two: The first stripe is orange which has a value
of 3. The second stripe is orange which has a value of 3. Therefore, the first
two digits of the resistance value are 33.
Step Three: The third stripe is brown which means x
10.
Step Four: The value of the resistance is found as 33 x
10 = 330 ohms. The silver stripe means the actual value of the resistor mar vary
by 10% meaning the actual value will be between 297 ohms and 363 ohms. (Since
10% of 330 = 0.10 x 330 = 33)
Example 3:
You are given a resistor whose stripes are colored from left to
right as blue, gray, red, gold. Find the resistance value.
Step One: The gold stripe is on the right so go to Step
Two.
Step Two: The first stripe is blue which has a value of
6. The second stripe is gray which has a value of 8. Therefore, the first two
digits of the resistance value are 68.
Step Three: The third stripe is red which means x
100.
Step Four: The value of the resistance is found as 68 x
100 = 6800 ohms (6.8 kilo ohms = 6.8 k ohms). The gold stripe means the actual
value of the resistor mar vary by 5% meaning the actual value will be somewhere
between 6,460 ohms and 7,140 ohms. (Since 5% of 6,800 = 0.05 x 6,800 =
340)
Example 4:
You are given a resistor whose stripes are colored from left to
right as green, brown, black, gold. Find the resistance value.
Step One: The gold stripe is on the right so go to Step
Two.
Step Two: The first stripe is green which has a value of
5. The second stripe is brown which has a value of 1. Therefore, the first two
digits of the resistance value are 51.
Step Three: The third stripe is black which means x
1.
Step Four: The value of the resistance is found as 51 x
1 = 51 ohms. The gold stripe means the actual value of the resistor mar vary by
5% meaning the actual value will be somewhere between 48.45 ohms and 53.55 ohms.
(Since 5% of 51 = 0.05 x 51 = 2.55)
3.2 Resistor
Rules
There are some more rules that may be useful when working with
resistors. You do not need to know them but if you need a resistor with a value
that you do not have, you may be able to use the following information to create
the value of resistor you need.
First Rule for Resistors : Series Connection
When two resistors are connected in series, as shown in Figure
4, the new resistance between points A and B is R1 + R2.
R1 + R2
AB
Figure 4
The resistors add together. For example if R1 = 500 ohms and R2
= 250 ohms then the resistance between points A and B would be R1 + R2 = 500 +
250 = 750 ohms. Section 1.5 has a picture that shows what a series connection of
two resistors looks like on a breadboard.
Second Rule for Resistors : Parallel Connection
When two resistors are connected in parallel, as shown in
Figure 5, the new resistance is smaller than either R1 or R2. The new resistance
between points A and B is (R1 x R2) / (R1 + R2).
A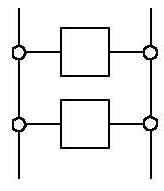 B B
Figure 5
For example, if R1 = 500 and R2 = 250 then the resistance
between points A and B = (500 x 250) / (500 + 250)= (125,000) / (750) = 167
ohms. If R1 = R2 then the new resistance is just R1 / 2. Using these two rules,
resistors can be combined to form new resistance values. Section 1.5 has a
picture that shows what a parallel connection of two resistors looks like on a
breadboard.
4 Finding Voltage and Current
Using Ohm's Law
Now that you are familiar with resistance, we can explore how
resistors are used to control voltage and current in electric circuits. There is
a simple relationship between current, voltage and resistance. This relationship
is called Ohm’s Law.
The formula is the following.
Difference in Voltage = Current * Resistance
or DV = I * R
(in units of measurement, it looks like Volts = Amps * Ohms
)
This is Form 1 of Ohm's Law.
To find current and resistance the following forms can be used.
They are the same as the above formula but in a different form.
Form 2: Current = Difference in Voltage /
Resistance
or I = DV / R
(units are Amps = Volts / Ohms)
Form 3: Resistance = Difference in Voltage /
Current
or R = DV / I
(units are Ohms = Volts / Amps)
These formulas are always used for situations where there are
two points with a resistor between them. DV is the difference in voltage between
the two points and current is what flows between the two points. These simple
relationships allow us to calculate many things. Given any two of the three
values (Current, Resistance, and Difference in Voltage) the third can be found.
The most common calculation is for current. Voltage is easy to measure and the
resistance can be found from the resistor (see color codes). Once these values
are known, current can be calculated using Form 2 of Ohm’s law, I = DV /
R.
For example, consider the problem shown in Figure 6. One side
is at 0 volts (ground) and the other side is at 5 volts (with a multimeter,
black probe on right side, red probe on left side). The squiggly line is the
symbol we use to represent a resistor.

Figure 6
The voltage difference between Point A and Point B is 5 - 0 = 5 volts (DV=5).
Assume the resistor between the two points has a value of 500 ohms (R=500). We
know that current flows from a point of high voltage to a point of low voltage
so we can draw an arrow from the higher voltage to the lower voltage.
Figure 7
Now we can find the current flowing through the resistor by using Form 2 of
Ohm's Law.
I = DV / R
If we put in values for DV and R we get
I = DV / R = 5 / 500
I = 5 / 500 = 0.01 Amps
I = 0.01 Amps = 10 milliAmps
10 milliamps can be abbreviated as 10 mA
This means the current is 10 mA. ( I = 10mA )
Now to check our answer we can use Form 1 and Form 3 of Ohm’s law. We have to
use the value of current in Amps for these formulas. So if we have I = 0.01 Amps
and Resistance = 500 ohms then by using Form 1 of Ohm’s law we can find:
DV = I * R
DV = I * R = 0.01 * 500
DV = 0.01 * 500 = 5 volts
So DV = 5 volts
5 volts is the voltage we started with so the value we found for the current
must be correct. We can also check the answer with Form 3 by using I = 0.01 Amps
and DV = 5 volts.
R = DV / I
R = DV / I = 5 / 0.01
R = 5 / 0.01 = 500 ohms
So R = 500 ohms
Now consider the problem shown in Figure 8. The voltage on one side is 10
volts and the voltage on the other side is 3 volts. Therefore the voltage
difference between the two points is 10 - 3 = 7 volts (DV = 7 V). The resistor
is 400 ohms (R = 400).

Figure 8
Then the current flowing from left to right is
I = DV / R
I = DV / R = 7 / 400
I = 7 / 400 = 0.0175 Amps
I = 0.0175 Amps = 17.5 milliAmps
I = 17.5 milliAmps = 17.5 mA
This means the current flowing from the left to the right is
17.5 mA.
Now suppose we have two points with a voltage difference of 5
volts. Point A is at 5 volts and Point B is at 0 volts (ground). (Notice that
the voltage difference is the important part. If Point A is at 7 volts and Point
B is at 2 volts then the voltage difference is the same, 7 - 2 = 5 volts.) Now
suppose we want a current to flow between Points A and B and we want the current
to be 0.02 Amps ( I = 0.02 Amps = 20 mA). Now we need to find the value of the
resistor so we use Form 3 of Ohm’s Law.
Resistance = Difference in Voltage / Current or R = DV / I
(Ohms = Volts / Amps)
DV / I = 5 / 0.02 = 250 ohms
This means that putting a resistor with a value of 250 ohms
between Points A and B will make a current flow from Point A to Point B and the
current will be 0.02 Amps (20 mA). Now using the values of voltage and
resistance, check the value of the current using Form 2 of Ohm’s law.
0.2 Amps = 5 Volts / 250 Ohms (Amps = Volts /
Ohms)
5 Using a Bread
Board
To build our projects, we will use a breadboard like the one
shown below.
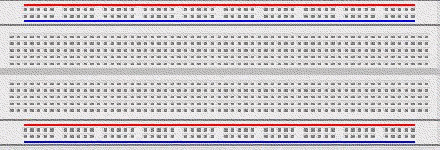
The bread board has many strips of metal (copper usually) which
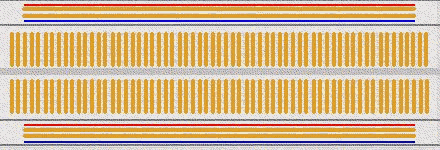
run underneath the board. The metal strips are laid out as shown below.
These strips connect the holes on the top of the board. This
makes it easy to connect components together to build circuits. To use the bread
board, the legs of components are placed in the holes. The holes are made so
that they will hold the component in place. Each hole is connected to one of the
metal strips running underneath the hole.
Each strip forms a node. A node is a point in a circuit where
two components are connected. Connections between different components are
formed by putting their legs in a common node. On the bread board, a node is the
row of holes that are connected by the strip of metal underneath.
The long top and bottom row of holes are usually used for power
supply connections. The row with the blue strip beside it is used for the
negative voltage (usually ground) and the row with the red strip beside it is
used for the positive voltage.
The circuit is built by placing components and connecting them
together with jumper wires. Then when a path is formed from the positive supply
node to the negative supply node through wires and components, we can turn on
the power and current flows through the path and the circuit comes alive.
A series connection of 2 resistors on a breadboard looks like
the picture below on the left and a parallel connection of 2 resistors looks
like the picture below on the right.
 
For chips with many legs (ICs), place them in the middle of the
board (across the middle dividing line) so that half of the legs are on one side
of the middle line and half are on the other side.
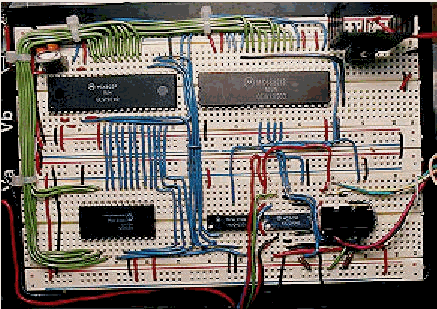
A completed circuit might look like the following. This circuit
uses two small breadboards.
6 Transistors and LEDs
Now we know enough that we can start to build circuits. But
first we will look a little closer at a component that was introduced in Section
1.2.
The LED

An LED is the device shown above. Besides red, they can also be
yellow, green and blue. The letters LED stand for Light Emitting Diode. If you
are unfamiliar with diodes, take a moment to review the components in Basic
Components, Section 1.2. The important thing to remember about diodes (including
LEDs) is that current can only flow in one direction.
To make an LED work, you need a voltage supply and a resistor.
If you try to use an LED without a resistor, you will probably burn out the LED.
The LED has very little resistance so large amounts of current will try to flow
through it unless you limit the current with a resistor. If you try to use an
LED without a power supply, you will be highly disappointed.
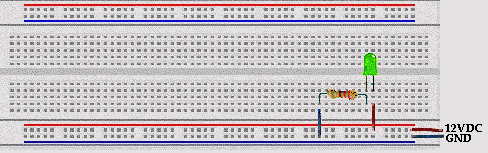
So first of all we will make our LED light up by setting up the
circuit below.

Step 1.) First you have to find the positive leg of the LED.
The easiest way to do this is to look for the leg that is longer.
Step 2.) Once you know which side is positive, put the LED on
your breadboard so the positive leg is in one row and the negative leg is in
another row. (In the picture below the rows are vertical.)
Step 3.) Place one leg of a 2.2k ohm resistor (does not matter
which leg) in the same row as the negative leg of the LED. Then place the other
leg of the resistor in an empty row.
Step 4.) Unplug the power supply adapter from the power supply.
Next, put the ground (black wire) end of the power supply adapter in the
sideways row with the blue stripe beside it. Then put the positive (red wire)
end of the power supply adapter in the sideways row with the red stripe beside
it.
Step 5.) Use a short jumper wire (use red since it will be
connected to the positive voltage) to go from the positive power row (the one
with the red stripe beside it) to the positive leg of the LED (not in the same
hole, but in the same row). Use another short jumper wire (use black) to go from
the ground row to the resistor (the leg that is not connected to the LED). Refer
to the picture below if necessary.
The breadboard should look like the picture shown
below.
Now plug the power supply into the wall and then plug the other
end into the power supply adapter and the LED should light up. Current is
flowing from the positive leg of the LED through the LED to the negative leg.
Try turning the LED around. It should not light up. No current can flow from the
negative leg of the LED to the positive leg.
People often think that the resistor must come first in the
path from positive to negative, to limit the amount of current flowing through
the LED. But, the current is limited by the resistor no matter where the
resistor is. Even when you first turn on the power, the current will be limited
to a certain amount, and can be found using ohm’s law.
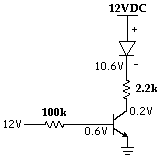
Revisiting Ohm's Law
Ohm's Law can be used with resistors to find the current
flowing through a circuit. The law is I = VD/R (where I = current, VD = voltage
across resistor, and R = resistance). For the circuit above we can only use
Ohm's law for the resistor so we must use the fact that when the LED is on,
there is a 1.4 voltage drop across it. This means that if the positive leg is
connected to 12 volts, the negative leg will be at 10.6 volts. Now we know the
voltage on both sides of the resistor and can use Ohm's law to calculate the
current. The current is (10.6 - 0) / 2200 = 0.0048 Amperes = 4.8 mA
This is the current flowing through the path from 12V to GND.
This means that 4.8 mA is flowing through the LED and the resistor. If we want
to change the current flowing through the LED (changing the brightness) we can
change the resistor. A smaller resistor will let more current flow and a larger
resistor will let less current flow. Be careful when using smaller resistors
because they will get hot.
Next, we want to be able to turn the LED on and off without
changing the circuit. To do this we will learn to use another electronic
component, the transistor.
6.1 The
Transistor
Transistors are basic components in all of today's electronics.
They are just simple switches that we can use to turn things on and off. Even
though they are simple, they are the most important electrical component. For
example, transistors are almost the only components used to build a Pentium
processor. A single Pentium chip has about 3.5 million transistors. The ones in
the Pentium are smaller than the ones we will use but they work the same
way.
Transistors that we will use in projects look like this:

The transistor has three legs, the Collector (C), Base (B), and
Emitter (E). Sometimes they are labeled on the flat side of the transistor.
Transistors always have one round side and one flat side. If the round side is
facing you, the Collector leg is on the left, the Base leg is in the middle, and
the Emitter leg is on the right.
Transistor Symbol
The following symbol is used in circuit drawings (schematics)
to represent a transistor.

Basic Circuit
The Base (B) is the On/Off switch for the transistor. If a
current is flowing to the Base, there will be a path from the Collector (C) to
the Emitter (E) where current can flow (The Switch is On.) If there is no
current flowing to the Base, then no current can flow from the Collector to the
Emitter. (The Switch is Off.)
Below is the basic circuit we will use for all of our
transistors.

To build this circuit we only need to add the transistor and
another resistor to the circuit we built above for the LED. Unplug the power
supply from the power supply adapter before making any changes on the
breadboard. To put the transistor in the breadboard, seperate the legs slightly
and place it on the breadboard so each leg is in a different row. The collector
leg should be in the same row as the leg of the resistor that is connected to
ground (with the black jumper wire). Next move the jumper wire going from ground
to the 2.2k ohm resistor to the Emitter of the transistor.
Next place one leg of the 100k ohm resistor in the row with the
Base of the transistor and the other leg in an empty row and your breadboard
should look like the picture below.

Now put one end of a yellow jumper wire in the positive row
(beside the red line) and the other end in the row with the leg of the 100k ohm
resistor (the end not connected to the Base). Reconnect the power supply and the
transistor will come on and the LED will light up. Now move the one end of the
yellow jumper wire from the positive row to the ground row (beside the blue
line). As soon as you remove the yellow jumper wire from the positive power
supply, there is no current flowing to the base. This makes the transistor turn
off and current can not flow through the LED. As we will see later, there is
very little current flowing through the 100k resistor. This is very important
because it means we can control a large current in one part of the circuit (the
current flowing through the LED) with only a small current from the
input.
Back to Ohm's Law
We want to use Ohm's law to find the current in the path from
the Input to the Base of the transistor and the current flowing through the LED.
To do this we need to use two basic facts about the transistor.
1.) If the transistor is on, then the Base voltage is 0.6
volts higher than the Emitter voltage.
2.) If the transistor is on, the Collector voltage is 0.2
volts higher than the Emitter voltage.
So when the 100k resistor is connected to 12VDC, the circuit will look like
this:
So the current flowing through the 100k resistor is (12 - 0.6)
/ 100000 = 0.000114 A = 0.114 mA.
The current flowing through the 2.2k ohm resistor is (10.6 -
0.2) / 2200 = 0.0047 A = 4.7 mA.
If we want more current flowing through the LED, we can use a
smaller resistor (instead of 2200) and we will get more current through the LED
without changing the amount of current that comes from the Input line. This
means we can control things that use a lot of power (like electric motors) with
cheap, low power circuits. Soon you will learn how to use a microcontroller (a
simple computer). Even though the microcontroller can not supply enough current
to turn lights and motors on and off, the microcontroller can turn transistors
on and off and the transistors can control lots of current for lights and
motors.
For Ohm’s law, also remember that when the transistor is off,
no current flows through the transistor.
6.2 Introduction to
Digital Devices - The Inverter
In digital devices there are only two values, usually referred
to as 0 and 1. 1 means there is a voltage (usually 5 volts) and 0 means the
voltage is 0 volts.
An inverter (also called a NOT gate) is a basic digital device
found in all modern electronics. So for an inverter, as the name suggests, it's
output is the opposite of the input (Output is NOT the Input). If the input is 0
then the output is 1 and if the input is 1 then the output is 0. We can
summarize the operation of this device in a table.
To help us practice with transistors we will build an inverter.
Actually we have already built an inverter. The transistor circuit we just built
is an inverter circuit. To help see the inverter working, we will build a
circuit with two inverters. The circuit we will use is shown below.
First Inverter (already
built)
Second Inverter

To build the circuit, use the transistor circuit we just built
as the first inverter. The first inverter input is the end of the 100k ohm
resistor connected to the yellow jumper wire. Build another circuit identical to
the first (the basic transistor circuit from Section 1.6.1) except leave out the
yellow jumper wire connected to the 100k ohm resistor (the inverter input). This
circuit is the second inverter.
Connect the output of the first inverter to the input of the
second inverter by putting one end of a jumper wire in the same row of holes as
the 2.2k ohm resistor and the Collector of the transistor (the output of the
first inverter) and putting the other end in the same row of holes as the leg of
the 100k ohm resistor of the second inverter (the input to the second
inverter).
Here is how to check if you built it correctly. Connect the
first inverter input (the yellow jumper wire) to 12V (the positive row). The LED
in the first inverter should come on and the LED in the second inverter should
stay off. Then connect the first inverter input to 0V (the ground row). (You are
turning off the switch of the first inverter.) The first LED should go off and
the second LED should come on. If this does not happen, check to make sure no
metal parts are touching. Check to make sure all the parts are connected
correctly.
The input can either be connected to 12V or 0V. When the
Inverter Input is 12V, the transistor in the first inverter will turn on and the
LED will come on and the Inverter Output voltage will be 0.2V. The first
Inverter Output is connected to the input of the second inverter. The 0.2V at
the input of the second inverter is small enough that the second transistor is
turned off. The circuit voltages are shown in the diagram below.
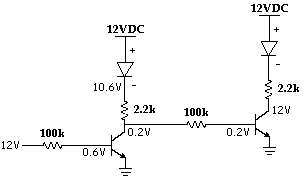
When the Inverter Input is connected to 0V, the transistor in
the first inverter is turned off and the LED will get very dim. There is a small
amount of current still flowing through the LED to the second inverter. The
voltage at the first Inverter Output will go up, forcing the second inverter
transistor to come on. When the second inverter transistor comes on, the second
inverter LED will come on. To find the voltage at the output of the first
inverter (10.4V), use Ohm's law. There is no current flowing through the
transistor in the first inverter so the path of the current is through the first
LED, through the 2.2k resistor, through the 100k resistor, through the second
transistor to ground. The voltage at the negative side of the first LED is fixed
at 10.6V by the LED. The voltage at the second transistor base is fixed at 0.6V
by the transistor. Then given those two voltages, you should be able to find the
voltage at the point in the middle (10.4V) using Ohm’s law. (Hint: First find
the current and then work through Form 1 of ohm’s law to find the voltage at the
point between the 2.2k resistor and the 100k resistor.)

Switch the input back and forth from 0V to 12V and you can see
that when the first stage is on, the second stage is off. This demonstrates the
inverting action of the Inverter.
7 Oscillators, Pulse
Generators, Clocks... Capacitors and the 555 Timer IC
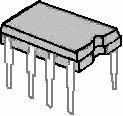
Introduction
As electronic designs get bigger, it becomes difficult to build
the complete circuit. So we will use prebuilt circuits that come in packages
like the one shown above. This prebuilt circuit is called an IC. IC stands for
Integrated Circuit. An IC has many transistors inside it that are connected
together to form a circuit. Metal pins are connected to the circuit and the
circuit is stuck into a piece of plastic or ceramic so that the metal pins are
sticking out of the side. These pins allow you to connect other devices to the
circuit inside. We can buy simple ICs that have several inverter circuits like
the one we built in the LED and Transistor section or we can buy complex ICs
like a Pentium Processor.
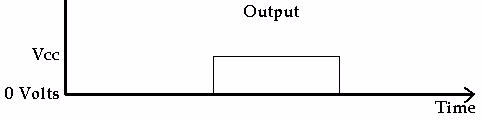
The Pulse - More than just an on/off switch
So far the circuits we have built have been stable, meaning
that the output voltage stays the same. If you change the input voltage, the
output voltage changes and once it changes it will stay at the same voltage
level. The 555 integrated circuit (IC) is designed so that when the input
changes, the output goes from 0 volts to Vcc (where Vcc is the voltage of the
power supply). Then the output stays at Vcc for a certain length of time and
then it goes back to 0 volts. This is a pulse. A graph of the output voltage is
shown below.
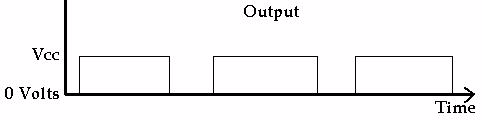
The Oscillator (A Clock) - More than just a Pulse
The pulse is nice but it only happens one time. If you want
something that does something interesting forever rather than just once, you
need an oscillator. An oscillator puts out an endless series of pulses. The
output constantly goes from 0 volts to Vcc and back to 0 volts again. Almost all
digital circuits have some type of oscillator. This stream of output pulses is
often called a clock. You can count the number of pulses to tell how much time
has gone by. We will see how the 555 timer can be used to generate this clock. A
graph of a clock signal is shown below.
7.1 The Capacitor
If you already understand capacitors you can skip this
part.
 
The picture above on the left shows two typical capacitors.
Capacitors usually have two legs. One leg is the positive leg and the other is
the negative leg. The positive leg is the one that is longer. The picture on the
right is the symbol used for capacitors in circuit drawings (schematics). When
you put one in a circuit, you must make sure the positive leg and the negative
leg go in the right place. Capacitors do not always have a positive leg and a
negative leg. The smallest capacitors in this kit do not. It does not matter
which way you put them in a circuit.
A capacitor is similar to a rechargable battery in the way it
works. The difference is that a capacitor can only hold a small fraction of the
energy that a battery can. (Except for really big capacitors like the ones found
in old TVs. These can hold a lot of charge. Even if a TV has been disconnected
from the wall for a long time, these capacitors can still make lots of sparks
and hurt people.) As with a rechargable battery, it takes a while for the
capacitor to charge. So if we have a 12 volt supply and start charging the
capacitor, it will start with 0 volts and go from 0 volts to 12 volts. Below is
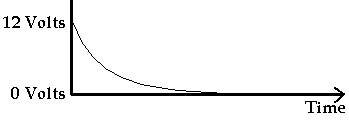
a graph of the voltage in the capacitor while it is charging.

The same idea is true when the capacitor is discharging. If the
capacitor has been charged to 12 volts and then we connect both legs to ground,
the capacitor will start discharging but it will take some time for the voltage
to go to 0 volts. Below is a graph of what the voltage is in the capacitor while
it is discharging.
We can control the speed of the capacitor's charging and
discharging using resistors.
Capacitors are given values based on how much electricity they
can store. Larger capacitors can store more energy and take more time to charge
and discharge. The values are given in Farads but a Farad is a really large unit
of measure for common capacitors. In this kit we have 2 33pf capacitors, 2 10uf
capacitors and 2 220uF capacitors. Pf means picofarad and uf means microfarad. A
picofarad is 0.000000000001 Farads. So the 33pf capacitor has a value of 33
picofarads or 0.000000000033 Farads. A microfarad is 0.000001 Farads. So the
10uf capacitor is 0.00001 Farads and the 220uF capacitor is 0.000220 Farads. If
you do any calculations using the value of the capacitor you have to use the
Farad value rather than the picofarad or microfarad value.
Capacitors are also rated by the maximum voltage they can take.
This value is always written on the larger can shaped capacitors. For example,
the 220uF capacitors in this kit have a maximum voltage rating of 25 volts. If
you apply more than 25 volts to them they will die. We don’t have to worry about
that with this kit because our power supply can only put out 12 volts.
7.2 The 555 Timer
Creating a Pulse
The 555 is made out of simple transistors that are about the
same as on / off switches. They do not have any sense of time. When you apply a
voltage they turn on and when you take away the voltage they turn off. So by
itself, the 555 can not create a pulse. The way the pulse is created is by using
some components in a circuit attached to the 555 (see the circuit below). This
circuit is made of a capacitor and a resistor. We can flip a switch and start
charging the capacitor. The resistor is used to control how fast the capacitor
charges. The bigger the resistance, the longer it takes to charge the capacitor.
The voltage in the capacitor can then be used as an input to another switch.
Since the voltage starts at 0, nothing happens to the second switch. But
eventually the capacitor will charge up to some point where the second switch
comes on.
The way the 555 timer works is that when you flip the first
switch, the Output pin goes to Vcc (the positive power supply voltage)
and starts charging the capacitor. When the capacitor voltage gets to 2/3 Vcc
(that is Vcc * 2/3) the second switch turns on which makes the output go to 0
volts.
The pinout for the 555 timer is shown below

Deep Details
Pin 2 (Trigger) is the 'on' switch for the pulse. The line over
the word Trigger tells us that the voltage levels are the opposite of what you
would normally expect. To turn the switch on you apply 0 volts to pin 2. The
technical term for this opposite behavior is 'Active Low'. It is common to see
this 'Active Low' behavior for IC inputs because of the inverting nature of
transistor circuits like we saw in the LED and Transistor Tutorial.
Pin 6 is the off switch for the pulse. We connect the positive
side of the capacitor to this pin and the negative side of the capacitor to
ground. When Pin 2 (Trigger) is at Vcc, the 555 holds Pin 7 at 0 volts (Note the
inverted voltage). When Pin 2 goes to 0 volts, the 555 stops holding Pin 7 at 0
volts. Then the capacitor starts charging. The capacitor is charged through a
resistor connected to Vcc. The current starts flowing into the capacitor, and
the voltage in the capacitor starts to increase.
Pin 3 is the output (where the actual pulse comes out). The
voltage on this pin starts at 0 volts. When 0 volts is applied to the trigger
(Pin 2), the 555 puts out Vcc on Pin 3 and holds it at Vcc until Pin 6 reaches
2/3 of Vcc (that is Vcc * 2/3). Then the 555 pulls the voltage at Pin 3 to
ground and you have created a pulse. (Again notice the inverting action.) The
voltage on Pin 7 is also pulled to ground, connecting the capacitor to ground
and discharging it.
Seeing the pulse
To see the pulse we will use an LED connected to the 555
output, Pin 3. When the output is 0 volts the LED will be off. When the output
is Vcc the LED will be on.
Building the Circuit
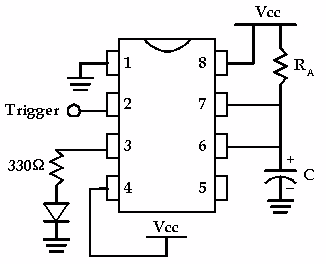
Place the 555 across the middle line of the breadboard so that
4 pins are on one side and 4 pins are on the other side. (You may need to bend
the pins in a little so they will go in the holes.) Leave the power disconnected
until you finish building the circuit. The diagram above shows how the pins on
the 555 are numbered. You can find pin 1 by looking for the half circle in the
end of the chip. Sometimes instead of a half circle, there will be a dot or
shallow hole by pin 1.
Before you start building the circuit, use jumper wires to
connect the red and blue power rows to the red and blue power rows on the other
side of the board. Then you will be able to easily reach Vcc and Ground lines
from both sides of the board. (If the wires are too short, use two wires joined
together in a row of holes for the positive power (Vcc) and two wires joined
together in a different row of holes for the ground.)
Connect Pin 1 to ground.
Connect Pin 8 to Vcc.
Connect Pin 4 to Vcc.
Connect the positive leg of the LED to a 330 ohm resistor and
connect the negative end of the LED to ground. Connect the other leg of the 330
ohm resistor to the output, Pin 3.
Connect Pin 7 to Vcc with a 10k resistor (RA =
10K).
Connect Pin 7 to Pin 6 with a jumper wire.
Connect Pin 6 to the positive leg of the 220uF Capacitor (C =
220uF). (You will need to bend the positive (long leg) up and out some so that
the negative leg can go in the breadboard.
Connect the negative leg of the capacitor to ground.
Connect a wire to Pin 2 to use as the trigger. Start with Pin 2
connected to Vcc.
Now connect the power. The LED will come on and stay on for
about 2 seconds. Remove the wire connected to Pin 2 from Vcc. You should be able
to trigger the 555 again by touching the wire connected to pin 2 with your
finger or by connecting it to ground and removing it. (It should be about a 2
second pulse.)
Making it Oscillate
Next we will make the LED flash continually without having to
trigger it. We will hook up the 555 so that it triggers itself. The way this
works is that we add in a resistor between the capacitor and the discharge pin,
Pin 7. Now, the capacitor will charge up (through RA and
RB) and when it reaches 2/3 Vcc, Pin 3 and Pin 7 will go to ground.
But the capacitor can not discharge immediately because of RB. It
takes some time for the charge to drain through RB. The more
resistance RB has, the longer it takes to discharge. The time it
takes to discharge the capacitor will be the time the LED is off.
To trigger the 555 again, we connect Pin 6 to the trigger (Pin
2). As the capacitor is discharging, the voltage in the capacitor gets lower and
lower. When it gets down to 1/3 Vcc this triggers Pin 2 causing Pin 3 to go to
Vcc and the LED to come on. The 555 disconnects Pin 7 from ground, and the
capacitor starts to charge up again through RA and
RB.
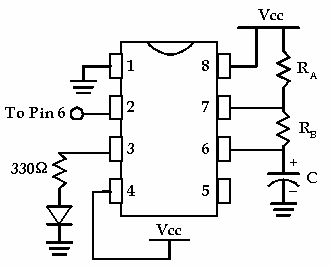
To build this circuit from the previous circuit, do the
following.
Disconnect the power.
Take out the jumper wire between Pin 6 and Pin 7 and replace it
with a 2.2k resistor (RB = 2.2K).
Use the jumper wire at pin 2 to connect Pin 2 to Pin 6.
Now reconnect the power and the LED should flash forever (as
long as you pay your electricity bill).
Experiment with different resistor values of RA and
RB to see how it changes the length of time that the LED flashes.
(You are changing the amount of time that it takes for the Capacitor to charge
and discharge.)
Formulas
These are the formulas we use for the 555 to control the length
of the pulses.
t1 = charge time (how long the LED is on) = 0.693 *
(RA + RB) * C
t2 = discharge time (how long the LED is off) = 0.693 *
RB * C
T = period = t1 + t2 = 0.693 * (RA +
2*RB) * C
Frequency = 1 / T = 1.44 / ((RA + 2 * RB)
* C)
t1 and t2 are the time in seconds. C is the capacitor value in
Farads. 220uF = 0.000220 F. So for our circuit we have:
t1 = 0.693 * (10000 + 2200) * 0.000220 = 1.86 seconds
t2 = 0.693 * 2200 * 0.000220 = 0.335 seconds
T = 1.86 + 0.335 = 2.195 seconds
Frequency = 0.456 (cycles per second)
|