Table construction |
|
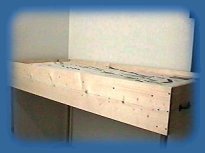
I started with a 36" hollow core door. I then added the 1"x12" pine for the fascia to the
sides. The side boards were screwed into the directly into the door, leaving 2" above the door
to protect the foam.
|
|

|
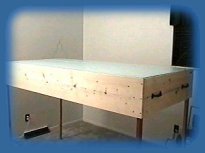
Here you can see the handles on the ends. Hopefully this will make moving the layout in the
future easier. Actually they help alot. We built the table top in the garage and then brought
into the house and upstairs to where it is now. At least we know that it can fit through a door
when needed.
|
|
Here is a good shot of the full-size track plan that I will be using. I printed it off using
the track planning software I use. It is actually 40 pieces of 8 1/2" x 11" taped together.
Adrienne and I had a fun evening do that.
|

|

|
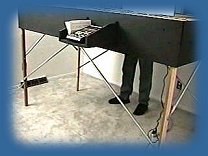
Here is a view of the underside. The legs are 2"x2"'s that are 48" long. This puts the tabletop
at about 53" or about arm level. I may end up shortening the legs a few inches so that I won't
knock things over when I am working on it. But right now I like it at that height. It doesn't
seem as toylike when you can see the trains coming head on, as opposed to look down on them.
The legs are removable, so I can bring it home someday, but they are tight. I am hoping to work
that out soon.
|

|
|
These are a couple of shots after we finally got the 2" foamboard in. The foam board come in 2'
x 8' lengths so we had to glue them together and the cut to length and width. This stuff can
get really messy and tends to stick to clothing because of the static cling. Fortunately we
were able to get most of it cleaned up or of the garage and didn't make to much of a mess in
the house.
|

|
I finally got around to painting the table. I decided on a flat black latex indoor paint because
it was easy to get and cheap. It helps to keep the focus on the layout and keeps the eye from wandering.
It also makes the layout look a lot neater and more presentable. In the future I will add a black
skirt that goes all the way around the bottom of the layout so I can store things underneath and not
have it look a mess.
|
|

|
I added some cross-bracing to help stabilize the table. I used 1/2" electrical conduit cut to length.
The ends of the conduit were pounded flat with a hammer and then drilled to allow me to bolt them in
place with bolts and wingnuts. They are all labeled, allowing me to take the layout apart, transport it,
and put it back together with little problem (theoretically). The extra stabilization keeps
the layout from shaking and tipping cars over.
|

