|


Gerda's original Dutch tutorial can be
viewed
here
A Christmas
Wish Book
This tutorial was written for PSP 9 but can
also be done in PSP X.
MATERIALS NEEDED:
FILTERS
DC Special
Supplies include:
A Brush,
Tube
Texture - pattern
and a few other tidbits.
Download here
NOTE: Right - click on the zip
file.
Choose the 'Extract to here' - option in
the drop-down menu
to open the file.
DO NOT click directly with the left mouse button
on
the downloaded zip file. Lycos will only show
an empty folder if you do that. :))
Step 1
J ust a quick note:
This is a basic tutorial for a wish book.
You can use any shapes you like.
You can see another example
here.
You can also download some more shapes here.
Open a new transparent canvas, size
700x550 px.
Fill with white.
Effects --> Filter -- DC
Special --> Book
0/70
Effects--> Texture
Effects --> Texture:

Add a new layer
Activate the Selection Tool --> Rectangle.
Draw a selection around the edges of the book.
Fill this with green: #004000.
Adjust --> Add / Remove Noise --> Add Noise:
Gaussian / 20 / Monochrome checked.
Adjust --> Sharpness --> Sharpen More
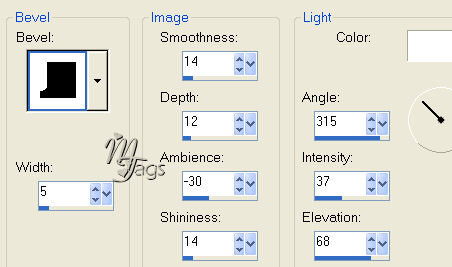
Effects --> 3D Effects --> Inner Bevel:

Deselect.
Merge layers.
Step 2
Foreground
color on green.
Add a new layer.
Activate the Brush tool and find the 'gerdaringband'
Set the size on 90 and apply:

With the foreground color still on green,
background on white, change the foreground to gradient:
Style - Linear
Angle - 65
Repeats - 1
Invert - unchecked
Selections --> Select All.
Selections --> Float
Selections --> Defloat.
Fill the ringband with the gradient.
Apply an Inner Bevel:
Deselect.
Duplicate this layer.
To position the ringsbands evenly, do the following:
Make sure the duplicated layer is active.
Press the Shift key down and press a few time on the
down arrow on your keyboard.
Hopefully it will work for you :)
Activate your Mover Tool and click
a few times on your canvas ( on the duplicated layer)
This way you will get evenly-spaced ringbands on the canvas.
Don't worry about the uneven spaces at the top and bottom.
We can fix that later.
Duplicate this layer again and repeat the Shift + Down Arrow action until
you have enough.
Lock the bottom layer.
Activate one of the others and merge layers visible.
Now shift the ringband so that it is evenly spaced on the image.
Unlock the bottom layer.
Merge layers.
Step 3
The fun starts here! :))
We are going to add all the pictures now.
You can use your own pics as well of course.
I have included a few Santa Clauses for you if you want
to use them.
It is all included in the zip file.
The foreground should be on green,
background on white.
Activate your Preset Shapes Tool: Ellipse / line width - 5 /
Vector and Anti-Alias cheched / Retain Style - unchecked.
Draw a circle in the top corner ( if you want to use
more than one picture)
Convert the Vector layer to Raster layer in the Layers palette.
Duplicate the circle layer as many times as you would want for pictures.
Position them where you like it.

Activate the top circle's layer in the Layers palette.
Use your Magic Wand and click in the inner white part of the circle.
Selectons --> Modify --> Expand by 1 pixel.
Edit --> Copy your image
Edit --> Paste as a new layer onto the canvas and
drag onto the
selection.
If you want to use bigger pictures, make sure to resize them first with
the 'Bicubic' - option chosen.

Selections--> Invert.
Press delete.
Deselect.
Activate the next circle layer in the Layers palette and repeat
this actions.
Remember to expand the inner white selection of the circle with 1 pixel,
otherwise you will have a small white edge around the pictures!! :))
Merge layers.
Step 4
Fun on the left page! :))
Foreground color on green,
background on white.
Activate the Preset Shapes Tool - Ellipse / line width - 3 /
Vector and anti-alias - checked / Retain Style - unchecked!
Draw a horizontal ellipse at the top.
Add a new layer.
Activate the Pen tool: width 2
Draw a line. Don't go over the ring band!
Convert the Vector layer to Raster layer in the Layers palette.
Duplicate this layer and
repeat the Shift + Down Arrow move in step 2.
Duplicate this layer and repeat this step until
you have enough lines in the available space.
This is more or less what you should have now:))

Merge layers.
Step 5
Lock the foreground color.
Background on white.
Draw a small circle on the the book's green cover
as seen below:

Effects --> Texture Effects --> Textures - Hatch medium
Apply with the same settings a before.
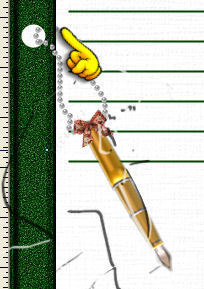
Open the 'penCBgerda'- psp image.
Copy and paste onto the canvas.
Erase a little part of the chain with the Eraser tool on 1.
Merge all layers.
Add a 2 pixel green border.
Step 6
Add some more elements to your book.
Go into the attic and find all the forgotten images :))
A few fun elements have been added to the zip for you.
The 'Miss Stanfort'and 'Chasecallas
SH'- fonts were used in the
example tag.
Add a nice Christmas wish on a new layer if you like
so that you can move it around.
Whatever you do, enjoy every minute of it !! :))
You're finished.

This
tutoral can be used freely, but please don't copy.
You may use a text-link to it.
Back to Index
©Design by Gerda
Visit Gerda's Dutch
website here

Translated
5th December 2006

This website was created in March 2005 and is owned
by
©Magstags
Home |
Filter Links |
Email |Terms
Of Use
|