|
Yvonne's Christmas

Gerda's original Dutch
tutorial can be viewed
here
This tutorial was written for Psp 9
but can also be done in
Psp X
A good knowledge of PSP is required.
MATERIALS NEEDED:
FILTERS:
Filters Unlimited
Supplies:
Misted tube from Gini
a gold pattern
2 fonts
the rest provided by
Gerda.
Download here
NOTE:
Right
-
click on the zip
file.
Choose the 'Extract to here' - option
in
the drop-down menu
to open the file.
DO NOT click directly with the left mouse button
on
the downloaded zip file.
Lycos will only show
an empty folder if you do that. :))
Step 1
Open the 'magic of christmas-Misted by gini'
- tube.
Copy and paste as a new image.
Close the original.
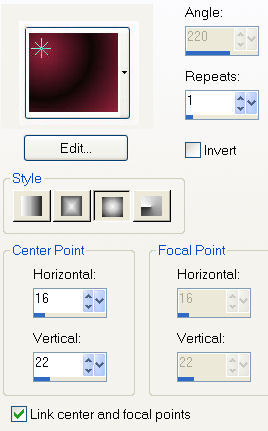
Change the foreground color to
#99223d,
background to #0f0705.
Change the foreground to gradient, with
these settings below:
Add a new layer.
Layers --> Arrange -->
Move Down.
Fill the new layer with the gradient.
Merge the layers.
Step 2
Add a new layer and
fill with the gold pattern.
Selections--> Modify --> Contract by 2.
Fill with the gradient.
Selections --> Modify
--> Contract by 3.
Fill with gold.
Selections --> modify --> Contract by 2.
Press delete key.
Deselect.
Merge layers.
Edit --> Copy.
Step 3
Open a new transparent canvas, size 650 x
550px.
Fill with the gradient.
Add a new layer.
Activate the Selection Tool.
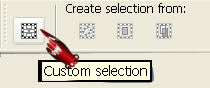
Click on the 'Custom
Selection'option in the Selection toolbar.
Fill in the following
values in the pop-up window:
Left 203/ Top 49 / Right 584 / Bottom 499.
Go to Image -->
Edit --> Paste Into Selection
Deselect.
Duplicate this layer.
Image --> Rotate --> free Rotate --> 15% to
the left.
'All Layers' should should be UNCHECKED! :)
Layers -> Arrange --> Move Down.
Step 4
Activate the second layer from the bottom in
the Layers palette.
Open a new transparent
canvas, size 500 x 500 pixels.
Fill with the gradient.
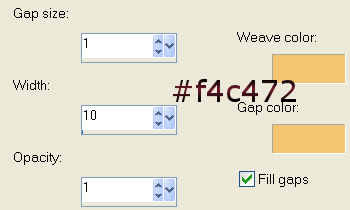
Effects--> Texture Effects --> Weave.
Apply with these
settings:
Color is #f4c472.
Effects--> Filter Effects -->
Filters Unlimited -->
Edges Square --> square edge 04
Copy the image and paste as a new layer
unto the other canvas.
Minimize the 'square
edge 04' - canvas since we
will use it again later
one.
Shift this layer a bit so that it shows
below your image.
The sideborders should
be the same distance from the canvas edge.

Lock the bottom layer
in the Layers palette.
Activate one of the
others and merge them visible.
Step 4
Unlock the bottom layer and activate it.
Add a new raster layer.
Set the foreground
color to gold pattern.
Activate the Selection
Tool again and choose the
Custom Selection again.
Fill in these values:
Left 20/ Top 67/ Right 227/ Bottom 475
Fill with the gold pattern.
Selections --> Modify
--> Contract by 2.
Fill with the gradient.
( The gradient should
be on the same settings as in step 1.)
Selections--> Modify --> Contract by 3.
Fill with the gradient again.
Effects --> Texture
Effects --> Blinds.
Apply with these settings below:
2/70 color black - all options checked.
Deselect.
Step 5
Lock the bottom layer.
Merge all other layers
visible.
Apply a drop shadow:
2/2/50/5 color - black.
Repeat the drop shadow:
-2/-2/50/5.
Click on the bottom layer in the Layers
palette to activate it.
Go back to the weave
image that you have made.
Copy and paste as a new layer onto the
canvas.
Image --> Resize --> 90%
'Resize All Layers' UNCHECKED !! :-))
Drag it below the Blinds layer as seen
below.

Apply a drop shadow:
2/2/50/5 color - black.
Repeat with -2/-2/50/5.
Merge the layers.
Step 6
Open the ' Se42gerda'tube.
Copy and Paste it onto the canvas as a new
layer.
Drag the bow to the corner.
Open the 'Se41gerda'
tube.
Position it in the middle of the bow.
Duplicate this layer.
Drag it to the other corner and resize 85%.
Merge the layers.
Open the 'SE40gerda'- tube.
Copy and paste and drag into position
as seen in the tag
example above.
Apply a drop shadow: 0/3/50/5 color -
black.
Repeat with 0/-3/50/5.
Copy the 'SE43gerda'-
tube.
Paste as a new layer onto the canvas.
Shift it to the right.
Merge the layers.
Step 7
Add a 2 pixel border and fill with gold.
Set the background color on gold.
New layer.
Add your name.
Rotate it 90% to the
right.
The 'Lanie Days' font
has been used in
Gerda's tag example.
Add a new layer.
Use the 'Riesling'font,
size 36
to write "Merry
Christmas''
Apply a drop shadow: 0/1/50/0 color - black.
Merge the layers.
You're finished !! :-))
Back to Index

©Design by Gerda

Visit Gerda's Dutch
website here

Translated 16th December 2006

This website was created in March 2005 and is owned
by ©Magstags
Home |
Filter Links |
Email |Terms
Of Use
|