|
*~* New
Years *~*
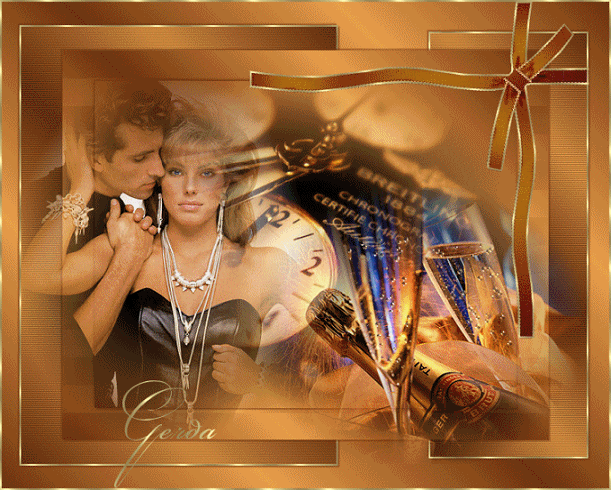
Gerda's original Dutch
tutorial can be viewed
here.
Image
size 203kb
This tutorial was written
for in PSP 9
but can also be made in
PSP X
A good knowledge of PSP is
required.
Filters Needed:
DSB Flux and
Ulead Particle
Supplies:
Tubes, made by, Jolande,
Innie, Susan,
Joluvsdogs (scraptube)
Download here
NOTE: Right - click on
the zip file.
Choose the 'Extract to
here' - option in
the drop-down menu
to open the file.
DO NOT click directly with
the left mouse button on
the downloaded zip file.
Lycos will only show
an empty folder if you do
that. :))
Step 1
Open the ' Jolanda time23'
and remove the watermark.
Change the foreground
color to #6e320e,
background to #eaa14a.
Gradient:
Style - Linear
Angle - 45
Repeats - 3
Invert - unchecked.
Add a new layer and fill
with the gradient.
Layers --> Arrange -->
Merge Down.
Merge layers VISIBLE.
Step 2
Image --> Canvas Size:
Drop shadow: 2/2/50/2
color #6e320e
Repeat with -2/-2/50/2
color #6e320e
Add a new layer.
Layers --> Arrange -->
Move Down>
Fill with the gradient.
Fillter DSB flux -->
lineair transmission
15/3/50 horizontal
Effects --> Edge Effects
--> Enhance.
Resize - 80% ('Resize all
layers' - UNCHECKED !!! )
Drop shadow: 2/2/50/2
color #6e320e
Repeat with -2/-2/50/2
color #6e320e
Step 3
Add a new layer.
Layers --> Arrange -->
Move Down>
Fill with the gradient.
It should be the bottom
layer now.
Activate this layer.
Add a new layer and change
the foreground to the gold
pattern.
Selections Tool -
Rectangle --> Custom
Selection:
Left 22 / Top 29 / Right
415 / Bottom 572
Fill the selection with
gold.
Selections --> Modify by
2.
Fill with the gradient.
Blur --> Gaussian Blur -
10.
Effects --> Texture
Effects --> Blinds: 2/24
everything checked, color
black,
Deselect.
Drop shadow: 2/2/50/2
color #6e320e
Repeat with -2/-2/50/2
color #6e320e
Step 4
Open the 'Susan T 2005'-
tube.
Paste as new layer onto
the canvas.
Move it to the left near
the gold edge as seen in
the example tag.
Open the 'oud en nieuw 10
psp image' of Innie.
Copy and paste as a new
layer.
Move it to the bottom
right.
Merge layers.
Open the ' joluvesdogs'-
scrap tube.
Copy and paste as a new
layer.
Image --> Mirror
Position it on the right
corner.
The edge of the bow should
fit against the gold edge.
It will be moved slightly
later :)
Foreground on gold pattern
Selections --> Selection
Float
Convert the selection to a
layer in the Layers
palette.
Fill with gold.
Selections --> Modify -->
Contract by 2.
Press delete.
Deselect.
Lock the bottom layer.
Merge the other layers
visible.
Unlock the bottom layer.
Move the bow onto the gold
edge.

Add your name in gold:
font Bickhamscript
Add a 2 pixel gold border.
Step 5 - THE
ANIMATION
Open AS and minimize.
Back to PSP: Activate the
Selection Tool - Point To
Point, feather 0.
Select the glasses , see
screenshot below,
make sure to stay inside
the glass,
otherwise the bubbles will
bubble
outside the glass as well
:-))))

Filter Ulead Particle:
Choose the Bubble effects
with these settings:
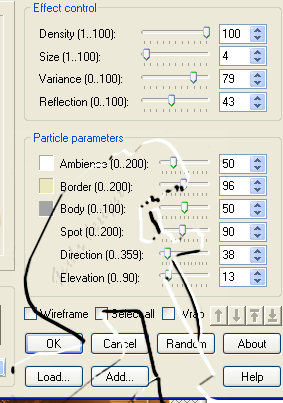
Repeat the bubbles and
choose 'Random'.
We want lots of bubbles,
right? :-))
Deselect.
Copy in PSP and paste "As
New Animation" in AS.
Undo the bubble effect in
PSP.
( 3x on the undo icon in
the top toolbar)
Repeat the same effect and
click ONLY on Random !!!
Deselect.
Copy in PSP and paste
"behind Current Frame" in
AS.
Undo the bubble effect
again in PSP ( undo icon
3x)
Repeat the filter effects
again with "Random"
clicked.
And paste into AS again
'Behind Current Frame'.
You must have three frame
now in AS.
In AS: go to Edit -->
Frame Properties - 10.
You're finished !!!! :-)))
The final size of the
image will be
270 kb.
This tutoral can be
used freely, but please
don't copy.
You may use a text-link to
it.
©DesignsbyGerda
Back to Index

The graphic
design of this page is
copyrighted to
©Magstags - All Rights
Reserved.
Home |
Filter Links |
Email |Terms
Of Use |