A page from:

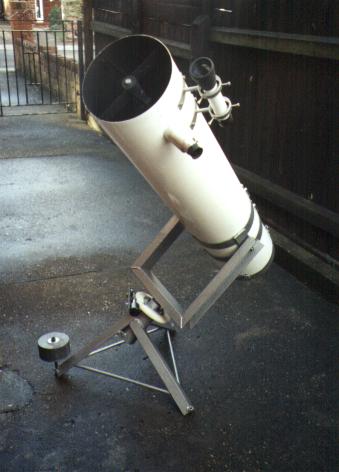 This is our 8.75" Newtonian telescope. We put it together in around 30 hours from bits of scrap metal and some simple fabricated parts, which we had made. Excluding the mirrors and eye pieces, the total cost was less than Ł15.00 ($20-$25).
The finder scope was also home made from half a pair of cheap binoculars.
I'll describe how to make everthing later but first thing's first, what can you see with a telescope like this ?
Well, that depends on where you intend using it. If you're in the middle of a city, you will be limited to the moon, Venus, Jupiter, Mars and Saturn. If you can easily get to, or live in more remote, darker sites, then the viewing choice is far greater.
This is an introduction into any astronomer's most prolific problem, light polution.
Light polution reduces visibility, to an extent, far greater than I ever imagined. City lighting throws up a haze which makes deeper space objects simply disappear, so even the brighter nebulae, galaxies and star clusters are just not visible. Even a bright moon can cause problems if fainter objects are your quarry. Having said this, it's surprising how little distance you need to travel, away from a source of light polution, before much more objects come into view.
Given favourable conditions, you should be able to glimpse all of our own planets along with many of their moons, plus lots of deep space objects, and while the images won't be up to Hubble's standards, you'll be no less excited to see them than the engineers operating the H.S.T.
The way to go on this, is deffinately, to buy a pair of good quality binoculars, say 10 X 50 size or 8 X 40. Don't worry, I'm not going to tell you to cut 'em in half and make a finder scope out of them, thy're to get started in astronomy to see if it suits you. If it doesn't, well everone should own a decent pair of bino's anyway. If it does suit, then they'll come in very handy all the same.
By the way, 10 X 50 refers to the magnifying power and the objective lens diameter. "10" means the object, being viewed, will appear 10 times closer than if viewed with the un-aided eye and "50" means the big lenses at the front are 50mm dia. 10 X 50 and 8 X 40 are ideal magnification to objective lense ratios and this is very important in astronomy so don't be tempted by some 50 X mag bino's with only 25mm objectives. They're not as good. The excellent light gathering abilities of large lenses are far more important than magnification.
On your way home from the binocular shop, call in at a book shop and buy a learner type book on star gazing, something with a few star charts in, or even a magazine like 'Astronomy Now' which has an up to date, simple chart included every month.
Now you're all set. It'll probably be cloudy for the following six weeks now but be patient, your chance will come. Your eyes will usually require about 30 minutes to fully adjust to the darkness, after which time you will be able to see more and more. When you look through your new bino's, you'll be amazed at how much they reveal.
For a nice easy taster, see if you can see the rings of Saturn or count the four larger moons of Jupiter. The Orion Nebulae is also easily spotted as are the Pliedes. They're in your book.
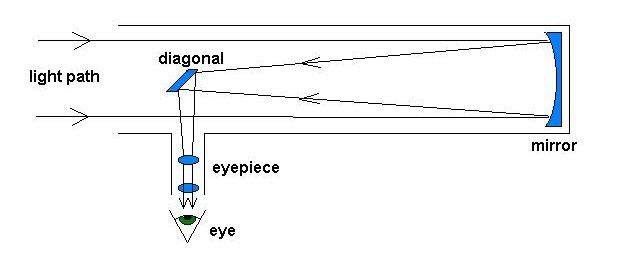
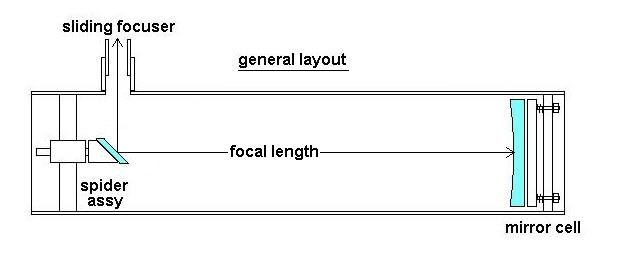
Simple telescopes all gather light, direct it to a focal point where an eyepiece magnifies the produced image to a desired level. The eyepieces are interchangeable to give different magnifications. These diagrams don't illustrate the fact that astronomical telescopes invert the image which makes them of limited use as terestrial scopes.

Quality. Money. These two words mean the same thing in astronomy. When selecting eyepieces and Barlows, go for quality. Super Plossls by Celestron and Meade are our favourite eyepieces. They are a good choice for quality and value. A 10mm eyepiece, of this type, retails at around Ł50-Ł60. Mega quality will cost 3 times that and I'm told the difference is significant.
The formula we used was:

Once we know the tube diameter, the mirror cell can be made. The best material for this is 18mm thick M.D.F.
Plywood could be used but can cause neatness problems. MDF is smooth, stiff and doesn't splinter when cut.

The mount is drilled 5mm as shown and the base 7mm. 6mm roofing bolts are screwed into the mount, stiff springs positioned and either nuts or wing nuts provide adjustment for the mirror. The mirror is held on with 3 large blobs of silicon sealant and the whole assembly fixed to the tube with 3 wood screws.
 Next, the spider assembily. This consists of two 16g steel strips bent as shown in the diagram on the left. Make them around 40mm wide for a 100mm dia. mirror scope and upto 50mm wide for a 200mm scope.
Dimension "X" needs to be the same as the ID of your tube.
The centre body was turned from 40mm dia. round nylon stock. Its finished diameter is 10mm less than the minor dia. of your diagonal mirror and a 10mm hole is bored through the center. The body is grooved longitudinally at the leg fix points to aid location of the legs and 2 counter sunk screws hold it all together.
Note: The screws should not protrude into the central 10mm hole.
The spider is held in the tube with 8x2B.A. screws and nuts. We'll discuss its position in the tube in the focuser section.
 This drawing shows the diagonal mirror mount assembily.