Character
Creation and Advancement
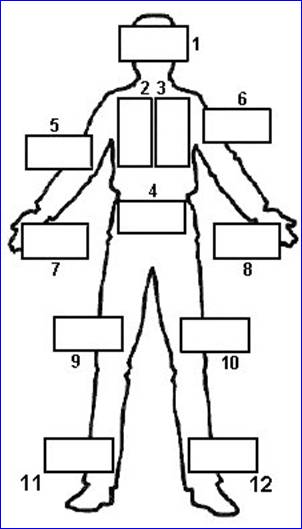
On initial character creation each vital area outlined in
the diagram above contains a predefined base number of wound points (refer to
Table 1 above for the Base numbers). To these base numbers add/subtract your Constitution
bonus, Strength Bonus, or both according to the table below:
|
Body Area
|
Ability Modifier
|
|
Body Area
|
Ability Modifier
|
|
1
|
Head
|
Con
|
|
7
|
Left Hand
|
Con
|
|
2
|
Left Chest
|
Con + Str
|
|
8
|
Right Hand
|
Con
|
|
3
|
Right Chest
|
Con + Str
|
|
9
|
Left Leg
|
Con + Str
|
|
4
|
Abdomen
|
Con + Str
|
|
10
|
Right Leg
|
Con + Str
|
|
5
|
Left Arm/Shoulder
|
Con + Str
|
|
11
|
Left Foot
|
Con
|
|
6
|
Right Arm/Shoulder
|
Con + Str
|
|
12
|
Right Foot
|
Con
|
Table 2
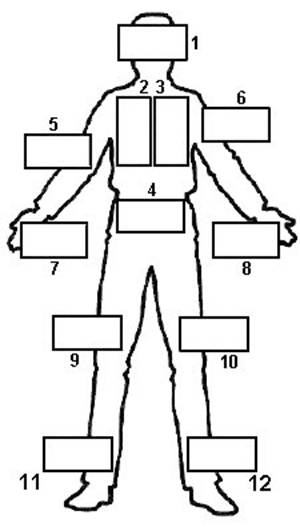
Fill in the resulting values in the appropriate body areas
of the chart above. The end result is now a summary of how many wound points
your character can sustain in any given area.
Wound Categories
After you’ve calculated the maximum amount of damage that
your character can sustain in each body area you need to calculate the wound
categories for each area. Wound categories represent the severity of damage
that a particular body area has sustained and are represented by ranges of
Wound Points. Look up your wound point total in the Wound
Category Ranges
table below and copy the values onto your character sheet for the various body
areas. The below table may help as a template.
|
Wound
Categories
|
|
Body Area
|
Light
|
Medium
|
Severe
|
|
1
|
Head
|
|
|
|
|
2
|
L. Chest
|
|
|
|
|
3
|
R. Chest
|
|
|
|
|
4
|
Abdomen
|
|
|
|
|
5
|
L. Arm
|
|
|
|
|
6
|
R. Arm
|
|
|
|
|
7
|
L. Hand
|
|
|
|
|
8
|
R. Hand
|
|
|
|
|
9
|
L. Leg
|
|
|
|
|
10
|
R. Leg
|
|
|
|
|
11
|
L. Foot
|
|
|
|
|
12
|
R. Foot
|
|
|
|
Wound Category
Ranges
In general in creating the below table I tried to keep the
Light category around 40% of the total and distributed the rest among the other
two categories.
Table 3
|
Wound Point Total
|
Light
|
Medium
|
Severe
|
|
1
|
-
|
-
|
-
|
|
2
|
-
|
-
|
1
|
|
3
|
-
|
2
|
1
|
|
4
|
-
|
3-2
|
1
|
|
5
|
4
|
3-2
|
1
|
|
6
|
5-4
|
3-2
|
1
|
|
7
|
6-4
|
3-2
|
1
|
|
8
|
7-5
|
4-2
|
1
|
|
9
|
8-6
|
5-3
|
2-1
|
|
10
|
9-6
|
5-3
|
2-1
|
|
11
|
10-7
|
6-3
|
2-1
|
|
12
|
11-8
|
7-4
|
3-1
|
|
13
|
12-8
|
7-4
|
3-1
|
|
14
|
13-9
|
8-4
|
3-1
|
|
15
|
14-9
|
8-4
|
3-1
|
|
16
|
15-10
|
9-4
|
3-1
|
|
17
|
16-11
|
10-4
|
3-1
|
|
18
|
17-11
|
10-5
|
4-1
|
|
19
|
18-12
|
11-5
|
4-1
|
|
20
|
19-12
|
11-5
|
4-1
|
|
21
|
20-13
|
12-5
|
4-1
|
|
22
|
21-14
|
13-5
|
4-1
|
|
23
|
22-14
|
13-5
|
4-1
|
|
24
|
23-15
|
14-5
|
4-1
|
|
25
|
24-15
|
14-5
|
4-1
|
|
26
|
25-16
|
15-5
|
4-1
|
|
27
|
26-17
|
16-5
|
4-1
|
|
28
|
27-17
|
16-6
|
5-1
|
|
29
|
28-18
|
17-6
|
5-1
|
|
30
|
29-18
|
17-6
|
5-1
|
|
31
|
30-19
|
18-6
|
5-1
|
|
32
|
31-20
|
19-6
|
5-1
|
|
33
|
32-20
|
19-6
|
5-1
|
|
34
|
33-21
|
20-6
|
5-1
|
|
35
|
34-21
|
20-6
|
5-1
|
|
36
|
35-22
|
21-6
|
5-1
|
|
37
|
36-23
|
21-6
|
5-1
|
|
38
|
37-23
|
22-7
|
6-1
|
Gaining Wound Points
To acquire more wound points simply apply your characters
ability score modifiers to the appropriate body areas according to Table 2 on
every odd level of advancement and
recalculate your wound categories. This means that when your character reaches
3rd level; add more wound points to the appropriate body areas based
on the modifiers from your Con and Str. When your character reaches 5th level, repeat the
process, repeat again at 7th, etc.
Now onto some questions about game mechanics: things like
death and dying, healing, little things like that :-).
Game Mechanics
This section will cover what happens in a typical game
session. We’ll discuss how to handle combat, healing, dying, as well as some
additional concepts that might add some interesting aspects to the game.
Combat
So how does combat work in this new system? Well, you’ll
find that your combat sessions will likely be much quicker to resolve, at least
in the basic mechanics. Things like cover, armor, position relative to the
target, initiative, and some of those special initiative actions like Delay,
Ready, or Refocus will become much more important. Getting the drop on your
opponents will be very advantageous.
So how does it work? Well, generally speaking, combat works
the same way you’re used to, except you need to roll one additional dice with
your damage roll, a 1d12 to determine which body area you hit. The target you
hit then subtracts the amount of damage you dealt from the Wound Points of that
particular body area. That’s it.
Wound Categories and Taking Damage
When you take damage, the amount you have left becomes
important as to your character’s abilities from that point onward as
represented by the different Wound Categories. Below is a brief summary of the
effects they have:
- Light
– The body area has suffered a scratch. Minor bleeding and pain. Causes a
-2 modifier to actions attempted with the affected body area.
- Medium
– The body area has suffered a wound. Free flowing blood. Causes a -4
modifier to actions attempted with the affected body area.
- Severe
– The body area has suffered extensive damage. Exposed tissue (perhaps
bone) and large volumes of blood. Causes a -6 modifier to actions
attempted with the affected body area.
Keep in mind that the interpretation of the above general
guidelines is relative to the body area. For example, a Medium wound to your
primary weapon arm or hand would affect your ability to use a sword or shoot a
gun. A Light wound to your head might affect your ability to reason or use
mental powers. Use your best judgment in interpretation the modifiers.
When any body area reaches (or passes) the Severe Wound
category, all actions taken by the character suffer a
-4 synergy penalty (except those taken specifically with the
afflicted body area; those occur at a -6 penalty as noted in the Severe
category above).
Critical Hits
When a critical hit is scored (by rolling a threat and then
another successful hit as normal) damage is multiplied following the normal
critical hit rules (default multiplier is x2) and is applied to the affected
body area normally. Needless to say, scoring a critical hit is
usually…well…critical.
When They Reach Zero…
When the Wound Points in any body area reach zero or lower
the body part in question is rendered useless. In the case of the Head (1), Left
and Right Chest (2, 3), or Abdomen (4) this results in instant death. In the
case of other body areas (basically, your appendage areas: 5 – 12) the part is
useless and requires extensive hospital time and appropriate medical care to
recuperate. You must continue to keep track of damage to body areas even after
they reach zero. If damage sustained to any appendage body area reaches twice
the total number of Wound Points the body area is destroyed.
If the Wound Points for any appendage body area (Areas 5 -
12) reach zero (or below) the character must make a Fortitude Save each round
at a DC of 10. The character must make a Fortitude
save each round thereafter with the difficulty increasing by 2 until the
character receives medical attention (typically a successful Heal or First Aid
roll, depending on your game system). Once the character receives medical
attention they are considered to be stabilized until they are either healed or
are wounded further. If wounded further the character is considered to have hemorrhaged
again and must make a new series of Fortitude saves (starting at the DC of 10).
Failing a Fortitude save means the character has lost
too much blood and dies.
Optional Rule
Some Game Masters may wish to use the standard “deaths door”
(-10 beyond your max hit points and you’re still not dead) rule. If using this
rule the body should be treated as a whole for determining when -10 hit points
is reached. That means any damage sustained to any body area once the character
has been wounded to a “lethal” amount to any critical body area (areas 1, 2, 3,
or 4), or fails the Fortitude save progression in the previous section, should
count towards the total “-10”.
Subdual Damage
Keep track of subdual damage for
each body area that is dealt subdual damage. Follow
the standard rules for being staggered or unconscious when the maximum amount
of subdual damage is dealt to the head, chest, or
abdominal body areas. When the maximum is dealt to other body areas and the
area is “staggered”, this means that you can only perform partial actions that
involve that body part, but other non-staggered body areas function as normal
(keep in mind the standard -4 penalty for having reached the Severe wound
category). When a body area is “unconscious” per the standard rules this means
the body area is useless until proper healing takes place.
Healing
Healing for wounds sustained to body areas that fall into
the Light or Medium wound categories can be healed with basic medical attention
and rest as normal. The body heals holistically, meaning that if your normal
rate of healing restores 2 points of damage per day of rest, then restore 2
points of damage to each body area that has sustained damage.
Wounds that fall into the Severe wound category (or worse
yet, the body area is useless) require more detailed attention. If you’re
playing in a fantasy setting this would mean the attention of a cleric or
healer that is skilled in conventional healing or magic. If you’re playing in a
real-life setting this would mean the care of a skilled physician. Body Areas
that have been rendered useless (Wound Points are zero or below) should require
not only skill but perhaps specialized equipment or facilities to heal.
Effects of Hit Location and Skill
Characters are trained in the use of their weapons (well,
ok, usually :-)). Having the basic skill is one thing, but as you gain ranks in
your weapons of choice, your skill in landing potentially lethal blows
improves. This is reflected in the ability to “bump” where a blow lands to a
more desirable location. The number of locations you can move a hit depends on your
base attack bonus. For every two points in your base attack bonus (note just
your base attack bonus, not total attack modifier) you have in a skill you can
“bump” the hit location one body area. This means that if you have a +1 or +2 base
attack bonus, you can move your shots hit location by one. If you have a +3 or +4
base attack bonus, you can move it two body areas and so on.
To determine what body areas you can move your shot from and
to, think of the hit location diagram shown above (Figure 1). You can bump your
shot to adjacent areas only. This means that if you can bump your hit one
location and you hit your target in the Abdomen, you could move the hit to body
areas 5, 2, 3, 6, 7, 8, 9, or 10; all the areas “around” the abdomen. If you
hit the target in the Right Foot you could move it to areas 10 or 11.
For example, early in James Bond’s career he is facing an
enemy spy in a gun battle and scores a hit with his Walther PPK. He rolls a 9
on his Hit Location check (the 1d12 you roll with your damage roll) indicating
the hit struck his target’s left leg. He needs to take care of this guard
quickly and since he has 2 ranks in his Pistol skill he bumps his hit location
to the Abdomen (area 4). He could have bumped his shot to any one of areas 7,
4, 10, 11, 12 as they are all “adjacent” to the left leg, meaning right next
to.
Later on in his career, Mr. Bond faces the same spy again
except this time Mr. Bond has been to the pistol range for some more pistol
training. He now has 3 skill ranks in his pistol skill. As luck would have it,
he again rolls a 9 on his hit location check after rolling a successful hit
against the enemy agent. He could again bump the shot to the Abdomen if he chooses,
but since he has 3 skill ranks he can bump the shot two adjacent areas, meaning
he could bump the shot to the Abdomen and then to the Left or Right Chest, or
to the Left or Right Arm, etc.
So what areas are adjacent? The below
table lists each body area and the areas that are adjacent to it. In
general, the rule of thumb “immediately next to” was used in determining the
table. It could be argued for example, that if the left arm is “next to” the
left hand, isn’t the left chest as well? Perhaps; my intent is just to make
skill more important in the game, so if you would like to adjust the table below feel free to do so.
|
Body Area
Adjacency Table
|
|
Body Area
|
Adjacent Areas
|
|
Body Area
|
Adjacent Areas
|
|
[1] Head
|
2, 3
|
|
[7] Left Hand
|
4, 5, 9
|
|
[2] Left Chest
|
1, 3, 4, 5
|
|
[8] Right Hand
|
4, 6, 10
|
|
[3] Right Chest
|
1, 2, 4, 6
|
|
[9] Left Leg
|
4, 7, 10, 11
|
|
[4] Abdomen
|
2, 3, 5, 6, 7, 8
|
|
[10] Right Leg
|
4, 8, 9, 12
|
|
[5] Left Arm
|
2, 4, 7
|
|
[11] Left Foot
|
9, 12
|
|
[6] Right Arm
|
3, 4, 8
|
|
[12] Right Foot
|
10, 11
|
Table 4
Coverage and Hit Location
So your arrow shot hit location rolled a hit to your targets
left leg, but his left leg is behind the boulder he is standing behind, now
what? Determining hit location should be confined to only those body areas
exposed. What is visible and what is not is left up to the discretion of the
Game Master. If only four body areas are exposed and your attack roll scores
high enough to be a hit, roll a 1d4 for hit location, or re-roll your 1d12
until it lands on a body area that is exposed.
Game Masters must use there best judgment when determining
what body areas a hit can be bumped to. For instance, if the target is lying on
ground with only his head exposed you should not be able to reach his other
body areas or if you’re flanking your character on the left side you should not
be able to attack body areas on his right side.
AC/DC – Armor Class/Defense Class
Each body area obviously becomes more important with this
system and armor detail comes into play. Your defensive rating (AC) in a normal
d20 system is just one value. In this system, each body area should have its
own defensive rating. If you are wearing a breastplate but no helmet, your
breastplate doesn’t really help your head if someone’s hit location role lands
a blow to your precious scalp. Your defensive rating for each body area should
be noted on your character sheet. Wearing leather boots vs. steel-plated boots
becomes important to note. Eventually, I hope to have some lists of armors for
various genres (fantasy, sci-fi, and real life) and their bonuses as general
guidelines, but for now it is up to the DM/GM to determine the bonuses various
helmets, armors, shields, boots, blast vests, etc. have.
New Combat Actions
Called Shot (Full
Action) – This action is used when you wish to hit a specific target,
whether it be a sniper trying to get that all-inclusive head-shot or an archer
trying to strike the leg of an oncoming horse.
Hitting a specific target is much more difficult task than simply taking
normal attack actions. The difficulty incurred depends on the size of the
intended target as follows:
- Target
is 3” or more across: -3 modifier to attack roll.
Shooting a car tire, shooting the gun from a targets hand, or hitting a
specific body area would fall into this category (as the
afore mentioned horse’s leg).
- Target
is less than 3” across: -5 modifier to attack
roll. Shooting to sever a rope would fall into this category.
Falling
To Be Determined.
Feats and Skills
Feats
Clarification on feats:
- Toughness
– Adds +3 to each body area.
- Add some
more, maybe improved toughness or some such??
Skills
- None
as yet but there might be room for some.
G.D.S Damage Chart Character Sheet
Template