![]()
![]()
Getting started: How to measure V(I)?
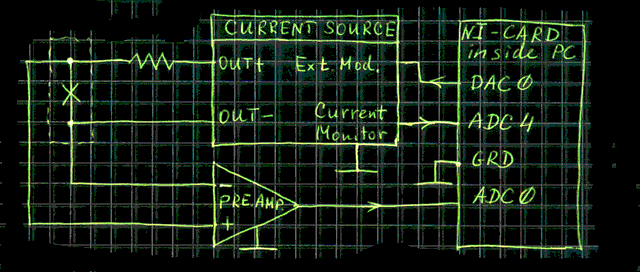
If you wanna play with the real sample (JJ or resistor) while following tutorial, connect this sample using 4 point technique:
Test
circuit with current source and voltage preamplifier.

Test
circuit without current source and without preamplifier.
Run GoldExI. In menu, go to Measurements | V(I). The following, so-called, measurement window will open.
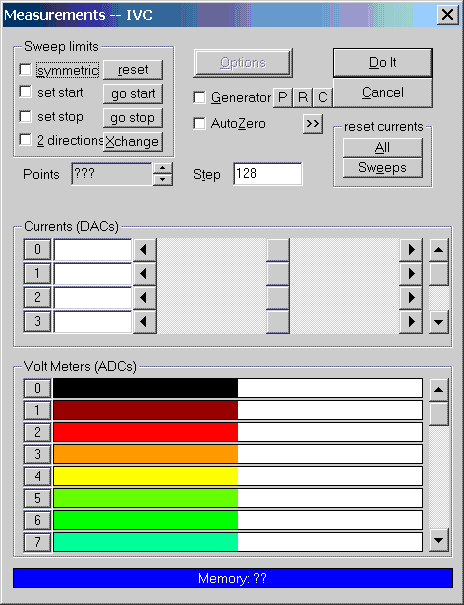
The measurement window looks similar for different kinds of measurements. Therefore almost everything that you will learn below applies also to the other kinds of measurementsm Ic(H), R(T), V(time), etc.
Virtual currents and virtual voltages. GoldExI operates with the so-called virtual currents and virtual voltages. The concept of virtual currents is just a universal way of identifying different current sources and their functions within GoldExI. Virtual currents are numbered from 0 to some maximum number e.g. 100 and have no initial relation to DAC or ADC channels of the installed NI-cards. Virtual voltages are also numbered from 0 to maximum value e.g. 300 and have no initial relation to particular ADC channels of installed cards. Each virtual current/voltage has associated properties which describe its function, and its relation to the physical DAC or ADC channels. The main property of each virtual current/voltage is its type. By default all virtual currents/voltages have the type "Disconnected"/"Not connected". When you ask GoldExI to measure something, GoldExI analyzes the types of all virtual currents/voltages to determine what will be their function during the measurement. All virtual currents which are "Disconnected"/"Not connected" will not participate in the measurement at all.
You have access to each individual virtual currents in the middle part of the measurement window which is embraced with the frame entitled "Virtual currents". Each row of controls corresponds to one virtual current and consists of:
The same applies to virtual voltages. You have access to each individual virtual voltage in the bottom part of the measurement window which is embraced by the frame entitled "Virtual voltages". Here each row has only two controls:
Configuring the current. Before we can start measurement we should tell to GoldExI which current to sweep and to which DAC of which card it is connected. Lets use virtual current 0 for this purpose. In the virtual currents group of controls, make a row of controls corresponding to the virtual current 0 visible using vertical scrollbar (if necessary) and click on the configuration button (left side) with number "0" on it. The virtual current configuration window will open. You should change the settings so that they look similar to the following example:
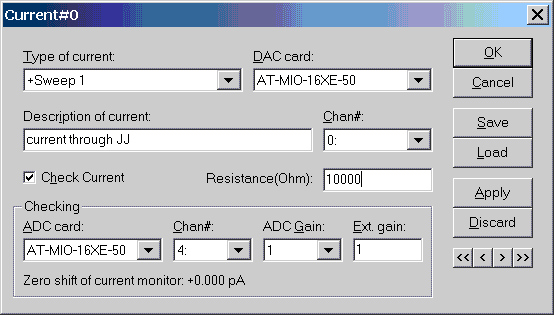
The title says that we are setting up the virtual current 0. The type of current says which role this current will play during measurement:
The fields "DAC Card" and "Chan#" let you select a card and physical DAC channel of this card which will be associated with given virtual current. Note, that only cards which have at least one DAC channel are shown in "DAC Card" drop down listbox.
The field "Description of current" let you enter a text which describes by words the function of this particular virtual current.
In the field "Resistance" you should put the value of a coefficient which GoldExI should use to show the current in the right units. In general GoldExI offers two ways of getting the value of current.
When configuration of the virtual current is complete, press okay. This will return you to the measurement window. If everything is done properly you will see that GoldExI shows (and permanently updates) the value of virtual current 0. You can use mouse to move a scrollbar corresponding to the virtual current 0. The value of current flowing in the circuit will change in real time and you should see this changes looking at the value of current which GoldExI shows. If something does not work properly you may connect an ammeter in series with the sample to make sure that you indeed are changing current when you are moving the scrollbar.
Configuring virtual voltage. Before we can start measurement we also should tell to GoldExI which voltage to measure and to which ADC of which card it is connected. Lets use virtual voltage 0 for this purpose. In the virtual voltages group of controls, make a row of controls corresponding to the virtual voltage 0 visible using vertical scrollbar (if necessary) and click on the configuration button (left side) with number "0" on it. The virtual voltage configuration window will open. You should change the settings so that they look similar to the following example:
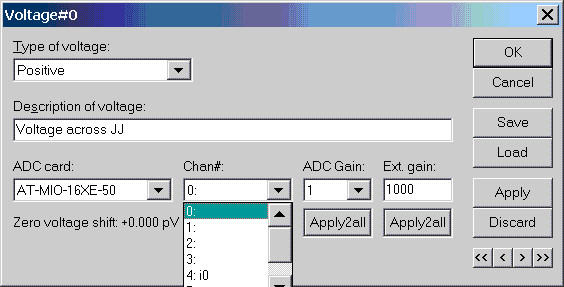
The title says that we are setting up the virtual voltage 0. Type of voltage says which role this voltage will play during measurements:
The fields "ADC Card" and "Chan#" let you select a card and ADC physical channel of this card which will be associated with given virtual voltage. Note, that only cards which have at least one ADC channel are shown in "ADC Card" drop down listbox. When you open the "Chan#" drop down listbox, you see not only possible channel numbers but also hints written to the right from a colon, as shown in the snapshot above. This hints tell you, which physical ADC channels of the selected card are already in use by other virtual currents and/or voltages. For example, in picture above, we see "4: i0" in the last line. This is a hint that ADC4 of the selected card (AT_MIO-16XE-50) is used by virtual current 0 (it is used to check the current). The same hints appear when you configure ADC and DAC channels in the virtual current setup window.
The field "Description of voltage" allows you to enter a text which describes by words the function of this particular virtual voltage.
The field "ADC Gain" allows you to set the gain of the internal preamplifier of the NI-card. This compels the card to use the particular gain and also allows GoldExI to keep track of it to calculate the voltage value correctly.
The field "Ext. Gain" should contain the gain of the preamplifier. If your preamplifier allows to select several gain values manually, you should not forget to change "Ext. Gain" value every time too.
After setting up the properties of the voltage, as shown on the above picture, press Okay. You will return to the measurement window. Now, GoldExI updates the voltage indicator too. Moving the virtual current 0 scrollbar by hand you should see not only changes in current, but also changes in voltage. If it is resistor, voltage should grow proportionally to current. If your sample is a Josephson junction, you should apply the current above critical to see a finite voltage.
Now you are ready to make you first measurement. Simply push "Do It" button. GoldExI sweeps the virtual current 0 from its minimum value to its maximum value and measures the voltage in each point. By default you will have 512 points on the V(I) curve. Depending on parameters, the speed of your computer and cards, the measurement can take from a fraction of a second up to several seconds. If measurement takes some time, during the measurement you should see that the position of the current scrollbar and the value of the voltage indicator changes.
Controlling the sweep. To control the parameters of the sweeping use the group of controls "Sweep Limits" in the top-left part of the measurement window. The meaning and functions of controls are as follows.
Generator. If you check the generator checkbox, GoldExI will program the DACs corresponding to "+Sweep1" and "- Sweep 1" currents and start a saw-tooth generation in real time, so that you can see the sweep on the oscilloscope. The parameters of the generation mimic very closely the parameters of the sweep, so that on the oscilloscope you will see the same curve as U will see after pushing "Do It" button. more...
Options. This button, if enabled/visible, gives you the possibility to change the options for this particular kind of measurements.
Auto Zero. If you have measured the IVC and you see that the voltage at zero current is not zero, this probably means that you ADC card or preamplifier has a shift/drift of zero. GoldExI can measure this shift and automatically subtract it from the voltage. To do this, just check on "Auto Zero". The button ">>" next to "Auto Zero" allows to configure the Auto Zero feature in more details. more....
Using "Points" and "Step" fields you can select the number of points on the V(I) curve to be measured. Note that, Sweep limits also affect the number of points. Experiment, a little bit by yourself to get the feeling how it works.
Reset Currents group of controls provides a fast way to set all currents (or only Sweep currents) exactly to zero.
The blue progress indicator at the very bottom of the measurement window is used for two purposes.
Finally, the buttons "Do It" and "Cancel" are used to start measurements and to close the measurement window without measuring anything, accordingly. Note, that during the measurement, the button "Cancel" changes its name and becomes the button "Stop". It can be used to interrupt the measurement at the arbitrary moment and show only the partial result -- the part of curve which was measured before the interruption. Instead of clicking on "Stop" button, you can hit "Esc" on your keyboard -- it does the same.
After you have measured the curve you wanted, it is the time to save your results. In menu go to File | Save. Select the file name, press okay. The "Data File Options" window may appear. GoldExI asks you which info would you like to save in addition to raw data file. When you save e.g. your_file_name.dat, GoldExI also creates a file file your_file_name.ini with additional info. You can select what kind of info you would like to save in "Data File Options"window, which appear during each saving operation (you can switch this feature off). For our test measurements it makes sense to save only: Averaging settings, Delay settings, and virtual current/voltage configuration.
When you open the file (File | Open), GoldExI can load also some or all settings from corresponding ini file. The "Data File Options" window will appear again asking you which piece of information you would like to load.
Tip:
See also: AutoZero, Averaging, Delays, Fast Generator.
![]()
[Review]
[Download]
[Gallery]
[Links]
[F.A.Q.]
[HerStory]
[Bugs]
[Suggestions]
[Author]
[EMDAQ.DLL] [Home]
[forum]
![]()
|
Designed
by Edward
Goldobin.
All Rights Reserved |
|
