Ganapathy Subramaniam (gpathy@yahoo.com)
3D Modeling and Animation Workbook
Ganapathy Subramaniam
(gpathy@yahoo.com)
3D Modeling Overview
Modeling Using Simple Forms and Transformations
Using Materials to Create
surface texture
More Modeling using the primitive forms
Animation Overview
Character Design
Basic Character Rigging
Creating an Animation Sequence
Creating a scene.
| Introduction |
This is an approach at introducing 3d modeling and animation, to someone who
has never done anything like this before. A workbook approach, where learning
happens through exercises is taken here, rather than a tutorial approach. basic
ideas are presented briefly and the reader is advised on what to practice. Also,
software specific details are avoided when possible, this is generic
material that can be applied on any software.
Materials needed:
Anim8or is used whenever a software is specifically dealt with, since it is
freeware and unbelievably tiny.
A computer that is able to run Anim8or reasonably fast (as our models get
complex things can really get slow).
A large notebook is needed to do rough drawings which helps in
visualization, plus a 2B pencil.
For details on how to use Anim8or to achieve a specific task, it is advised to
refer to the manual.
| 3D Modeling Overview |
To create realistic characters and objects that can be used in an animated movie
with ease, we use 3 dimensional modeling. Once the objects are created, the
computer software has the capability to take care of rendering the objects
according to our specifications, such as surface material, lighting,
perspective, camera angle and movement etc. So what is really the essence
of 3D modeling? It is creating models that are as realistic as necessary, and
using as simple forms as possible to build them. Where do we begin? How do we
approach it?
In order to better render realistic figures, Italian renaissance artists began
looking at the 3rd dimension. since we use two eyes to gather visual
information, providing us the depth , this depth has to be better understood if
we want to create an illusion of realism. One of the techniques used to
understand the 3rd dimension was to use a basic set of forms to create any
desired form. using a combination of the sphere, the cube and cone of varying
sizes, one could construct almost any desired form. This gave the artist a
technique to approach 3D easily.
Continuing from where these artists left, we have sophisticated 3D software that help us construct realistic objects with ease. but the approach is pretty much the same. what they did on paper with a piece of charcoal, or with clay, we are doing with the mouse and the monitor.
Anim8or is a great tool to master the basics of modeling and animation.
simple to use, and very direct in its approach, and also being a freeware adds
to its popularity.
Lets begin by looking at objects and observing the basic forms that can
approximate their appearance.
Demonstration
1.look at the monitor in front of you, the front of it can be easily seen as
a cubical form. so are the table, keyboard and the UPS.
2.A circular wall clock can be seen as a thin cylindrical form. (cylinder with a
small length)
Exercise
Try to observe the things around you, be it anything and everything, hands,
faces, pens, houses, buses,toys, and try to figure out the basic forms and
combinations of such basic forms that they are made of.
One can use a piece of paper and pencil to note the observations. drawing helps
a lot in visualising.
Skill Acquired
Ability to visualize any object in terms of a composition of simple forms.
| Modeling Using Simple Forms and Transformations |
We begin with a series of exercises that get us accustomed to the software as
well as the process of modeling.
We start by using primitive solids such as the sphere, cube, cylinder and simple
transformations such as moving, rotating, scaling, and modifying its shape by
bending twisting etc. we use what is called as polygonal modeling, which is the
simplest of the methods.
At this point we do not worry too much as to getting close to realism in terms
of details, we focus on the general shape and form of the object that we are
trying to model. Just the general overall form. details come later. it is
important to start looking at an object and trying to visualize the underlying
simple forms. With is in mind, let us begin our first modeling session.
Demonstration
It is indeed very difficult and clumsy to explain the process of using a
highly graphical interface. It is acknowledged that what follows must be
replaced either by a video demonstration, or a classroom demo.
| Lets model a table Open Anim8or and go to the Object Mode(the default mode when u start Anim8or) Make sure you are in Object Edit. The arrow button on the top left is selected. from menu, select View/All. this brings up all four views of the design environmet. Front,Left,Top and Perspective. We build any object part by part. we begin by visualizing the basic shapes of the object. We can look at a table as to consist of table-top and legs. table-top is basically a rectangular sheet with a small thickness. At the bottom of the tool buttons you will find sphere, cube and cylinder creation tools.(buttons) Click at the cube button. place the mouse on the 'front' window and draw a cube. Double-click on the cube to open the properties box. now, you can set the parameters that define the cube. Set appropriate values for the x,y, and z size, to be x=40,y=3,z=30. this is our table top. legs are rectangular columns. Click the cube button again, and draw a some what vertically long cube form. double-click on the new form and set the values to be, x=3,y=20,z=3. now we have a good sized leg. use the three views to postion the leg under one of the corners of the table-top. you can move a component by first pressing the move button from the tools(the one that looks like a cross bar), and then by selecting the component and moving the mouse. you can create the other three legs by copy-paste from the edit menu. and positioning them. select view/perspective, and click on the 'eye' button at the left. this is the view mode. use the buttons at the bottom grooups such as rotate, scale etc, to view the table you have just built from various angles.
|
 |
Exercise
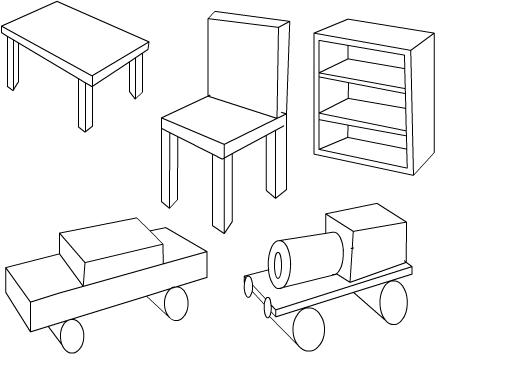
A set of outlines for some common objects are given here. Use them to create 3D
models. Do more of your own from whatever objects that you can think of.
We will be using only the sphere, the cube and cylinder to create all our
models. Try to get the overall form, do not focus on details at this point.
Chair, shelf, train engine, tv, house, tree, See-saw, hammer, ladder, Pencil.

Skill acquired
Ability to create a 3d form that approximates the object that is modeled, using
primitive forms such as sphere, cube and cylinder by creating, moving,
positioning, scaling, rotating, copying etc.
| Using Materials to Create surface texture |

We have created a few basic forms using the primitive sphere, cube and
cylinder. Even though the object look blockish, they have an approximate form of
the objects that we are modeling. The idea is to get a feel of building objects
from the primitives. There are many more methods that achieve realism, but for
now we focus on simplicity, to get a over all understanding of the process of
modeling and animation.
Now, the next thing that we are going to work on is the surface of the
objects that we have been creating. You must have noticed that all objects are
gray. In reality objects have color, roughness, reflectivity, some are dull,
some are bright and shiny. some are smooth and so on. We call all of these
properties as the surface modeling. or surface texture modeling.
Using Color to model surface
But, again, keeping
things as simple as possible, we focus on just the property of color.
First we begin by creating materials. once a material is created, we apply it to
our object. simple? just two steps.
1. create a material, 2. apply to the object.
You can apply a material to any number of objects.
Demonstration
Select Options/Materials from the main menu. This will bring a column next to
the tool box. You will see a button named 'New'
double click the button, this opens the materials editor. select different
parameters. For now, focus on the color. clicking ok will create the material!
Now, select an object and click on the Apply button on the materials column. Now
your objects are covered with the new material that you made.
Exercise
| 1. Create a Red material. Create a sphere
and apply the material to it. |
|
| 2. Create a lot of objects of different
shapes, some can be of the same shape. Create Red, Blue, Green and Yellow materials, and apply to different objects that you create. |
 |
Try creating many materials, change the color, and maybe a few other
parameters to get an idea. we will look at more details later.
Next time you look at any object
around you, try to look at the different properties such as color,
roughness, smoothness , any patterns such as on wood etc.
Using patterns to model surfaces
Another simple yet effective method of creating realistic surface texture is
to make use of a pattern that is either a photo of a real surface such as wood
grains, or rock patterns, or sand etc. Also one can create their own patterns
using any graphics program.
Demonstration
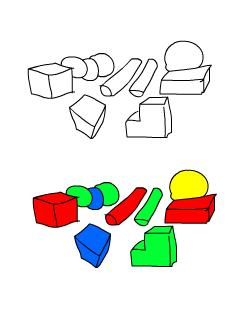
Create a pattern, either from a photo or by yourself. Create a new
material . Click Textures, and choose the Ambience & Diffuse parameters
and select the pattern file, and set it. (spend some time on Anim8or and you
will figure it out). There.. now we have created a material with a pattern.
Apply it to objects and you will see the effect!
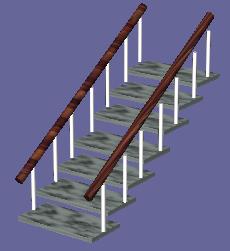
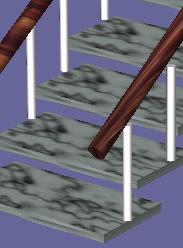
The patterns used for the above stairs and handrail are ,
You can use these files as well.
Note that the way patterns are mapped onto the surface is interesting. More
on how to fit them more perfectly later.
For now, think of this process like, covering a pillow with the pillow
cover. The object takes the texture of the pillow cover stretched over it.


Exercise
1. Create a Table, with a table top, and legs. Create two
materials one marble and one wooden. apply the marble material to the table top,
and the wooden material to the legs.
2. Use a graphics program such as Paint, and create a simple pattern, add
colors, lines etc. apply it to the book shelf you created in a previous
exercise.
3. Create or obtain a pattern that represents the green parts of a tree. apply
them to the tree you created previously, and wooden material to its trunk.
| More Modeling using the primitive forms |
Let us do some more modeling using the simple method that we saw. While
keeping the method the same, let us try to model some more complex objects and
with a little more details.
Exercise
Use simple primitive forms, and by resizing, positioning, rotating etc, try
to model the object. Begin with the overall object in mind, and then add
details as much as needed. Keep the model simple. Do not look for ornamentation
and decorations at this point. try to look for the basic forms. This exercise
will both help you to visualize an object in terms of simple forms and also
build your modeling skills.
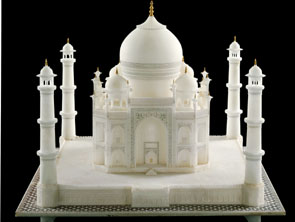
Taj Mahal

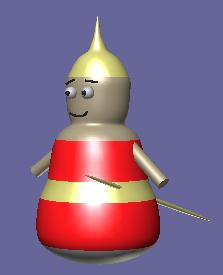
Rolling Doll
Cradle
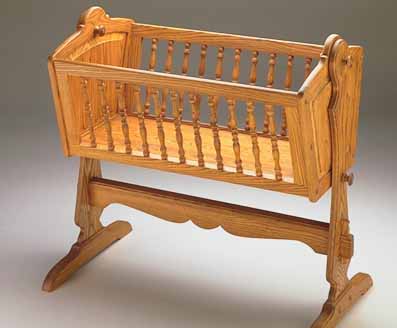
Stair case

Circular stairs
Now, do some of your own, use pictures from the newspaper or
a book, or of course from the internet. create outlines with a pen on the photo
if that can help visualize. as always keep it simple. smooth surfacing and other
exciting tools are coming soon.
MORE COMING SOON....
Advanced Modeling using the Polygonal Mesh
We saw, how using simple primitive forms such as spheres,
cubes and cylinders we could approximate the overall form of any object.
We did this, by creating the appropriately sized sphere, cube etc, and placing
them in the desired position, by moving, rotating and other such
transformations. Though it is a very simple and straight forward process, it
does not give us the level of detail that we want to add to the objects that we
are modeling. Certain kinds of forms are very difficult to model just using this
simple 'additive' modeling that we have been doing.
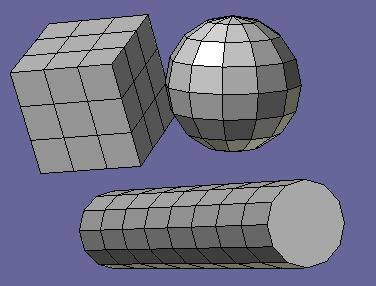
The next, rather big step is true polygonal modeling using the mesh. When we
look at a cube, or a cylinder, we can look at it as an object made of several
tiny polygons. The cube is made of six 4-sided polygon all of same size. A
cylinder is made up of rectangular polygons arranged in slightly varying angles
in a circular shape to create the cylinder. similarly we can think of the sphere
as a collection polygons. It is again an approximation only, but with more
number of polygons, we can create the illusion of smooth surfaces.
Once we begin to see the primitive forms to be made of smaller polygons, the
next step is to make small changes to the polygons themselves , thus resulting
in fine changes to the overall shape of the object.
Subdivision modeling and more Transformations
Modeling using subdivision
A major next step in modeling is to aim for smoother surfaces. sharp solids
such as cubes, or broken spheres are not appealing. In order to achieve smooth
forms , but still maintaining a low number of polygons to create our objects,
there is a technique called subdivision modeling. Subdivision basically means
subdividing the polygons that are part of our primitive form. So more the
polygons, the more smoother the form is. The process is similar to polygonal
modeling, but the polygon based form is automatically smoothened based on
interpolation algorithms.
The idea of using subdivision here is to add more to the realism of the objects
that we are modeling.
Try converting some of the models that you built into subdivision models. You do
that by, selecting the object and clicking 'Build/Convert to Subdivided' from
the menu.
Using more Transformations
What we have done in the previous exercise is to use the primitive solids
with basic transformations. We can create slightly more complex objects using
more transformations such as Bending, Twisting, Tapering etc. We will use a few
of them to model some more objects.
This is done very simply, by first creating a basic form, such as cylinder, or
cube, and then twisting it, or bending it as much as we need.

We can apply these transformations either to primitive forms or to subdivided
forms.
Anim8or has a very easy to use tool called the modifier. The bottom most button
on the tool box is the modifier tool.
![]()
Click on the tool, and draw using the mouse, you will see a mesh , adjust the
size of the mesh, and position it near an object you want to modify. In the
dialog box that appears, select the type of modification, such as bend, twist
etc. and also, you can set the parameters such as amount f twist etc, by double
clicking on the modifier mesh.
After that you select which object you want to modify. you do that by selecting
the object and the modifier, and clicking
"Build/Modifiers/Bind Modifier" from the menu. when you are satisfied with
the change, you can select, "Build/ Modifiers/effect modifer" to modfiy the
object
Demonstration
create a lengthy cylinder. click on the Modifier tool. draw the
modifier mesh around the cylinder. choose 'bend' , set 180 degrees. Bind,
and Effect modifier to see the effect.
Exercise
3D Modeling and Animation Workbook Level 1
3D Modeling overview
Modeling Using Simple Forms and Transformations
Using Materials to create surface texture
More Modeling using the primitive forms
Animation Overview
Character Design
Basic Character Rigging
Creating an Animation Sequence
Creating a scene.
3D Modeling and Animation Workbook Level 2
Advanced Modeling using the Polygonal Mesh
Subdivision modeling
Applying more Transformations
Modeling using Splines and Transformations
disclaimer: This article is intended to be an educational tool. for any picture that is present that is not created by the author, the creators are thanked as it has been useful. any copyrighted material usage is accidental. please inform the author about it at gpathy<.at.>yahoo<.dot.>com .