|
PLUMERIA  Plumeria's
are a tropical flowering tree, sometimes called "frangipani" or "temple
tree" in the plant family APOCYNACEAE, Though tropical by nature, when
protected from frost, they are well suited to subtropical or temperate
climates. Plumeria's
are a tropical flowering tree, sometimes called "frangipani" or "temple
tree" in the plant family APOCYNACEAE, Though tropical by nature, when
protected from frost, they are well suited to subtropical or temperate
climates.
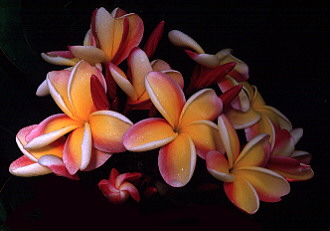
Plumeria are valued as landscape
plants, ornamentals, and for their flowers. The flowers come in seemingly
endless variety of color, size and fragrance. Flowers can be strung together
to make a lei (pronounced lay) which is presented to friends and
guests of either gender and worn around the neck like a large loose necklace.
Plumeria Characteristics This page describes general observations and characteristics of cultivars of genus Plumeria. The plumeria genus is composed of five or more species although nearly all cultivars are considered part of species P. rubra or P. obtusa. We are concerned with the flower, the leaf, and the plant as a whole. There are certain characteristics considered when assigning to a species or in recognition of a variety. Growth Habit Plumeria seem to have a fairly well defined growth habit, but will sometimes exhibit peculiar behavior. Compare plumeria to cats: they excel in doing things they are not supposed to do! Nearly every generally accepted rule of plumeria culture will from time to time be proven incorrect. For example: plumeria do not grow roots from a cutting in water (most of the time!); plumeria require full sun to bloom. Plumeria need to bloom in order to branch. Almost any part of a plumeria tree
can be propagated by cutting, see How to Grow Plumeria from a Cutting for
a procedure that will usually produce successful results. The plumeria's annual growth cycle has evolved to accommodate a dormant period to coincide with months of drought in the arid tropical regions of Mexico, Central America, and Caribbean Islands where it is indigenous. This corresponds to the Winter season in the Northern Hemisphere and permits storing the plant indoors, out of light, out of sight, and out of mind when outdoor weather conditions are likely to include frost or freezing temperatures. While dormant, the plumeria requires no care and most varieties will loose some if not all of their leaves. As the sun's intensity and temperatures increase during the spring, plumeria begin to break dormancy by producing an inflorescence on many tips. Many plumeria will be in full bloom before the spring rains and before producing a single leaf! Active growth occurs after spring rains as long as temperature and sunlight requirements are met. Most vegetative growth occurs under these conditions. This includes revitalization or regeneration of a desiccated root system, new leaf growth, and stem and branch elongation. Many varieties will continue to bloom and initiate new inflorescence during the vegetative period. Most varieties will set fruit during this period as well. As autumn approaches, drought, less sunlight, and cooler temperatures all contribute to plumeria entering its dormant period. Many lower leaves will turn yellow and drop, flowering will be significantly reduced or stop altogether, and overall plant growth will slow to a stop. The fully dormant plumerias requirements are few: temperatures above freezing and conditions on the dry side. Dormancy lasts from one to five months depending on environmental factors. Characteristics Overview Flowers  Plumeria
flowers have five petals, although flowers with four, six, seven or more
petals are not uncommon. Some types of flowers do not fully open and are
referred to as shell, semi-shell, or tulip like. Most flowers have a strong
pleasant fragrance that is most intense during the early part of the day.
A great many different fragrances have been described, but since smell
is so subjective and varies for environmental and nutritional reasons,
we do not attempt to be comprehensive in its description. We try harder
with colors. There seem to be several basic plumeria color schemes: white
with a yellow center, yellow, multicolor, and red. There is speculation
that red is a special case of multicolor. Most of the reds can be more
properly referred to as red-purple. Plumeria
flowers have five petals, although flowers with four, six, seven or more
petals are not uncommon. Some types of flowers do not fully open and are
referred to as shell, semi-shell, or tulip like. Most flowers have a strong
pleasant fragrance that is most intense during the early part of the day.
A great many different fragrances have been described, but since smell
is so subjective and varies for environmental and nutritional reasons,
we do not attempt to be comprehensive in its description. We try harder
with colors. There seem to be several basic plumeria color schemes: white
with a yellow center, yellow, multicolor, and red. There is speculation
that red is a special case of multicolor. Most of the reds can be more
properly referred to as red-purple.
Plants The plumeria is more appropriately considered a tree. In the tropics it can grow to heights over ten meters. A mature plumeria has very strong hardwood and can be safely climbed by the average person so long as the limbs are at least seven centimeters in diameter. Remember to keep your weight where the branches intersect or be sure there are plenty of cushions below! We are concerned about the general growth habit of a plumeria variety, how well it branches (i.e. what is the usual number of new tips produced from a tip when it blooms), its history, its seed bearing potential, and its use as a container, ornamental, or landscape plant. Characteristics in Detail Flowers Measurements of plumeria flower varieties
are with respect to other plumeria. When a universal standard can be applied,
such as a ruler or color chart use it; otherwise the comparison is among
peers. Size: The size of the flower recorded represents an average floret. It has been stretched out to its maximum width without risking pulling it apart. The distance between the two most distant petal tips is then measured. Please be aware the this average can be off by as much as 100%! A great deal depends on the plants maturity, environment, and the point in the flowering cycle. Many varieties will produce larger flowers early in the flowering cycle. Petal Texture: This is a subjective measurement of how one variety's flower measures up to another. When the measurements are taken use a zero to three scale, with zero being fragile, one being delicate (typical of most plumeria), two being strong, and three being rigid. Generally strong and rigid flowers will be somewhat better lei flowers than those described as delicate. Fragrance: This is a very subjective measurement. Most plumeria enthusiasts know what a plumeria smells like. It smells like a plumeria! Petal Type: Petals are described according to their overall shape, their tip, and any unusual characteristics they may possess. Plumeria petals fall into either elliptical, obovate, and rarely spatulate categories. They can be further described as wide or narrow. Occasionally, we find petals with other characteristics such as reflexed or twisted. Petal tips are described as round or pointed. Elliptical: The widest part of the petal is close to the middle. Obovate: The widest part of the petal is close to the tip. Spatulate: Special case of obovate, where the petal is spoon shaped. Wide: Petal seems somewhat round. Narrow: The petal is more than four times longer than it is wide. Reflexed: The fully open petal will nearly form a semi-circle where its tip may be pointing down or back to its base. Twisted: The petal is convoluted in any of a number of ways that give a curled or even a fluted appearance. Round tip: The tip does not come to a point. Pointed tip: The tip comes to a point. Flower Type: This description applies to the plumeria blossoms that fail to open or open in a peculiar way. Some varieties frequently will not open into a flower, but remain as a partially open bud resembling some types of small spiral seashells; these are referred to as shells. Others open more fully than shells but not fully retaining a cupped or tulip like appearance; these are referred to as semi-shells. Since most plumeria florets open fully, this description is only used for those that do not. Leaves The emphasis of The Plumeria Place
is on the flower. There are, however, some interesting items observable
in plumeria leaves that can aid in identification of varieties in or out
of bloom. Color: It should be no surprise that most plumeria leaves are described as green. There are, however, variations of green; some showing a purplish tint or even a blackening. Generally them as simply light green, or green unless there is really some other aspect worthy of note. Texture: A measurement of plumeria leaves usually describing how rigid the leaf is compared to other varieties of this species. Since this measurement is probably influenced by environmental factors, it should taken with a grain of salt. Generally we will describe the leaf as flexible or rigid depending on how easily it is bent. Consider a leaf held by its petiole (stem) being waved back and forth slowly through the air, one that shows significant distortion from its plane from air resistance is described as flexible, one that retains its shape is described as rigid. Since nearly all plumeria leaves can be described as glabrous (smooth and not hairy (pubescent)), we only mention the rare exceptions. The bottoms of nearly all plumeria leaves are also considered glabrous, even though they are bumpy with exaggerated veins. Leaf Border Color: The extreme edge of the plumeria leaf may show some color other than green, frequently red. This may be an indication of the variety's heritage. Petiole Color: The petiole is the leaf stem. It is usually green or green with a reddish tint. This may be an indication of the variety's heritage. Leaf Shape: We are concerned with the shape, size, and type of tip of the plumeria leaf. This may be an indication of the variety's heritage and can aid in identification. Plumeria leaves are described as elliptic , oblanceolate, and rarely lanceolate. These descriptions can be refined as wide or narrow as necessary. The tip of the leaf is described as acuminate, acute, or obtuse.
Oblanceolate: The widest part of the leaf is nearer its tip than its center. Lanceolate: The widest part of the leaf is nearer its petiole than its center. Acuminate: The curve of the leaf edge will abruptly change as it narrows near its tip. Acute: The curve of the leaf edge will not significantly change as it narrows near its tip. Obtuse: The leaf will have a very blunt tip that does not usually come to a point. Variegation: A few plumeria varieties will show light to moderate random changes in the coloration in different random areas of a single leaf. This is referred to as variegation. Since it is so unusual it is only mentioned when observed. Plants Measurements and observation of the overall plumeria tree are interesting as they can relate to its suitability as an ornamental, container grown, or a landscape plant. They can also be of interest for growers for their genetic information and possible use in hybridization. Pollen Parent: The name of the male parent if known. Seed Parent: The name of the female parent if known. Deciduous or Evergreen: Deciduous plumeria usually drop most if not all of their leaves during a dormant period. Evergreen plumeria either retain most of their leaves while dormant or do not experience an annual dormant period. In the sub-tropic climates where evergreen plumeria are stored indoors for the winter, most evergreen varieties do go dormant and do drop their leaves. Seed Production: This is based on our experience, observation, and advice from others. Seed production is rated as: none observed (not known to had ever set seeds), rare (once), seldom (unusual but occasional), average (at least once a year), or profuse (much more than average). It relates to how many seed pods will be produced by a mature specimen under ideal conditions. Branching: Based on the observation of how many new tips grow after an inflorescence is produced. For this measurement we examine a specimen of the given variety and note how many new tips are usually produced. This frequently falls into the range of one to five to which we apply our opinion of the variety's branching habit:
Fair: 2 Good: 3 Excellent: 4 or more Compact: Usually a smaller plant with better branching habit and minimal stem elongation before blooming and branching again. Upright: Refers to the attitude of the plant. More specifically, to the angle that new tips emerge from an old tip after blooming. The angle is the wide angle that the new tip makes with respect to the original branch. When this angle is wide, the plant appears more upright. For example, if a new tip emerged at a 180° angle from the original tip, it would be in perfectly straight alignment with it. No plumeria exhibit this characteristic, except in the case where the plumeria blooms without branching. Yet, the closer this angle approaches 180° the more upright its character. An upright plant is considered the opposite of a rangy plant. Rangy: Refers to the attitude of the plant. More specifically, to the angle that new tips emerge from an old tip after blooming. When the angle is narrow, sometimes approaching 90°, the plant takes on a rangy appearance. This characteristic is exaggerated when the new branches curve, sometimes down, before blooming and branching again. Rangy plants frequently have significant stem elongation before blooming and branching again. A rangy plant is considered the opposite of an upright plant. Lanky: Usually a larger plant with more stem elongation before blooming and branching again. Normally applied to upright plants rather than rangy plants since rangy plants frequently exhibit this characteristic. Dense: Refers to the relative closeness of branches to each other and can be used with other growth habits in seemingly contradictory ways such as Rangy, dense. This is a subjective opinion rather than a measurement. Trunk Circumference: This measurement is taken approximately 300 cm from the ground. It is provided to indicate the relative maturity of the specimen examined. Plumeria Propagation from a Cutting When to Cut: Plumeria can be propagated by cuttings anytime of the year, but most successfully and easily when the cuttings are taken during late winter while the plant is dormant. You can store the cuttings for months before planting. In any event there must be sufficient warm weather remaining to allow the cutting to establish a healthy root system outdoors. What to Cut: Select a tip or branch from a healthy plumeria. The cut should be made in mature wood, not green, but having a grayish sheen to it. It should be at least 25 cm long, but avoid cuttings much longer than 50 cm unless they have multiple forks or branches since the cutting will probably grow another 30 cm before blooming and branching, and would become unacceptably tall in short order. Generally, a cutting with two or more branch points will establish itself faster and take longer to attain objectional height. How to Cut Using a very sharp knife, clippers, or large tooth pruning saw; cut the specimen from the donor plant. The cut should be diagonal (i.e made at a 45° angle on the branch being cut) and clean, without damaging the branch tissues on either the donor or cutting. The cut branch on the donor plant should not provide a place for water to collect. The diagonal surface on the cutting provides additional space for root callus to form. If the cutting has leaves, they should be cut off immediately. Excess sap loss is avoided if they are cut off at a point about 2 cm from the branch. The remaining stub will yellow and fall off in a couple of days. If the cutting has inflorescence or fruit, it may optionally be retained. The fruit will usually ripen allowing the seeds to be harvested later. Allow the cut end to seal off for at least two weeks in a warm, dry, and well ventilated area. If the cutting was taken in late winter, you can wait as late as April or May (or longer) to plant. How to Plant Before planting the cutting, dip the cut end in water, root stimulator or concentrated Superthrive, then into a rooting powder that contains a fungicide such as Rootone. Only about 2 cm of the cut end should be so treated because roots will only develop along the circumference of the cut end. Select a container appropriately sized for the cutting. Use a one gallon pot (about 4 litres) for cuttings without a branch point, but a two gallon pot (about 7 litres) for cuttings with one or more branch points. Of course, very large cuttings will require a larger container for stability. The planting medium has three layers: The bottom layer should be a fast draining planting mix rich in organic material. The middle layer should be perlite or sand. The top layer should be the same as the bottom layer. Everyone seems to use a different planting mix formulation, but the essentials are high organic content, fast drainage, and moisture retention. Fill the pot 2/3 full with the planting mix (the bottom layer), make a fist sized indentation and fill it with perlite or sand (the middle layer). Insert the cut end of the plumeria into the perlite/sand. Top off with more planting mix till the pot is nearly full (the top layer). The additional mix can be packed in to provide support, but supplemental support or staking is recommended. During the early root growing process it is very important that the cutting be stable. The initial roots are quite fragile and easily broken if the cutting is wobbling about in the pot. Root Development: During the root development process water usage will be minimal. However, the soil should not be allowed to completely dry out. Approximately one cup (350 ml) of water should be added weekly until the plant has established a root system. Fortunately, frequent tropical downpours do not seem to cause any problem during the rooting process. Generally, a lush healthy growth of leaves will indicate an equally healthy root system. The entire rooting process should be performed in a somewhat dry, warm to hot, and full sun environment. Excellent results can be achieved by placing the container in full sun on a concrete surface. The heat absorbed and radiated by the concrete stimulate root growth. Plumeria will generally be established in 45 to 75 days after planting. However, the new root system is very fragile. Avoid lifting the plant by the trunk, instead pick it up by the pot. Attempt to keep the plant as stable in the pot as possible. When it blooms: Plumeria may bloom during the rooting process, however, the bloom does not indicate an established root system. The flower may or may not be representative of future flowers. Some people cut off the inflorescence so the plant devotes more energy to root development. Remember, healthy leaves indicate healthy roots, flowers do not. Winter Storage: The healthy established plumeria cutting can be stored for the winter as any other plumeria. Plumeria Care, Subtropical Plumerias can be grown in containers, in the ground, or containers sunk in the ground. During the months of active growth, ample sun, food, and water are essential. Healthy plumeria will grow vigorously and bloom regularly and profusely when they receive at least 6 hours of full sun per day and an ample amount of the proper fertilizers. Plumeria love lots of water, but can't tolerate wet feet, so they must be planted in highly organic fast draining soil or in beds with adequate drainage. Clay, gumbo, and silt are examples of poor draining soils; avoid these at all costs. The way you care for your plumeria depends on the season of the year. Bring your plants out of storage in the spring, watch them grow and bloom in the summer, prepare for dormancy and storage in the autumn, and store them for the winter. In the Spring: When the nighttime temperatures begin to usually remain above 50°F, plumeria can be brought out of winter storage and encouraged out of dormancy. Due to conditions of storage, some root loss and desiccation of branches is expected, this is no cause for alarm. This is the time to feed, water, top dress, and/or repot. Since the plant is dormant, it will be minimally disturbed by repotting and root pruning as necessary. Repotting and root pruning are optional and are performed as with any other container grown plant. Top dress by scraping off the loose soil and dead roots from the first couple centimeters of soil. Replace the removed soil with a mixture of compost and/or well composed cow manure. Feed and water thoroughly using a fertilizer such as Nitrosol, Super Bloom or Carl Pool's BR-61. If desired, there are specialty plumeria foods that can be used. Place the plant in a warm and sunny location. Some people like to sink the container into the ground, but be sure it is in a raised and well drained area such as a rose bed. This promotes more vigorous growth, provides support, and prevents it from blowing over. Plumeria tips are fragile and easily snapped off when the plant blows over. In the Summer: For plumerias, summer has arrived once a lush growth of leaves has developed. Many will bloom before developing leaves, others will not. Once the leaf growth has developed, the summer regimen of care can be followed. As mentioned before plumeria are heavy feeders. However, in order to discourage excessive stem elongation and to promote flowering, fertilizers low in nitrogen and high in phosphorous are, once again, recommended. Super Bloom, Seasol or Carl Pool's BR-61 are excellent choices. Keep a plumeria healthy by feeding once or twice a month, and watering as necessary. The recommended foods can be sprinkled directly on the soil and then watered in. Consider using two tablespoons per five gallon pot per month. During exceptionally hot periods, plants in above ground containers may need thorough watering as often as every other day. Drooping leaves can indicate a thirsty plant. As with all plants, check the soil before watering, if its dry for the first several centimeters, water thoroughly. Certain varieties of plumeria find dry heat excessive for nominal blossom production. If this appears to be a problem, move the plant into a "shifting shade" location for better flower production and keeping quality. As the days begin to grow shorter during August and September, some lower leaf yellowing and drop is normal. Some varieties will attempt a fall bloom cycle, if you are lucky and the weather cooperates, plumeria can still be blooming into November and December! But watch out, an early frost can damage or kill the plant. In the Autumn: For plumeria, fall begins once the nighttime temperature frequently begins to drop below 55°F. Studies have concluded that plumeria stop growing when the average ambient temperature drops below 65°F. Stop feeding and reduce water to encourage the plant to go into its natural dormant period. Some growers think that feeding after mid Autumn may contribute to the black tip fungus problem, however this has not been proven. It is difficult to predict the weather and therefore it's difficult to give a date by which your plumeria should be safely stored for the winter. By all means, if temperatures are expected to fall into the lower 30°F, the plants should be protected. Most varieties can be damaged or killed by temperatures in the low 30°F for even a few hours. For the Winter: During the winter plumeria require very little care. In fact winter care could be considered winter storage. Before storage, the plumeria should be defoliated. The best way to do this is to cut each and every leaf off the plant at a point about 2 cm from the stem. If you don't defoliate, the leaves will yellow and fall off during storage providing a good environment for pests and fungus (as well as make a mess). Store the plumeria in a cool to warm, dry, and ventilated area such as a garage, storage shed, or your living room. Temperatures should not be allowed to fall below freezing in the storage area. During exceptionally cold periods, for example below 25°F outside, a small supplemental heater may be required for plants stored in unheated sheds. A cool greenhouse is not recommended for plumeria storage because it will tend to be too damp and thus promote black tip fungus and other fungus problems. Some people suggest not watering plumeria at all for the entire winter, but probably a small monthly drink does more good than harm, especially if the branches are getting desiccated and the plant is in a warm dry location. Since a defoliated plumeria takes up considerably less space than one in full leaf, they can frequently be stacked two and three high in the storage area. |