 Windows Mobile Wireless Adhoc Networking Windows Mobile Wireless Adhoc Networking
Despite what I've written earlier about it is better to get a wireless router and using infrastructure mode, there are still situations where adhoc mode might be useful. Imagine visiting a friend who has a notebook with wireless connection. He also has internet connection, and you'd like to check your emails. But he needs to work on something with his notebook. Internet connection sharing using adhoc mode would be useful here.
And so, I've re-written the guide for Windows Mobile 2003 and Windows XP with SP2. The old version of the guide for Pocket PC 2002 is still accessible here.
1. Desktop (or notebook) settingsI assume that the host computer is running Windows XP with Service Pack 2 and that it has a wireless adapter installed. The first step is to configure the wireless adapter. Go to Network Connections by right-clicking on the icon with a little red cross in System Tray and select Open Network Connections.

Go to the properties page of the wireless network by right-click on Wireless Network Connection and select Properties.
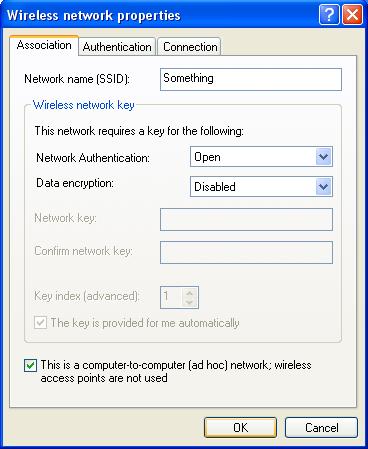
Go to the Wireless Network tab, then add a new network by clicking on the Add button.
Fill in the details - SSID, WEP key and check the last box to indicate this is an ad-hoc network. WEP is disabled in the example below. After the initial set-up, you should enable it.
The next step is setting up Internet Connection Sharing (ICS). Back in Network Connections page, open the properties for the Internet connection. Right-click on the appropriate connection and select Properties.

Note:
The Internet connection is normally made through a dial-up modem, or a network card which is connected to cable/ADSL modem. The example in the screenshot above uses a dial-up connection.
What is interesting here is that you can create a dial-up connection even when there is no modem present. This means that a machine that has only a single wireless adapter and no other connections can still use ICS. The reason one might want to do this is because with ICS, Windows Mobile device will be automatically assigned an IP address. Without ICS, you would have to configure the device to a fixed address. If you frequently connect to other network which has a wireless access point, then you'd have to keep switching between fixed IP address and server-assigned IP address setting - very inconvenient.
In the properties page, go to the Advanced tab and enable ICS.

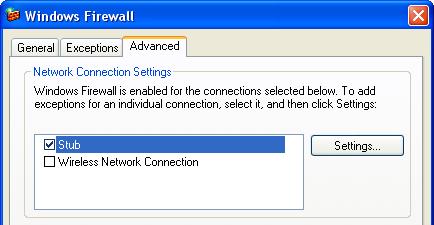
To configure the firewall, click the Settings... button under Windows Firewall. In the Windows Firewall dialog box, go to the Advanced tab. Disable the firewall for the wireless connection but leave it enabled for the Internet connection.
That's all for the desktop.
2. Device settings
The nice thing about Windows Mobile is that for Internet sharing, there is not much else to do on the device. After the wireless network on desktop is indicated as connected, enable the wireless on the device. A dialog box will then ask if the detected network connects to Internet or Work. Select Internet, wait a short while for the device to pick up a valid IP address, then everything is ready.
Note:
It appears that when wireless is enabled, the device will first connects to the desktop with a private IP address in the range of 169.254.x.x. Within 30 seconds, a new IP address will be assigned in the range of 192.168.0.x. Only then is the connection correctly established.
To be able to sync with the desktop in addition to sharing the Internet connection, you will need to perform additional configuration on the device. Go to the Connections settings page by tapping Start -> Settings -> Connections -> Connections.
In the Advanced tab, tap on Select Networks button to go to the Network Management page.
Set both fields to My Work Network, then tap on Edit....
Check the option that says "This network connects to the Internet".

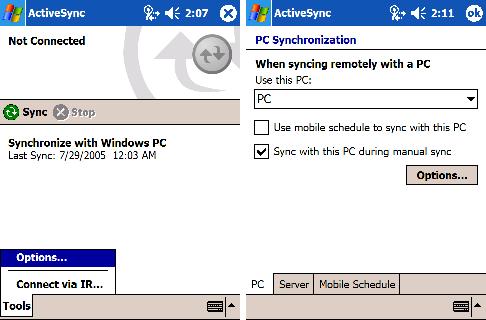
Go to ActiveSync options on the device. Run ActiveSync, tap on Tools -> Options.... Check the option "Sync with this PC during manual sync".
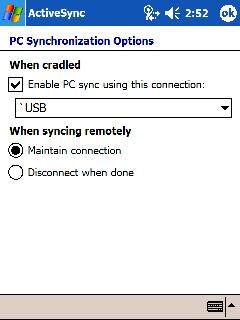
If you want to maintain the ActiveSync connection after synchronisation is complete, tap the Options... button, then select "Maintain connection" for the When syncing remotely option. Remember that it is not possible to establish partnership with the desktop using network connection. You must have already done that beforehand through cable, cradle or bluetooth connection.
Make sure that desktop ActiveSync is configured to accept network connections. Click on the ActiveSync icon in System Tray and select Connection Settings.... The third option ("Allow network...") should be checked.

That's it! To sync, just tap the green Sync button on the device.
With adhoc connection established, it is possible to access files on the desktop from the device. The reverse (access files on the device from desktop) is unfortunately not possible. For that you can ActiveSync, though it's just not the usual file sharing anymore.
Set up shared folder on the desktop just as you would when doing files sharing between computers. Note that you just need the File and Printer Sharing for Microsoft Networks service. It is not necessary to have Client for Microsoft Networks installed.
For the device, I use GSFinder+. Invoke File -> Tools -> Network Connect... to map the shared folder to the device. The first time you run this item, you'll be ask if you want to activate the Network folder. This is a special folder which appears to be like a storage card. Mapped folders will appear under this special folder.
With this approach, shared files appear to be in the Network storage card and you are free to read them (and write to them, if the permission was set). So you can, for example, map a folder with audio files and play them with Windows Media Player on your device.
Well, that's the end of this guide. Until Windows Mobile 5, which is probably just a couple of months away...
