Making your own Imagemap
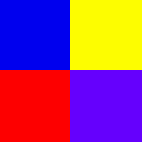
- You will need a picture that you will like to work with at first. I have chosen this cube as it has 4 parts where I can link to different places.
- Next open this image in a program that will be able to tell coordinates such as Paint Shop Pro or others. In this tutorial I will show how to make 4 separate links using the cube image shown above, one in every square
- In order to make in image map, you will need to know the coordinates x1, y1, x2, y2. Use the Rectangular tool and copy the coordinates of the top left hand corner of the first link that you want to make. Then drag it to the bottom right corner of the image that you want as a link. For me I have used the coordinates 2,2 for the top left corner and 69,68 for the bottom right corner which is the top left box of this cube image. Then find the other coordinates for the other 3 links that you want to make.
- After the other 3 sets of coordinates are made using the rectangular too, it's time to do the coding part. The code should look like the following. The usemap attribute must be used so the browser can tell that it is reading it off a map.
<html>
<head>
<title>Title</title>
</head>
<body>
<img src="name.gif" usemap="#name_map">
<map name="name_map">
<area shape=rect coords="x1,y1,x2,y2" href="http://www.something.com/">
<area shape=rect coords="x1,y1,x2,y2" href="http://www.something.com/">
<area shape=rect coords="x1,y1,x2,y2" href="http://www.something.com/">
<area shape=rect coords="x1,y1,x2,y2" href="http://www.something.com/">
</map>
</body>
</html>
Back to Home

