On this page I try to give some basic information how to correctly adjust a guitar. Most of this refers to electric guitars, but some of it also applies to acoustic guitars. It is mostly based on my personal experience.
Someone actually seems to read this page, I recently got this mail:
(Gender) Male
(MailType) Compliment
(COMMENTS)
Thank you, thank you, Thank you!!!
You have no idea how much your well done web page has helped me. I have no longer got frett buzz. It's been driving me crazy, and I dont have the time or money to have a profesional do it for me.
Page contents
How often should you change strings? Simply put, replace your strings when you feel they tend to sound muddy or do not intonate truely anymore. How long do strings last? If you never play, very long! Apart from that it depends on how much you play, the moisture of your hands, dirt (do you wipe your strings after playing?), how heavily you bend your strings and so on.
String life: when you put on new strings, after a while you realize that it takes about half an hour (of playing) before they ring beautifully, with a clean, wiry sound (I'm not discussing flatwounds, personally I do not even like those). After that, useful string life begins. Including the initial one, there are four phases:
There is no one correct way to tell which adjustment should be made first, if the guitar needs a major readjustment. After readjusting the neck you will have to readjust other things over and over again, until the overall result gets better and better. Neck truss rod or action adjustment usually requires intonation readjustment afterwards, but not necessarily the other way round, however. If all else is well, intonation may be adjusted last (electrical adjustments such as pickup height, pole pieces etc. are an entirely different matter). If the neck angle is correct (which can't be adjusted except for bolt-on-necks anyway), you might want to begin with adjusting action.
In the following, if you are not sure what you are doing, leave the adjustment
to a pro, if the paragraph is marked with the following sign:
Steel strings exert a pull of about 150 to 200 pounds on the neck, depending on the gauge (string thickness). Just like a bow, the guitar is deformed under this pressure, and all adjustments have to be made according to this state. If you switch to another string gauge this delicate balance is shifted.
Next, some people tell you to remove all the strings, then put on the new ones. My advice is: don't!
To counterbalance the strong pull of the strings (consider that a force of about 150-200 pounds is perhaps more than the weight you can lift!) most steel string guitars have a steel truss rod inserted in the neck. If you remove all the strings at once, this truss rod pulls the neck with a similar stregth to the other side, but now without balance! (Basically, the same applies to guitars without truss rod, except for those with nylon strings which have less pull).
Therefore you should replace the strings individually, replacing one string with a new one, then the next and so on. Even if it may not immediately damage your guitar if you remove all at once.
If all strings have to be removed for some time, for example in case of a major repair such as replacing frets, the truss rod tension must be released for that time, which is probably best left to a pro.
It is however, a good idea to clean the fingerboard when you put on new strings. Do this before you actually change strings, to keep dirt off the new ones. In the case of the finished maple fingerboards as those on many Fenders, use the same guitar polish as used on the body. To clean the rosewood and ebony fingerboards most other guitars are equipped with, such as archtop guitars, you may clean the fingerboard with a soft cloth and alcohol or xylene, but, be careful not to touch any plastic or finish, and, as this reduces the wood's humidity (inner moisture), only! if you afterwards wipe the fingerboard either with special fingerboard oil available in your music store, or with linseed oil you probably get (for much less $) in a drug store. You should rub the fingerboard with linseed oil every few months anyway, to keep it smooth and alive.
Finally, when you're done and all strings have been replaced and tuned, you should stretch the strings. They have to get accustomed to their new tension, which they will eventually (you notice that when they tend to get out of tune for several days), but you can greatly decrease that time by stretching them.
Strings are stiff and therefore will not immediately fall into place. Hold the string with thumb and fingers and stretch it (so that it gets an S-shaped curve) see figure 1. Each string at a time (but don't overdo it, a sharp bend in a string immediately kills it).
Next, new strings tend to bow at the winding post (figure 2 a). That's another reason they tend to detune themselves when new. Press the string gently there so that it gets straight (see figure 2 b).

You will find that it takes much less time until the strings keep in tune.
Note that intonation adjustment and adjusting the action are mutually dependent, since pressing the string increases its tension and therefore influences intonation. Also, some guitars require more action because of their fingerboard radius, for example Telecasters often have a smaller fingerboard radius than other guitars. When bending strings (except the d and g strings), a small fingerboard radius will make the strings buzz even if the action is otherwise correct.
Also, the right amount of action is dependent on which strings you play. The heavier these are, the less they will buzz, so with a .009 set of strings you will need a little more action than with .010 strings (beware: changing the string gauge will also require neck readjustment.
For the following I assume that your guitar is otherwise correctly adjusted. If your guitar has a non-adjustable bridge, as most acoustic guitars, this will require that you remove the saddle, so - unless you know what you're doing, leave it to a pro. The following applies to guitars with adjustable bridges.
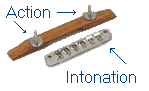 This
is an example of a bridge typical for archtop guitars which can be adjusted for
action and intonation.
This
is an example of a bridge typical for archtop guitars which can be adjusted for
action and intonation.
Play your guitar, one note at a time, each note on each fret, loudly. Some notes will buzz more than others. Concentrate on these.
If string action is adjustable for each string, adjust one string at a time; if you have a bridge with two height-adjustment screws like most jazz guitars (as in the example) and electric acoustics, concentrate on the 2nd and 5th string, but cross check with all when you think you are finished.
Release string tension before you actually turn the screws.
If the strings buzz, gradually increase string action until the buzz is reduced to a minimum. There is no one correct value for string action, it is partly a matter of taste, some players even prefer a light buzz when playing loudly. If you feel your action is too high, decrease it a little, then play every note on this string to check which first begins to buzz.
When you are done, you will have to readjust intonation, and in the case of heavy strings or a considerable change, it is possible that you willl have to readjust the neck as well.
Before trying to adjust the neck, you will have to check if this makes sense at all. If the neck has warps or bends, or if it needs to be refretted, then your guitar needs professional repair anyway.
Second, this only makes sense if the neck angle is correct. If the neck angle is adjustable (bolt-on necks only), check that first (hopefully, soon to come).
A correctly adjusted neck is not perfectly straight, but has a slight bow, away from the strings in the middle (because the string will need more space to vibrate there than at the nut or the fret you play).
Again, there's no simple way to tell if the guitar's neck is correctly adjusted. First you have to make sure there is no warp in the neck: Look down the fingerboard from the headstock and try to see all the frets simultaneously. If they are all parallel, then there is no warp. Second, look along the neck concentrating first on one side of the fingerboard, then the other (imagine you are looking along the barrel of a shot gun figuring out if it is straight. This requires some practice). If the neck has an S-shaped curve, forget about it, you will need professional repair anyway.
If the neck, however, is perfectly straight, or has a slight, but constant curve all along its length, then we can go on. But be aware that this operation, when not done correctly, might damage your guitar!
 Check out where the truss
rod adjusting screw is located, in most cases you will have to remove the small cover
on the headstock (see right, an example found on most Gibson guitars). Before you
change anything, you will need the right wrench or tool. Don't tinker around with
a key that is not exactly the right tool for this operation!
Check out where the truss
rod adjusting screw is located, in most cases you will have to remove the small cover
on the headstock (see right, an example found on most Gibson guitars). Before you
change anything, you will need the right wrench or tool. Don't tinker around with
a key that is not exactly the right tool for this operation!
For most Gibson guitars, the PRS guitars and others a special wrench you can cheaply get from your music store, is required. Take your guitar along and check that the wrench has a solid grip on the bolt, as there may be different sizes (or quality).
Most Fender guitars (except the Fender Bullet type neck which requires an Allen key) will have the adjusting-bolt on the other end, so you will need to remove the scratchplate. If there is a bolt with a cross-shaped slot, then any large screw driver will do.
Many acoustic guitars also have the bolt underneath the sound hole, often you will need an Allen key. These are inexpensive, and you can keep them in your case.
No we go! First press the 1st string on the first fret and the last simultaneously. There must be a little space between the middle frets (7th to 10th) and the string, i.e. the string must vibrate freely between these points. Do the same with the 6th string, and then with one of the middle ones (eg the 4th string).
If you can put a coin between the string and the fretboard, the truss-rod probably needs tightening (note that acoustic guitars need more space, but this should be action adjustment!)
If the string does not vibrate freely between these points, however (when pressed down at the first and last frets!) the truss rod probably is too tight. Try to loosen the bolt, by carefully turning it counter-clockwise and clockwise a tiny little bit, in any case not more than the angle of a few minutes on a clock.
When you feel you can move the nut smoothly without violence, if the neck needs tightening, tighten the truss rod (usually by turning it clockwise), if it needs loosening, loosen the rod, but NEVER! at any one time turn the bolt more than a quarter turn, usually less will do for the moment.
If you do not know which direction means tightening the bolt, try to move it a little around. In most cases you can feel you need more power for one direction, which is usually tightening.
Don't expect marvels! A guitar neck is (usually) made from wood, which is a natural, living material, so it will take some time for it to get used to its new shape. After you have turned the bolt to its new position, firmly hold the body of your guitar between your knees and firmly hold the headstock (or better, the neck at the first fret) with one hand, and gently try to bend the neck in both directions, holding it in the middle with the other hand (because sometimes the truss rod gets stuck inside the neck).
Do not put the truss rod cover back in place, but keep in in your case. Wait a few days for the neck to get used to the new truss rod tension.
If, a week later, the neck curve is good, you're done, otherwise repeat the whole exercise.
What is the right amount of neck curve? Technically, the angle between the fretboard at a given fret played, and the string, should be the same all along the fingerboard. This, however, would require very precise measurement, which usually can't be done. It's usually OK when you press a string down at the first and the last fret, and the string can vibrate freely between these two points, which means there is a little space between the string and the middle frets, approximately as much as the diameter of the 2nd or 3rd string. To get an idea of this, visit a music store and perform this test with several guitars (but keep in mind that the guitars in the store may need readjustment as well!).
First you must determine if your string length can be adjusted individually, for each string, as is the case with most electric guitars (see the example above), or if there are screws for several strings (older Teles for example have three screws for two strings each), or if you only have a bridge which can be moved as a whole (such as the one on hollow-body electrics and archtops) or with two screws (such as the trapeze tailpiece Les Pauls, the Gibson Melody Maker, and some others).
If the strings can be adjusted individually, do so, if there are only two screws, concentrate on the 2nd and 5th string, but cross check later with all.
Before you begin, be sure to have the right tool to make your adjustment. Most guitars need a simple screwdriver, some (like those with a modern vibrato unit) will need a tiny Allen key, some - like the Tele or the PRS - will need a Phillips driver, some may require a screwdriver and an Allen key at the same time.
First, tune all open strings. Then choose one string to begin with (eg the first) and play the note at the twelfth fret. Be sure not to press the string more than is necessary (as you could, until it touches the fingerboard between the eleventh and twelfth fret, this would increase tension and therefore pitch, so this gives erroneous results).
Second, play the octave flageolet note by touching the string lightly exactly over the twelfth fret (not pressing it!), and then plucking the string and immediately afterwards remove your finger. The pitch of this note should be identical to the fretted note.
If you hear a difference, but not which note is the higher pitch, change the string length anyway and figure out if it gets better or not.
If you hear no difference but you are not sure if your ear can hear accurately enough, you might check it with an electronic, chromatic tuner (which recognizes any notes). It is however, good hearing training, and there is no instrument as sensible as a trained ear. Don't believe anybody saying that the human ear is not precise enough!
Back to adjustment: if the open string is in tune, then also the flageolet note is in tune. If the fretted note has a higher pitch, you will need to increase string length. Otherwise, shorten it by moving the saddle towards the headstock (usually by turning the screw counter clockwise).
It is a good idea to loosen the string (or all strings, depending on how many strings are affected) completely before doing the actual turning of the screw, as all the parts are under heavy tension and may get damaged while turning the screw when the string is in tune. I know, I know, this is kinda bothering, but it's worth it, if you want to reduce wear. In the case of hollow body electrics or acoustics with a nonadjustable bridge which can only be repositioned as a whole, you have no choice anyway. Fortunately you don't have to do this every so often.
If you have reached the correct position for one string, repeat it with the rest, until you're done. In the case of nonadjustable, separate bridges, move the whole bridge and test the 2nd and 5th string each time. Now all the other frets will tune truely for these strings, hopefully! (if not, there's no remedy without a major repair or a replacement bridge, and probably that guitar isn't worth it, anyway.
Lastly, cross check all the strings, sometimes you have to go for a compromise. Note that if you don't have all strings of one set together (such as the plain strings from a .010 set and the 5th string from a .013 set or such, you get nowhere.
Do you have questions?
Or do you know better?
| guestbook | index | environmentals | links | what's new |
Last update Nov 20 1998
G.D. © 1998-2003