| |


|
Build Your Own Half-Rack 1U Router |


This page is a documentation of what and how I have built a half-rack space 1U router/ firewall using old hardware readily found in garages, basements, and trash cans with a minimum of store bought components. Being that I found the base computer to build from in a trash can, the total cost of this project was around $100. This was because I bought the PCI card adapters, the LCD and flash drive, which were not necessary to make a working unit, but nice to have for the price. More time than money was put into this project and commercial grade products could readily be made if you are willing to spend the extra cash to add the extra hardware you would use on such a product (ie... a good case, a 2 to 4 port pci NIC, compact-flash card, etc..). A special thanks also goes out to the LEAF project for providing me with an easy to use, extremely configurable, embedded operating system that turns out to be perfect for this application for the low price of nothing! Initial Things To Consider
The first step is to find a computer to tear apart and build the new router with. I prefer
an old AT style board for several reasons.

One of the biggest problems you may run into is finding a power supply that fits the height requirements of the case. Between the thickness of the sheetmetal and the spacing of the mounting stand-off's, you may have a hard time finding one that has a maximum component height of 1.5". I have found several in some old 386 and 486 machines that only required cutting the heat sinks on the rectifiers down. The power requirements of running one of these routers with a solid-state drive such as a flash or compact-flash drive will only be around 30 watts, which is much less than a hard-drive. I wish you good luck in finding one, as I have only had luck in about 10% of the power supplies that I have looked at. 


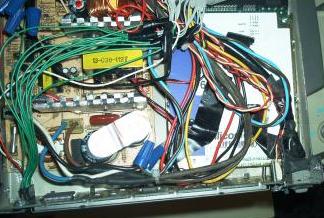
Initial LayoutYou then need to dis-assemble the base computer and gather all the parts needed to make your router. The big thing to keep in mind here is that a full-rack unit is 18" wide and a half-rack unit is 9" wide to fit on a 19" standard rack. The height of each rack space is 1.75" (per "U"). The depth depends on the rack or enclosure you are using. If you are using an open rack, make sure that you can support the depth of the router concerning the weight without twisting the mounts or router case when mounted. Another thing to consider with half-rack cases is that you will not be able to use a 5.5" drive within the width requirements. You will need to use a 3.5" wide drive to lay the power supply and drive next to each other. Personally, I prefer solid-state drives that don't have any moving parts. A couple of this solid-state drives are flash-disks and Compact-Flash disks. 

You need to layout all the components of your router on a non-conductive square, flat surface. Layout the components in the placement they will mount and decide on a physical size for the case. I typically use either cardboard or a piece of glass. If you are rack-mounting use the width measurements listed above for a guideline. You will want to make sure there is room for the power switch, power cord or jack, serial pert(s), and LCD. Your placement may also be dictated by wire and cable lengths... you can extend the length of a power cord quite easily, but stretching an IDE cable is much harder ;) 
I have chosen to make a case out of the old sheetmetal case of an old 486 tower server case ... you can buy a case or sheetmetal to make one, but this was free! I took the measurements of the layout and marked them on the old case sheetmetal with a magic marker, then cut out the sheet-metal using a sawzall and portable jig saw. After the sheetmetal is cut out, you will need to make the bends for the sides and tabs for screwing the top section and bottom section of the case together with. A sheetmetal brake works best, if you have access to one, but you can use a vise or any other means you can think of to do this with .... the sheetmetal brake will always look much nicer though. 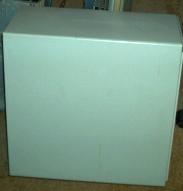

Getting Everything In ThereThe next step is to layout the front and back panels for device holes. You will also want to lay the components in the case and mark the mounting holes. I use stand-offs to mount everything to the case. I drill out the holes with a 1/8" drill bit and tap them with a #6 tap. The reason for this is to ensure that you get your hole placement at the right height, rather than finding out they won't run into something else later on. What device holes you will need are up to you. A few to consider would include, a slot for a floppy or compact-flash drive, your power supply switch, any LED's,the power cord or jack, keyboard, serial port(s), network cards and/or modems, and a LCD display. The order I do this in is:

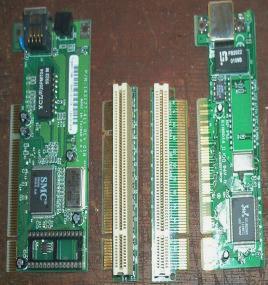
One thing you will need to make sure of is that you can get your network card(s) fit into the case. Your component layout on the back panel will have to work around the placement of the cards. If you have a couple of old ISA riser cards, you can cut them down and clean up the edges to fit inside the case. I personally bought a couple of PCI right-angle adapters to get my cards in there. This will be a large consideration for people that need a 100baseT NIC. You will want cards with only ethernet connectors on them. A last option when considering this is server network cards that have multiple ports on them .... if you can afford them! Of the network cards I have had success with:


Finishing Up!A coat of primer and two coats of flat black later and you should be ready to put everything back in for the last time. I put everything in, double check all the wiring, and then power test it too make sure all the wiring is correct. If you get the BIOS to post, you should be on the down hill slide now, and ready to load your operating system. My OS of choice for these is one of the releases at the LEAF project. These releases are embedded Linux that are very configurable for a huge variety of router and firewall setups and have support for floppy, flash, cdrom, hard-drives, LCD's, and configuration through a different computer via terminal over a serial port (ie.. HyperTerm, mini-com, etc...) and remotely with SSH over the network. Check the LEAF web site, FAQ's, and How To's out for more infomation on these configurations. Once you get your your OS loaded and configured on the drive, go ahead and hook it up and make sure everything works. If your good there, set your BIOS so that it will boot without a keyboard or monitor attached, remove any extra drives and ISA/PCI cards, close the router up, and put it in service.
About This Project and Some Personal NotesI have built several of these now and I am considering starting a commercial company to make Open Source alternatives to Cisco and Checkpoint type products. I hope you have found this document useful and I would appreciate any feedback you have on it. If you are interested in buying a product from me, send the physical and configuration requirements for the implementation and I will be more than happy to work with you for a cost effective deployment. These appliances can be used for routers, firewalls, transparent firewalls, bridges, IPSec gateways, and are WAN capable. My contact information is at the bottom of this page. ~Guitarlynn |
 |

|
| | copyright 2002 | Contact Guitarlynn | |