This Page is Printer Friendly!

3-D Perspective
This Page is Printer Friendly!
| Anime-by-Example | June 28, 1998 Update |
This Page is Printer Friendly! |
||
|
3-D Perspective |
|
This Page is Printer Friendly! |
||
 |
TO BE COVERED:
|
Introduction:
Alright! So you've decided you want to do 3-D perspective, and you're having problems. 3-D's really not that hard, once you get the knack of it. You'll see.
For those who don't know much about perspective, here's a little tid-bit. Perspective, in this sense, does not means "a person's opinion," rather, it pertains to the way objects are distorted when we look at them: a long highway reaching beyond the horizon (thereby narrowing until the road's width converges to one single point on the horizon; effectively, a pair of intersecting lines). When you put your hand in front of your face, your hand blocks your whole field of vision. THAT'S perspective.
Okay, before you go clambering off trying to master 3-D objects, let's start with the basics:
- All 3-Dimensional objects have a depth, width and height (hence the name "three dimensions"). Make sure you provide THICKNESS for everything you draw in 3-D, or it will look very odd.
There are a few things you should know about perspective before we move on:
- Perspective in reality involves a gradual re-sizing of objects at increasing distances. Therefore, an object passing through varying distances away from the camera will be subject to that gradual perspective.
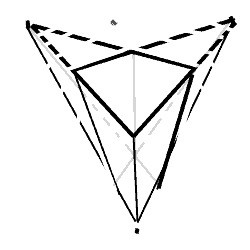
- All perspective lines radiate from their singular points. In addition, lines that are in reality parallel with each must all come from one source .
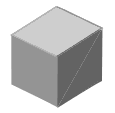 |
Notice all the "length" sides are parallel, all width sides are parallel, and all height sides are parallel. I forgot the geometric term for this condition, but the box in this form is said to be not realistic: it has no point perspectives. You know that Nintendo 64 logo that spins around? That's irregular 3-D. |
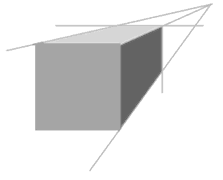 |
The width lines are pinched and grouped so that all the lines seem to originate from
one point. Notice how lines in the other 2 dimensions still remain infinitely parallel to
the all the lines of their kind. This is the most simple of the perspective drawings, and
consequently, the most widely used for drawing backgrounds and extra little things in a
picture. This type is only useful for objects which have a side faced DIRECTLY head on to the camera (angle of picture). A lot of shots utilize the "radial spoke"-like properties of the one-point perspective. Tunnels are often shown coming head on from a perspective point located at the center of vision. |
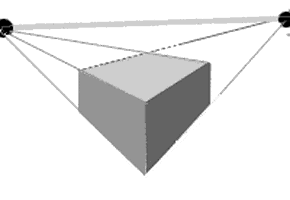 |
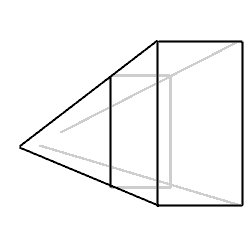
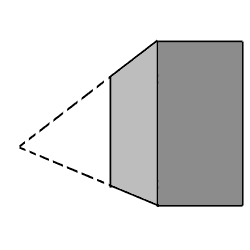
Now both the length and width are bounded each by a single point. It's as if the length and width are "pinched". When drawing 2-point perspective objects, usually the 2 points are positioned on the horizon and the object lines are extended from them to the correct shape boundaries. |
|
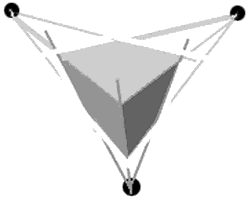
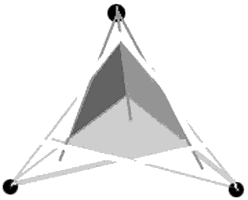
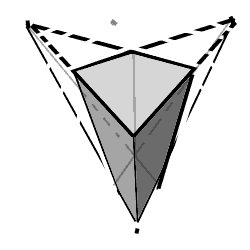
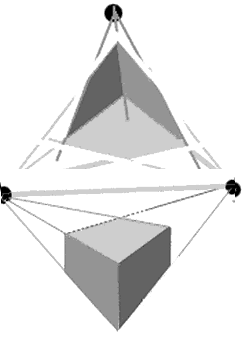
Finally, the third point is added to bind the height lines. This gives the effect that
as you look down upon the object, the object tapers off into the distance below you.
Notice how the box seems to appear way lower than the observer. Look familiar? A lot of
shots in movies and animation that look down on a city from a roof top employ this general
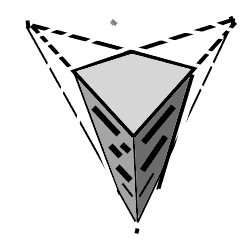
shape of building. Similarly, if you wanted to draw a building as you would view it looking up at it, simply place the height-point above the 2-point horizon. See the bottom drawing.
|
 |
Basically, you can combine the perspective types together in one picture. See how I
combined the 2 point and 3 point together? It works! You can even create a new set of 2-
or 3-point from which to create another object rotated at a different angle. Think of objects as having certain perspective attributes of their own. For example, The top object in this picture has 3-point justification. It is independent from the 2-point justification object in front of it. This is an extreme case, and looks kinda bad, but it shows how you can easily use different point-perspective objects in the same picture. |
"Okay," you think, "I've got that much down. Now I'm having problems scaling the 3-D to look realistic."
- To make 3-D objects cohere to other aspects in your picture-- be it people or other objects, you have to have a clear idea of the size of the dimensions of all objects in the picture. Pay close attention to the examples below-- the proportion of the pots and pans to the chairs, for instance.
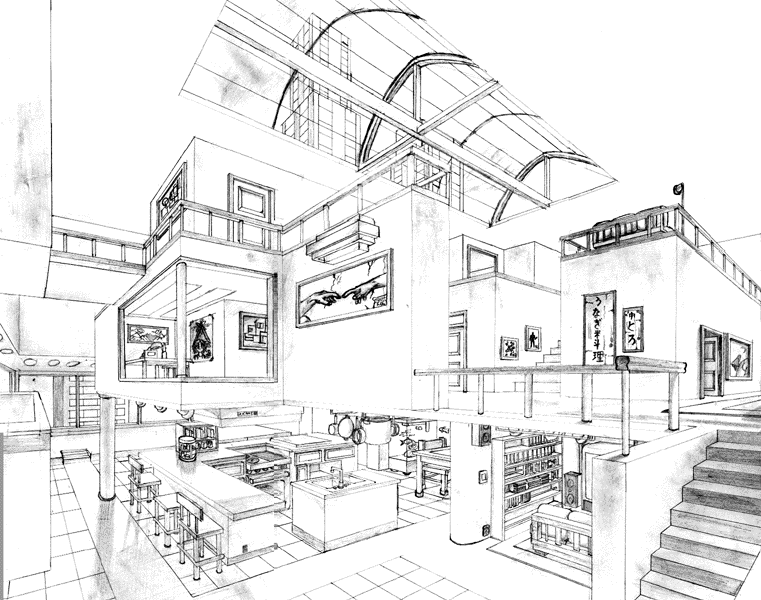
Buildings and Planar Structures
Drawing buildings is a reatively easy task. A simple building structure is basically a shaded box. Whether you choose 2-point or 3-point type buildings, you always use the same process, draw length, width, and height lines from the respective length origin point, width origin point, and height origin point. From there create a box plane by using two of the three dimensions (for example, use the length and width to create horizontal roofs and platforms, etc.).
2-POINT
3-POINT
2-Point Perspective Application
Take a look at an example I scrounged up around the house:
(Click on the image to see a larger picture.) |
 |
|
|
Click on image for a larger picture |
 |
|
|
Characters Subject to Perspective
If you are aiming for a dynamic shot, where the camera is either looking down on a character, or a camera is situated on the ground looking up at a him/her, then the characters' proportions need to be changed to accommodate for the change in perspective. The normal equal measurements for the torso, arms, and legs no longer hold true. Well, actually, they are distorted in such a way that the parts of the body that are farther away from the camera appear smaller than those parts which are closer up. Of course, you probably knew this already.
Take a look at this Evangelion group picture:
 |
Notice how the size of Asuka, Rei and Misato's heads are different, the one closest to the camera being the largest. Now, the parts of the body can be viewed similarly to the three heads: those closer are bigger. I know it's a stretch in thinking, and please tell me if you find a better way to explain it. Think of each part of the body (torso, lower arm, upper arm, wrist, fingers, upper legs, head, lower legs, etc) as a separate "head". Therefore, when subject to perspective, they are transformed similarly to the three EVA girls' heads. The only difference is that you must make sure the body parts look WELL CONNECTED. |
That takes us to this next Evangelion picture, which employs such a technique.
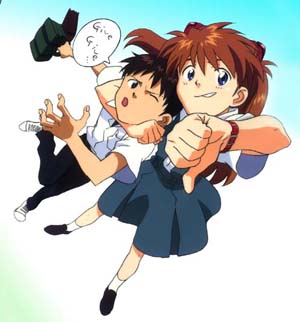 |
Is something wrong with the proportions? Of course they are! They're supposed to be!
Surely, Asuka's fist isn't really as big as her head. We all know that it's just closer to
the camera. And look at Shinji's satchel. It's looks way too small to carry books-- or
even a lunch at that. but when given the scope of the rest of the perspective, we realize
that it really is quite big.
We see that it is basically the case. In reality, Shinji's luggage is big enough to hold an average-size textbook (he's a schoolboy). Take a magazine-- Animerica, TIME, your old Geometry book, whatever. See? the foot is about as long as those reading materials, and therefore, the picture perspective makes sense, because it seems that Shinji's foot will JUST fit into the satchel. |
I am thinking about expanding this section on character scaling. If you would like to see more, please send me your comments or requests. My e-mail address is on the bottom of this page.
All 3-Dimensional objects have a depth, width and height (hence the name "three dimensions"). Make sure you provide THICKNESS for everything you draw in 3-D, or it will look very odd.
Perspective in reality involves a gradual re-sizing of objects at increasing distances. Therefore, an object passing through varying distances away from the camera will be subject to that gradual perspective.
All perspective lines radiate from their singular points. In addition, lines that are in reality parallel with each must all come from one source .
Body parts are always connected to other body parts, and therefore do not float by themselves in front of the camera
Objects at any given distance from the camera will be distance from proportional in size to other objects at the same the camera.
All buildings have a base, so don't taper the bottoms of the buildings to a single point. That's usually bad, and it's a bad habit.
Look, you don't have to get the perspective proportions exactly, but make sure you've scaled around the right size.
If there are any comments, questions or requests for
addition, please feel free to e-mail me at
Mung765@hotmail.com
Back to Top | Back to Anime By Example
Main | My Art | Your Art | Anime by Example | ADIDR | Amp Skins | Gnostic UK | Links | Send Mail
All characters and icons are copyright to their respective
company/author,
and use of these images are intended to be used solely for analysis and
educational purposes, and should not be distributed.
Animex / Anime by Example is the work of Manhattan.