 Welcome! In this handout we will cover
the following topics. I hope to get to most of them in the
evening, but if not, feel free to contact me if the directions
here don't make any sense to you. Contact info is at the
end of the handout.
Welcome! In this handout we will cover
the following topics. I hope to get to most of them in the
evening, but if not, feel free to contact me if the directions
here don't make any sense to you. Contact info is at the
end of the handout.
Welcome! In this handout we will cover
the following topics. I hope to get to most of them in the
evening, but if not, feel free to contact me if the directions
here don't make any sense to you. Contact info is at the
end of the handout.
The time period that the SCA covers (roughly 1000 to 1600, although the formal definition is Pre-seventeenth century [ie, pre 1600] culture) is very, very wide. It would be impossible to give you an accurate overview of everything that you could wear, even if we restricted it to just one country.
The best suggestion, once you start looking at different types of garb, is to go to the library and find a general history of costume, and look at the styles there to see what you like. There are some caveats, however. Many of these compendiums are not particularly careful or reliable with the details of the costume; the costumes pictured are sometimes agglomerations of different elements from similar times, or drawings based on other drawings, which may not be accurate. Use such collections as a general indicator, and be certain to check books with period illustrations before starting construction of a new outfit.
 What is worn:
One of the things that sets the SCA apart from your average neighborhood social club is that we wear funny clothes. In general, SCA "generic" garb is based on what the European peoples wore during the Middle Ages; specifically those items in common use from about 1000 to 1300 or so AD. As people get more experience with the SCA, they tend to branch out or concentrate their interests, but for the purpose of this seminar, we'll cover the "generic" outfit.
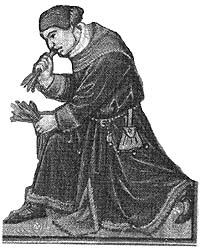
If you've been to an SCA event, you'll notice many people in shirts or tunics that reach to the knee, with long loose sleeves; worn over trousers or hose. Women will wear these with a longer undertunic to the ground, and one shorter tunic over it, or one long garment by itself, and usually with a veil. Both genders tend to wear boots or floppy Chinese shoes; and the garb is often decorated with trim at the neck, hem, sleeve end, and often biceps (over a seam that falls on the upper arm). You'll notice that these generic SCA clothes are very similar to the clothes in the illustration below.
So how do you construct something these garments? There are
two very easy ways to arrive at the basic "T" tunic. (So-called
because when laid flat, the arms and the body form a T shape,
unlike modern fitted clothing, which doesn't tend to have as much
play in the arms.) The various dress accessories are also
relatively easy to construct, so let us begin!
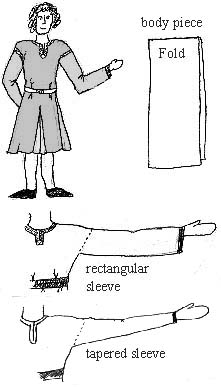 The
first, as illustrated here, is the most economical of fabric. It
is based on rectangles and triangles; very easy to construct. As
it happens, it's also fairly close to the method used in period
for these garments. It is difficult to describe this method in
print, but easy to construct once you know what to do.
Check out this other description of how
to make this tunic, with an automatic measurement calculator.
The
first, as illustrated here, is the most economical of fabric. It
is based on rectangles and triangles; very easy to construct. As
it happens, it's also fairly close to the method used in period
for these garments. It is difficult to describe this method in
print, but easy to construct once you know what to do.
Check out this other description of how
to make this tunic, with an automatic measurement calculator.
For the body of the garment, you will have a rectangle that reaches from your shoulders to the knee (or to the ground, depending what you want.): Take a measurement of yourself at your widest point (chest or hips). Add four inches for comfort. This is the width of your body panel.
Have a friend measure the length for you; if you're doing it yourself, there's a good chance that you'll measure incorrectly as you try to see what the number is. Add extra for a hem, or don't add extra if you plan to finish the hem with bias tape. You can either cut two of these rectangles out of the fabric, or you can cut one long rectangle out of the fabric, so you don't have the shoulder seams. If you're not making shoulder seams, mark the halfway point with a small snippet at the halfway point.
Now we cut out the sleeves, which are also rectangles. Take one end of your body rectangle, and lay it across your shoulders along the top, so you can see where the edge will come over your upper arm. Measure from that point to your wrist, and add seam allowance. This will be the length of your sleeve.
Measure around your upper arm, and take that measurement, plus 2" and seam allowance, for the width of the sleeve.
If you wish to have a tapered arm, also take a measurement around the broadest part of your hand as it would be scrunched for getting through a tight sleeve, not as it lies normally.
Add the same amount of seam allowance, and this will be the measurement for the wrist end of your sleeves.
 Now, the more complex bit: The extra gores (triangles)
that are added to the garment to form the skirt. These usually
are set in starting at the waist, but also can be started higher
on the body if you wish.
Now, the more complex bit: The extra gores (triangles)
that are added to the garment to form the skirt. These usually
are set in starting at the waist, but also can be started higher
on the body if you wish.
Find the point on your body where you wish for the gores to start. Measure from their to your designated hemline, taking into account any extra length added for hem allowance. This measurement becomes the radius or side dimension of the triangles we are going to make to set in.
You will need eight triangles. Two each for each side, and for center front and center back. The bottom edge of the triangles will vary depending on how much fabric you have left, but in general, aiming for a bottom measurement of appx 10" will be sufficient.
One side of the triangle will be on the straight grain of the fabric, and one on the bias. You will need to even out the length along the bias so that your triangles become circle-segments; do this by folding each triangle once or twice and then cutting across evenly, from the shortest side. Lastly, the neck hole must be cut. It is easiest to do this before any other sewing begins.
 "Keyhole" necklines are easy to do, and very
accurate for this type of garment. You can either cut it out and
edge it with bias tape, or you can make a facing for it, sew the
facing on, and then cut it out. I prefer the bias tape method,
because it doesn't allow little bits of facing to stick out at
odd times, and produces a smoother look.
"Keyhole" necklines are easy to do, and very
accurate for this type of garment. You can either cut it out and
edge it with bias tape, or you can make a facing for it, sew the
facing on, and then cut it out. I prefer the bias tape method,
because it doesn't allow little bits of facing to stick out at
odd times, and produces a smoother look.
Although humans vary in the shape of their necks, generally a squashed circle will do very well as a neckline.
The lines in this drawing show the center meridian of the body and the shoulder line in relation to the placement of the neck.
Measure around your neck and fiddle with the squashed circle shape until you have one that looks like it will work for you.
You should also determine the depth of the slit in the front. Take the difference between your neck measurement and your head measurement; divide in half. This is the minimum amount of slit that you will need to get the opening over your head. You may make it longer if you like, of course. Cut it along the grain of the fabric, in front, paying attention to the weave so that the cut is guaranteed to be straight.
Finish the edge however you prefer; bias tape is a good choice. You can either start the bias tape at the center back, or at the bottom of the slit (see the illustration.)
 If you're going to put trim around the
neckline, now, when it is flat, is the easiest time. To fit flat
trim to a round neckline, sometimes it is easiest to gather the
trim with a drawstring at the neck, sew down the gathers on the
inner edge, and sew it flat on the outer edge. Other times, it
looks best to pleat the inner edge to take up the fullness.
If you're going to put trim around the
neckline, now, when it is flat, is the easiest time. To fit flat
trim to a round neckline, sometimes it is easiest to gather the
trim with a drawstring at the neck, sew down the gathers on the
inner edge, and sew it flat on the outer edge. Other times, it
looks best to pleat the inner edge to take up the fullness.
Now that the neck is done, sew the sleeves to the body. If you're going to put trim over this seam, now is the easiest time to do so -- when it's laid out flat. Likewise, putting trim on the sleeve cuffs is easiest at this time.
Next sew the gores to the body, as shown, with the bias edge matched to the straight grain of the body. See the picture; you'll have two gores on each side of the body pieces.
The next step is a little complex, but worth it. Cut a slit up the middle front and middle back of the body pieces, from the hem to the same height as the other gores. This is where you will insert the remaining gores. Sew them in, like the ones on the sides, with the bias edge of the gore against the straight grain of the slit.
You're almost done. Now all you need to do is sew the gores together along their bias edges, front, back, and sides, and sew the underside of the sleeve, and the upper body seam.
You're done! Now all you need to do is hem it and trim any of
it that you wish to! (remember that it is easiest to trim neck
and arm seams before you sew the side seams.)


If you have a great deal of fabric, there is a very quick way of
making a tunic, which is to simply draw the outline on the fabric
as shown, using a shirt that is comfortable, over fabric that is
folded twice to produce both front, back and sides from one
cutting. The neckline can be made in the same way that is
described above. Be certain that the fullness at the sides of the
body is rounded so that it does not hang down unevenly.
You can insert gores in the center front and center back to
more closely approximate the period method described above.
This will make the skirts hang much better.
The variety of different patterns used during the Middle Ages
is amazing. Diamonds (lozenges), circles, squares, rectangles,
elaborate birds and beasts. Generally, if you are using
commercial trim, anything that doesn't look too modern will work
very well. Stay away from things that are obviously made with
mylar (gold and silver strips), pearls or pearlized colors, or
depictions of critters or flowers that look too realistic. Within
those parameters, though, there are a great many trims on the
market, including basic grosgrain type ribbon, that will do fine.
If you're really inspired, you can do embroidery or beadwork!
Buttons (shank type) are also known throughout our period for
fastening and decoration.
Not only linen, and wool were available; fine silks were also available at times and places in our period. (Fine silks are those without slubs and with very small fibers; they are lustrous and thin. Silk noil would not have been used in period, but its nubbliness makes it resemble wool, or poorer cloth, and it breathes well.)
Many people find cotton to be an economical choice, but be
advised that you'll be happier in pure cotton than in polyester-cotton
blends. The weaves used, even early in our period are often quite
complex. One of the most popular for the upper classes was a
diamond-patterned twill; the pattern of the weave makes diamond
shapes, somewhat like a squashed grid, in the fabric. In general,
a woven geometric pattern that is symmetrical will look
believable. Colors varied greatly, so you don't have to worry too
much about that for your first few outfits. Much later in period,
colors became more codified, but for the most part, that doesn't
happen until the late Renaissance. Wear the colors that you want
to, and avoid florescent hues unless you're very certain you know
what they used!
 Once you've
got your tunic done, the next most useful thing to own is some
kind of headwear. Not only does it protect your head from the sun
or the cold, but it keeps off random tourney dust and helps avoid
tangles.
Once you've
got your tunic done, the next most useful thing to own is some
kind of headwear. Not only does it protect your head from the sun
or the cold, but it keeps off random tourney dust and helps avoid
tangles.
Men often wore the close fitting cap pictured, or a hood. Women wore both of these as well. In some cases, they would have more constructed hats (felted wool, etc.) with brims, but these two will serve you well until you decide what sort of hat you prefer. Only vary rarely would anyone be seen without some sort of hat.
See the other handouts on hood construction or close caps if you want more detail. The close fitting cap is easily made out of a folded piece of fabric which has been sewn with a curve across the back, as shown, and ties attached to the ends to fasten under the chin. It is going to wrinkle along the upper seam; my understanding is that the 3-piece caps were only very late in period, but they solve this characteristic.
Often these were white, but I have seen illustrations of this in both green and red; there may have been other colors in use.
 Women's veils were ovals or circles of white
cloth (usually linen) held on with bands of the same fabric. I
have not yet seen any other color than white used as a veil in
the illustrations for this time period, although many people like
to have different colored veils. Use opaque lightweight fabric; a
good cotton if you don't have a source for white linen. Opaque
fine silk would work well also.
Women's veils were ovals or circles of white
cloth (usually linen) held on with bands of the same fabric. I
have not yet seen any other color than white used as a veil in
the illustrations for this time period, although many people like
to have different colored veils. Use opaque lightweight fabric; a
good cotton if you don't have a source for white linen. Opaque
fine silk would work well also.
 Later in period there are apparently records
of veils with dyed bands of color along the margins, but I do not
have a good source for that either. It does produce an
interesting effect, as does beading the edge, another common
modern variant.
Later in period there are apparently records
of veils with dyed bands of color along the margins, but I do not
have a good source for that either. It does produce an
interesting effect, as does beading the edge, another common
modern variant.
Sometimes veils were square and used as a shawl over the tops of the shoulders, but for ease of wear until you are used to them, I recommend the oval.
The bands that hold the veil on are thin strips, about 1" wide, and about a foot and a half long, depending on your head size.
Fasten the first one with a straight pin under your chin and passing over the top of your head, just forward of your ears, and not over the highest part of the back of your head. This one will resist the downward and backward weight of the veil itself.
Pin the next one across your forehead, circling your head parallel to the ground. Fasten it also to the chin band where they cross.
Now you have a secure base for your veil, which will ensure
that it does not fly off in the wind, or as you do things. The
veil is then pinned to the bands at the center front, center top,
and the sides where it lies over the crossed bands over your ears.
If you have the time, many people like to make pleats in the veil
at the temple, to provide a little ruffling/fullness effect.
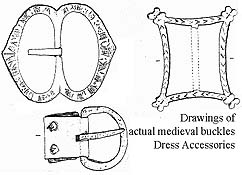
 Belts
during this time period are not particularly complex. For the
most part, a belt a few inches longer than your waist, with a
simple buckle, will do just fine, especially for men. Such a belt
would not have a "keeper" -- that little circle of
leather meant to keep the extra belt length smooth along the belt
on your body. The picture is from the book Dress
Accessories and shows a belt fragment, still in a knot, with
buckle and all.
Belts
during this time period are not particularly complex. For the
most part, a belt a few inches longer than your waist, with a
simple buckle, will do just fine, especially for men. Such a belt
would not have a "keeper" -- that little circle of
leather meant to keep the extra belt length smooth along the belt
on your body. The picture is from the book Dress
Accessories and shows a belt fragment, still in a knot, with
buckle and all.
Many people in the SCA wear belts that have a long tongue hanging down from the belt at the buckle. I haven't found a good illustration of this style in the early period, but if you want to wear this style, make sure that you 1: use a belt with a real buckle, and then loop the extra "behind" the buckle area so it will hang straight, and 2: don't wear a belt whose tongue hangs below the hem of your tunic.
You can buy such belts in almost any menswear department, out of many substances that resemble leather. If you want one that hangs down, shop in the Large Men's or Large Women's departments or stores; they sell sizes that will give you more than enough length for the fashion statement that you want. You may have to punch extra holes in these, though.
Making such a belt is easy, if you don't want to shop for one. Go to the fabric store and buy the appropriate length of "Belt Interfacing" which is a plastic product meant to be the guts of a fabric belt. Buy a suitable buckle, fabric to cover it (black heavy cotton is good) and a few "brass drapery rings," which can be bought from a good fabric or upholstery store. They are about 1/2" across, and solid -- no butted or overlapped ends.
 Sew the fabric into a tube that is 1/4"
larger than the interfacing, and about 3" longer than the
interfacing. Turn this inside out, so the seam doesn't show.
Insert the belt facing into the tube, leaving about 1" of
extra fabric at the non-buckle end. Fiddle with the tube so
that the seam runs along the "inside" of the belt
facing, where it won't show when you're wearing the belt.
Sew the fabric into a tube that is 1/4"
larger than the interfacing, and about 3" longer than the
interfacing. Turn this inside out, so the seam doesn't show.
Insert the belt facing into the tube, leaving about 1" of
extra fabric at the non-buckle end. Fiddle with the tube so
that the seam runs along the "inside" of the belt
facing, where it won't show when you're wearing the belt.
Starting at the non-buckle end, roll the belt up very loosely; about the size of your waist, maybe a bit smaller. When you get to the end that the buckle will be attached to, put a pin through both the belt fabric and the interfacing, and let it unroll. This will allow a little ease in the belt for stretching of the plasic, and for the effects of converting a straight bit of plastic to a belt that encircles something. Sew the buckle to the belt, making sure to go through the plastic a few times in the process. Any bad stitching will be hidden by the rest of the belt; don't worry here. Don't forget to cut a little hole for the buckle bit itself.
Put the belt on. Figure out where the best spot would be for the hole you will use most often; make a mark there. Also add two more marks on either side, about an inch apart, for variations in clothing thickness.
Using a leather needle, take one of the brass drapery rings, and sew it securely to the belt, going through both the plastic and the layers of fabric. This will ensure that your belt will not tear under heavy use (it is plastic, after all.) Either sew these to the underside, or to the top; but if you sew the rings to the top, be prepared to cover any shiny bits with more sewing thread.
Now cut (with an exacto knife or hole punch) the holes inside of the reinforcement, and make sure that the tail end of the belt looks good. You're done!
 The other thing that is very, very useful for
SCA garb is a belt pouch. Although carrying stuff around with
oneself didn't become particularly important until life became
more complex in the 1400s, we here in the modern world need
something to carry our authorization cards, driver's license, car
keys, etc. The belt pouch is one of the useful semi-period
things to accomplish this. (Semi-period means that we have
lots of examples of pouches, but no certainty that they might
have been actually worn, as opposed to being used for storage
containers, etc.)
The other thing that is very, very useful for
SCA garb is a belt pouch. Although carrying stuff around with
oneself didn't become particularly important until life became
more complex in the 1400s, we here in the modern world need
something to carry our authorization cards, driver's license, car
keys, etc. The belt pouch is one of the useful semi-period
things to accomplish this. (Semi-period means that we have
lots of examples of pouches, but no certainty that they might
have been actually worn, as opposed to being used for storage
containers, etc.)
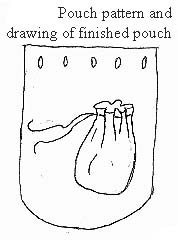
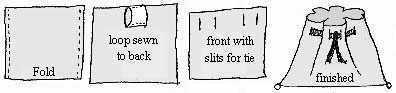
The basic belt pouch can be made out of leather or fabric. Both versions work easiest using a simple U shape of material, sewn along the bottom and edges, and with a drawstring at the top. If you are inclined to get fancy, you can line it or decorate it.
A later version was certainly worn and is also easy to make.
Take a rectangle of material (I suggest about 7x14"); fold
it and sew up the sides. Finish the top edge if necessary.

In the center back, sew a finished loop of material to make a belt loop -- finished dimensions of the loop should be about 2" wide by a little longer than twice the width of your belt. Sew it to the pouch firmly at the bottom of the loop and also at the top edge of the pouch.
Sew or cut a flat strip of material that is twice the width of
the pouch, plus a little extra. (If you're using fabric,
you can do this as a tube.) Cut slits in the pouch to take this
drawstring; four on the front and four on the back. Be
symmetrical with this (same placement front and back.) Finish the
holes as you see best; (Fray Check is one option; buttonholes
another) and thread the drawstring through the holes. If
you pull the drawstring up slowly, it will gather in a pleated
manner that looks really cool, and very much like the picture
here.
There are a few very easy things you can do with your clothing and self that will make you look more medieval. Here are a few suggestions:
Feel free to contact me if there is something that isn't clear
in this handout, or if you have a question. I can be found
at the email form below, or via anyone in Crosston; I'm Lady
Cynthia du Pre Argent, currently Seneschale of the Shire.

There are so many books and people resources that I've learned
from in my time in the SCA that it would be difficult to list all
of them. Or even any of them, since I'm finishing this
handout at work! So if you'd like help finding other
sources, contact me and I'll work up a proper bibliography list.
The good drawings of belt buckles and pins are from Dress
Accessories: Medieval Finds from Excavations in London.
| All material (c) 1999 Cynthia Virtue | Email Author with comments |