ARC/INFO SELF-DEMO
Quick Reference Page| System Practice|
Arc/Info Self-Demo - UNIX| AML Self Demo|
Modeling Self Demo| TIN Self Demo
Quick Reference Page
DON'T TYPE ANYTHING ON THE TERMINAL YET. Simply review this information
relative to the diagram.
System Keywords - UNIX
Your Prompt>    System Prompt
cd              Change Directory

                 ______
                | trng |
                |______|
         __________|___________
     ___|___     __|___     ___|___
    | ahmed |   | zane |   | chris |
    |_______|   |______|   |_______|
             ______|________
         ___|___         ___|___
        | class |       | notes |
        |_______|       |_______|

        Diagram 1:  Example system tree
Examples:
        cd              cd by itself puts you in your home directory (zane)
        cd class        zane to class
        cd ..           class to zane
        cd /            zane to trng ( / is root )
        cd zane/notes   trng to notes
        cd /trng/ahmed  to another user
        cd ~chris       to another user
        cd              home again

mkdir <dir>     Make Directory
ls              List Directory
ls | more       List Directory Page by Page (vertical "pipe" preceeds 'more')
rm              Remove File
rm -r <dir>     Remove a Directory
vi {file}       System Editor (Create/Edit a File)
more <file>     Display a Datafile Page by Page
pwd             Show Current Pathname
mv <from_file> <to_file>        Rename a Datafile
cp <from_file> <to_file>        Copy a Datafile
System Practice
Login (To get started, you may need help from your System Administrator)
- open your UNIX 'window'
(Note: What you see in bold is what you type, followed by <return>
or <enter>)
login: <yourlogin>
password: <yourpassword>
(Note: System prompts are site dependent; for simplicity, we will use
'Your Prompt' in this self demo)
Your Prompt> ls
Your Prompt> mkdir test1 (You're creating a directory)
Your Prompt> ls
Your Prompt> mkdir test2
Your Prompt> ls
Your Prompt> cd test1 (You're changing to the test1 directory)
Your Prompt> ls (See, it's empty)
Your Prompt> cd .. (You're changing directories - back up)
Your Prompt> ls
Your Prompt> rm -r test1 (You're removing the test1 directory)
Your Prompt> ls (See, it's gone)
Your Prompt> rm -r test2
Logout
- Your Prompt> exit
Note: The comments after the inputs above help you to THINK about
the purpose. As you work this self-demo, CONTINUE to LOOK
and THINK, especially when there are no comments.
Arc/Info Self-Demo - UNIX
- login: <yourlogin>
password: <yourpassword>
Your Prompt> ls
Your Prompt> arc (entering the Arc software)
Arc: clean (see the arguements for a command)
Arc: q
We will now begin by automating a simple map. We will use the system
editor to type in coordinates:
- Your Prompt> vi ludat (vi is the system editor; you'e entering
it to create file 'ludat')
i (DO NOT HIT RETURN) (will put you in input mode; no screen
change will be visible)
(Type the coordinates below EXACTLY as listed WITH NO SPACES;
do not type the ID: or X,Y: prompts)
- 101 <r>
1,.9 <r>
1,6.1 <r>
end <r>
102 <r>
.9,1 <r>
(enter coordinate data) (If you notice an error here, you may press
<escape> to take you out of input mode - then press "d"
twice to clear the line - then press "o" to place the cursor
on the next line down)
end <r>
end <esc>
<shift>:
wq <r> (Write file and save it, then Quit)
Your Prompt>
(Note: If you make a mistake, finish, then type <shift>:
to go to line mode. Then type the number of the line you want to fix (such
as 10 <r>). Next use the 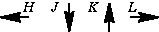
keys to move cursor to the number/letter of the mistake, then hit 'r'
for replace (do NOT hit <r>), and then type corect data. Continue
the 'H J K L'/r/ 'fix' sequence until the file is edited.
Now type :wq to exit. A 'Quick Reference' for the vi editor is attached
as an appendix to this self-demo for use as necessary.
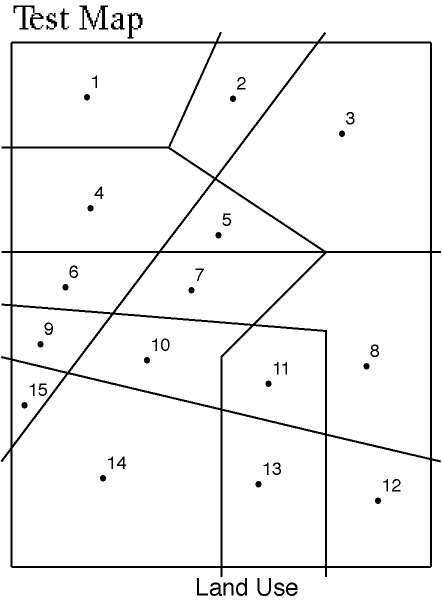
        ID:  101                        ID:  106
        XY:  1,.9                       XY:  .9,5
        XY:  1,6.1                      XY:  2.6,5
        XY:  end                        XY:  end

        ID:  102                        ID:  107
        XY:  .9,1                       XY:  .9,4
        XY:  5.1,1                      XY:  5.1,4
        XY:  end                        XY:  end

        ID:  103                        ID:  108
        XY:  5,.9                       XY:  .9,3
        XY:  5,6.1                      XY:  5.1,2
        XY:  end                        XY:  end

        ID:  104                        ID:  109
        XY:  5.1,6                      XY:  .9,2
        XY:  .9,6                       XY:  4,6.1
        XY:  end                        XY:  end

        ID:  105                        ID:  110
        XY:  3,6.1                      XY:  4,.9
        XY:  2.5,5                      XY:  4,3.25
        XY:  4,4                        XY:  .9,3.5
        XY:  3,3                        XY:  end
        XY:  3,.9
        XY:  end                        XY:  end
- Your Prompt> ls (notice the ludat exists)
Your Prompt> more ludat (Press <r> a few times,
then the space bar to reach your prompt>)
Your Prompt> arc
We will now use the GENERATE command to read the system file
of coordinates and turn them into a coverage (i.e. an automated
map)
- Arc: ls
Arc: generate <r> (note the arguement you will
use)
Arc: generate lugn01
Generate: input ludat
Generate: lines
Generate: quit
Arc: ls (note there are more 'things' in your workspace)
We will now use the ARCEDIT sub-system to add labels to each polygon
feature.
- Arc: arcedit
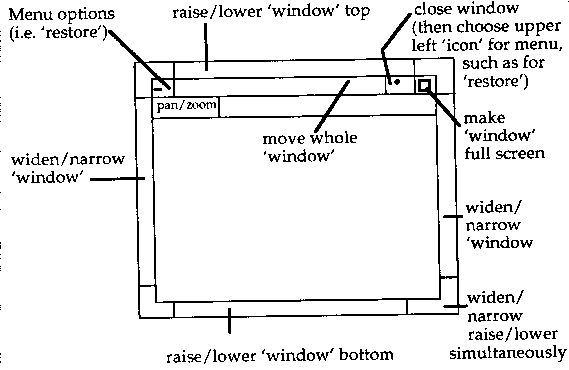
Arcedit: display 9999 (note: if necessary, use diagram below
to adjust your 'window' for simultanious viewing. Use 'fat' bar at top
to move window, use 'thin' bars around window to change window SIZE. REMEMBER
MOVE THE POINTER TO THE WINDOW YOU WISH TO USE.)
Arcedit: editc lugn01
Arcedit: drawenv arc tic label ids
Arcedit: draw (note the overshoots along the edges - we will
eliminate later)
Arcedit: editfeature labels
Arcedit: add
(use crosshair to add the polygon labels in the exact sequence
shown on the map. Find the center of each & press '1' (numbers automatically
increment). Continue in sequence until each polygon has a mark; then press
9 to quit and move cursor/pointer to window with Arcedit prompt.)
Arcedit: draw
Arcedit: save
Arcedit: quit
Arc: quit
Your Prompt>
We will now enter the coverage directory to list the files composing
it (note the tic file - the file of 'regestration' points).
- Your Prompt> cd lugn01
Your Prompt> ls (note the files that comprise your coverage,
write them down here for future reference)
Your Prompt> cd ..
Your Prompt> ls
Your Prompt> arc
We will now enter the INFO sub-system to list the tic file of
'registration' points.
- Arc: INFO (use CAPITOLS when in INFO!)
Enter User Name: ARC
Enter Command: DIR
Enter Command: SEL LUGN01.TIC
Enter Command: LIST (the TIC registration coordinates were automatically
generated at the corners of your map and listed in coverage units)
Enter Command: DIR
Enter Command: QUIT
Enter User Name: STOP (now go back to lower case)
Remember INFO is case-sensitive!!
We will now create topology with the CLEAN command (CLEAN also
does some automatic edits).
- Arc: clean (note the arguements you are going to use)
Arc: clean lugn01 lucn02 .25 (the .25 is a 'tolerance' in map units
that will eliminate overshoots shorter than .25 map units along the edges)
Arc: quit
Your Prompt> cd lugn02
Your Prompt> ls (compare this list of files with those you
wrote down a minute ago)
Notice there are some new files, such as the pat (the Polygon
Attribute Table).
- Your Prompt> cd ..
Your Prompt> ls
Your Prompt> arc
We will now enter INFO and list the Polygon Attribute
Table (pat) (remember to use capitals).
- Arc: INFO
Enter User Name: ARC
Enter Command: DIR (notice there are more files)
Enter Command: SEL LUCN02.PAT
Enter Command: LIST (note that the ID is named LUCN02-ID,
adjust the window if necessary)
Enter Command: ITEMS (note that the storage parameters for the ID's
are internally defined 4,5,B; this is important for compatibility when
relating new files you will soon create)
Enter Command: Q
Enter User Name: STOP (now return to lower case)
Arc: arcplot
Arcplot: display 9999
Arcplot: mapextent lucn02 (move pointer to dialog window if
necessary)
Arcplot: arcs lucn02 (notice the overshoots are gone)
Arcplot: labels lucn02
Arcplot: q
Arc:
We will now use the system editor to create a code file (an attribute
table) to better describe each feature by assigning a true code. For instance,
here polygon 1 has a land use code of 8060. Later we'll see that 8060 represents
'Commercial Neighborhood'. Such coding descriptions are typically published
in a DATA DICTIONARY relative to a given database - we'll identify text
labels later.
- Arc: vi lufil (remember: vi is the system editor; you'e entering
it to create file lufil)
i (DO NOT HIT RETURN) (go to 'input' mode)
(now enter the following codes)
1,8060 <r>
2,8010 <r>
3,8090 <r>
4,8090 <r>
5,8080 <r>
6,8170 <r>
7,8170 <r>
8,8170 <r>
9,8130 <r>
10,8020 <r>
11,8090 <r>
12,8170 <r>
13,8070 <r>
14,8170 <r>
15,8020 <r>
<shift>:
wq <r>
(if you make a mistake, please refer to the instructions before for
editing procedures)
- Arc: ls (notice that lufil now exists)
Arc: more lufil
Arc: show workspace (write down the full pathname which is the
responce to this input EXACTLY as shown)
We will now enter INFO, create a heading template for the code file
created in the system editor, and read the code file (lufil) in:
- Arc: INFO (remember: UPPER CASE)
Enter User Name: ARC
Enter Command: DIR (press <r> or N to continue)
Enter Command: SEL LUCN02.PAT
Enter Command: LI
Enter Command: IT (notice that LUCN02-ID is defined 4,5,B)
Enter Command: DEFINE LUCN02.CODE
- Item Name: LUCN02-ID
Item Width: 4
Item Output Width: 5
Item Type: B
Item Name: LU-CODE
Item Width: 4
Item Output Width: 4
Item Type: I
Item Name: <r>
Enter Command: LIST
Enter Command: ADD FROM <pathname you wrote/LUFIL
Enter Command: LIST (notice the datafile is now populated)
We will now temporarily relate the two LUCN02.PAT and LUCN02.CODE files.
- Enter Command: SEL LUCN02.PAT
Enter Command: LIST (notice the LUCN02-ID item in both datafiles)
Enter Command: RELATE LUCN02.CODE 1 by LUCN02-ID
Enter Command: LIST AREA, LUCN02-ID, $1LUCN02-ID, $1LU-CODE
(note the $1 identifies items to draw from related datafile1 - LUCN02.CODE)
(notice the datafile is empty)
Enter Command: Q
Enter User Name: STOP
We will now physically join the two LUCN02.PAT and LUCN02.CODE files.
(Remember to go to lower case)
- Arc: joinitem <r> (note the arguements)
Arc: joinitem lucn02.pat lucn02.code lucn02.pat lucn02-id lucn02-id
Arc: ls
Arc: kill lugn01 <-This removes an unnecessary coverage (housecleaning)
Arc: listcoverage (see - its gone)
Arc: INFO
Enter User Name: ARC
Enter Command: DIR (notice that lugn01... is no longer there)
Enter Command: SEL LUCN02.PAT
Enter Command: IT
We will now createa symbol table to better display our coverage with
labels and/or shadings/symbols. We can control symbols to sometimes represent
colors. When doing so, the following colors are available (may be terminal
dependent):
        1 is White               6 is Magenta           11 is Blue
        2 is Red                 7 is Yellow            12 is Purple
        3 is Green               8 is Orange            13 is Pink
        4 is Blue (Dark)         9 is Green (Dark)      14 is Gray (Dark)
        5 is Blue (Light)       10 is Green (Light)     15 is Gray (Light)
- Enter Command: DEFINE SYMTAB.LU
- Item Name: LU-CODE
Item Width: 4
Item Output Width: 4
Item Type: I
Item Name: LABEL,20,20,C
Item Name: LABELMINOR,20,20,C
Item Name: SYMBOL,4,5,B
Item Name: <r>
Enter Command: IT
Enter Command: ADD
- LU-CODE> 8010
LABEL> URBAN
LABELMINOR> SINGLE-FAMILY
SYMBOL> 2
LU-CODE> 8020,URBAN,MULTI-FAMILY,9 (notice you can enter
all items for a record)
LU-CODE> 8060,COMMERCIAL,NEIGHBORHOOD,3
LU-CODE> 8070,COMMERCIAL,REGIONAL,7
LU-CODE> 8080,COMMERCIAL,TOURIST,6
LU-CODE> 8090,INDUSTRIAL,LIGHT,8
LU-CODE> 8130,WATER,UTILITY,4
LU-CODE> 8170,TRANSPORTATION,ROAD_R.O.W.,5
LU-CODE> <r>
Enter Command: LI
Enter Command: Q
Enter User Name: STOP (go back to lower case)
We will now practice displaying our coverage:
- Arc: arcplot
Arcplot: display 9999 (move arcplot window, may need to move
pointer to dialog window)
Arcplot: mapextent lucn02
Arcplot: arcs lucn02
Arcplot: labels lucn02
Arcplot: clear
Arcplot: arcs lucn02
Arcplot: labeltext <r> (note the arguements)
Arcplot: labeltext lucn02 lu-code symtab.lu
Arcplot: clear
Arcplot: linecolor 7
Arcplot: arcs lucn02
Arcplot: overarea 5 5(5" x 5" area)
Arcplot: overflowposition *
(Note: Use cursor to locate 'Overflow' labels at upper right of map
when located use cursor or any key but <r> to invoke).
(point to dialog window)
Arcplot: oversep .4 .2
Arcplot: polygontext <r> (note the arguements)
Arcplot: polygontext lucn02 lu-code symtab.lu
Arcplot: clear
Arcplot: polygontext <r>
Arcplot: polygontext lucn02 lu-code symtab.lu (note the default
pen drawn shadings)
Arcplot: clear
Arcplot: symbolset color
Arcplot: &set ps polygonshades (for efficiency, we can 'set'
aliases) (This is AML!)
Arcplot: %ps% <r>
Arcplot: %ps% lucn02 lu-code symtab.lu (note the terminal dependent
'solid fill' shadings)
A map legend requires a system file listing the colors used in the previously
created symbol table (above) and the legend text per color (prefix each
color number with a period).
- Arcplot: q
Create the system file: (use either upper or lower case)
- (Relate the .2, .9, .3 ... etc. numbers here to the 2, 9, 3, ... symbol
numbers above)
Arc: vi lu.legend
i (DO NOT HIT RETURN)
.2
Urban - SFR
.9
Urban - MFR
.3
Com-Neighborhood
.7
Com-Regional
.6
Com-Tourist
.8
Industrial
.4
Water-Util
.5
Road R.O.W. <esc>
<shift>:
wq
Arc: ls
Legend files consist of pairs of lines: The first line (and subsequent
odd-numbered lines) define the symbol and are preceded by a period. The
second line (and subsequent even-numbered lines) give a text description
for the preceding symbol.
We will now display the map WITH a legend:
- Arc: ap ('short form' for arcplot)
(choose 'console' window)
Arcplot: display 9999 (you may need to again choose 'console' window)
Arcplot: mape lucn02 ('short form' for mapextent)
Arcplot: symbolset color
Arcplot: polygonsh lucn02 lu-code symtab.lu (if you haven't
left Arc, %ps% will work)
Arcplot: keypos * (locate the legend where you wish, possibly upper
right) (press any key except <r>; then choose 'console' window)
Arcplot: keysep .4 .2 (text seperation from legend color boxes and
color box seperation)
Arcplot: keybox .2 .2 (size of color box)
Arcplot: keyshade lu.legend (for lines, use 'keyline'; for points,
use 'keymarker')
Arcplot: move * (locate a place above the legend and just to the
right of the map for a map title - use mouse or press any key except <r>,
then choose 'console' window)
Arcplot: textsize .2
Arcplot: textcolor 7
Arcplot: textfont 7
Arcplot: text 'This is my map'
Arcplot: q
CONGRATULATIONS! You've just made your first complete computer map!
(except for north arrow & scale bar, of course!)
We will now create a 'bogus' line coverage and use various symbols to
display each line.
- Arc: build lucn02 line
Arc: INFO
Enter User Name: ARC
Enter Command: DIR
Enter Command: SEL LUCN02.AAT
Enter Command: IT
Enter Command: LI
Enter Command: Q STOP
Arc: arcplot (move the window if necessary)
Arcplot: display <term#> (may be unnecessary)
Arcplot: mape lucn02 (may need to choose 'console' window)
Arcplot: arclines <r> (note the arguments)
Arcplot: arclines lucn02 lucn02# (notice we're using the unique
internal sequence number as the 'symbol' item; hense the many symbols)
We can do the same for polygon 'point' locations:
- Arcplot: arclines lucn02 lucn02# (note the different symbols)
Arcplot: q
The above use of 'arclines' and 'labelmarkers' was simply to demonstrate
that different symbolization capabilities exist (along with polygon shading).
You are now going to preform some minor analyses. We'll start
by creating a small 'stream' line coverage directly in GENERATE
(versus reading in a system file).
- Arc: generate stream
Generate: lines
ID: 201
XY: 2,1
XY: 5,3
XY: end
ID: 202
XY: 4,2
XY: 2,6
XY: end
XY: end
Generate: q
Arc: ls (notice the 'stream' coverage exists)
Now we'll take a quick look at the 'stream' coverage.
- Arc: arcplot
Arcplot: display <term#> (you may need to choose
'console' window)
Arcplot: mape stream
Arcplot: arcs stream
Arcplot: q
Now we'll create 'line' topology.
- Arc: clean stream # .25 # line (note: the # replaces arguments
you do not wish to use)
Arc: build stream line (Note: this is an unnecessary step - it does
the same thing as CLEAN, minus the edits; CLEAN, in fact, runs BUILD)
Now we'll put a BUFFER sphere of influence around the streams:
- Arc: buffer <r>
Arc: buffer stream strmbuff # # .5
(Note 1: Again, the # replaces the arguments you do not wish to use)
(Note 2: .5 is a half inch buffer; coverage is still measured in
inches - it has not been TRANSFORMed) (Questions?)
Now we'll take a quick look:
- Arc: arcplot
Arcplot: display 9999
Arcplot: mape strmbuff
Arcplot: arcs stream
Arcplot: linecolor 2
Arcplot: arcs strmbuff (Note the rounded ends)
Arcplot: q
Arc: rename lucn02 landuse
Arc: ls
Arc: lc (short for 'listcoverages') (Only coverages in the workspace
are shown)
Now we'll physically overlay and combine the 'landuse' and 'strmbuff'
coverages with IDENTITY:
- Arc: identity <r> (note the arguements)
Arc: identity landuse strmbuff lustrbuf
Again, we'll take a look.
- Arc: arcplot
Arcplot: display 9999 (need to choose 'console' window; remember,
the software remembers display device IF you have NOT left Arc.)
Arcplot: mape strmbuff landuse (Note: You're listing two coverages)
(The extent of the map will be the min/max coords. that completely encloses
the features of both coverages.)
Arcplot: arcs landuse
Arcplot: linecolor 2
Arcplot: arcs strmbuff
Arcplot: clear
Arcplot: arcs lustrbuf (Note: IDENTIFY removed the rounded ends)
Arcplot: clear
Arcplot: list
Arcplot: list landuse.pat info (Note: ARCPLOT lets you list
attribute files from INFO)
Arcplot: list strmbuff.pat info
Arcplot: list lustrbuf.pat info
(Note that 'lu-code' AND 'inside' [the Buffer code item] both exist
on this attribute table; Answer 'no' to the 'Continue?' prompt when ready
to stop)
Arcplot: map strmmap (You're creating a MAP COMPOSITION;
it's RE-USEABLE!
Arcplot: symbolset plotter
Arcplot: polygonsh landuse lu-code symtab.lu
Arcplot: shadesym 2
Arcplot: polygonshade strmbuff strmbuff-id
Arcplot: map end
Arcplot: display 1040 (THIS TURNS A MAP COMPOSITION INTO A PLOT
FILE)
Enter Graphics Filename: stmapplt
Arcplot: plot strmmap
Arcplot: display 9999
Arcplot: mape strmbuff landuse
Arcplot: map strmmap
Arcplot: q
Arc: draw stmapplt 9999 (choose the 'console' window and hit
<r> to continue)
Arc: q
Your Prompt>
AML Self Demo
Instead of using ARCPLOT repetitively, you may now use the ARC MACRO
LANGUAGE (AML), to create a simple menu MACRO and a simple command macro,
both of which will let you display any coverage in the same way.
MENU MACRO
Use your system editor to type in the following AML statements. Save
it as picture.aml.
- Your Prompt> vi picture.aml
i
&type entering arcplot
arcplot
&s cover [response 'Please enter cover name']
(Note: type this whole line including the information in brackets)
&s term [response 'Please enter terminal type']
&terminal %term%
disp %term%
mapextent %cover%
arcs %cover%
labels %cover%
&pause
q
&return <esc>
<shift>:
wq
Now, enter Arc
- Your Prompt> arc
Arc: &run picture
(Answer questions to view the landuse coverage you created, -i.e.,
landuse, 9999; then choose 'console' window and hit return)
COMMAND MACRO
Use your system editor to type in the following statements. Save it
as picture2.aml
- Your Prompt> vi picture2.aml
i
&args term cover
&type Entering Arcplot
arcplot
&term %term%
&display %term%
mapextent %cover%
arcs %cover%
labels %cover%
&pause
q
&return <esc>
<shift>:
wq
Now, to view coverage:
- Arc: &run picture2 <term> <cover>
(i.e., &r picture2 9999 landuse)
Modeling Self Demo
Often, you will need to create a coverage 'abstraction' (i.e. a map
of data that doesn't directly exist, such as combining soil types, slope,
vegetation, and hydrology into erosion potential). For this, you will 'model'
the new data.
The following exercise shows you some of the simple mechanics
of this process.
- Arc: additem lustrbuf.pat lustrbuf.pat model 5 5 i
Arc: INFO
- Enter User Name: ARC
Enter Command: SEL LUSTRBUF.PAT
Enter Command: IT
Enter Command: LIST LU-CODE, INSIDE, MODEL
(Note: We will do a model that will identify urban areas within the
stream sphere of influence [buffer]; we will locate all polygons with a
'lu-code' of 80xx AND an 'inside' code of 100 - refer back for lu-code
meaning).
Enter Command: PROGRAM LUMODEL
- 10000 PROGRAM SECTION ONE
(Odd numbered sections implement each command on all records in the
file)
> SEL LUSTRBUF.PAT
> RESEL LUSTRBUF# > 1 (Polygon #1 is the 'Universe' polygon)
> PROGRAM SECTION TWO (Even numbered sections implement all commands
on each record in the file)
> IF LU-CODE > 8000 AND LU-CODE < 8100
> CALC MODEL = 50
> ENDIF (each IF requires an ENDIF)
> IF INSIDE = 100 (The BUFFER command created an attribute field
called INSIDE and added a code of 100 for every polygon representing a
feature 'buffer').
> CALC MODEL = MODEL + 50
> ENDIF
> PROGRAM SECTION THREE
> LIST LU-CODE, INSIDE, MODEL
> PROGRAM END
> <r>
Enter Command: COMPILE LUMODEL
(Note: If there are errors, use the CHANGE command in INFO to correct
the program).
Enter Command: RUN LUMODEL
(Note: All the polygons with 100 in the 'model' item are what we want).
Enter Command: SEL LUSTRBUF.PAT
Enter Command: LI MODEL
Enter Command: Q STOP
Now, we'll display the model.
- Arc: arcplot
Arcplot: disp 9999
Arcplot: mape lustrbuf
Arcplot: arcs lustrbuf
Arcplot: resel <r>
Arcplot: resel lustrbuf poly model = 100
Arcplot: polygonshades lustrbuf 2 (If specific polygons have
been 'reselect'ed, polygonshades displays only the subset).
Arcplot: q
Arc: q
TIN Self Demo
If your site has the TIN System
TIN is ESRI's 'Triangulation' oriented surface modeling and display
software. This simple exercise has the student create the default INFO
'Item' (Spot) where the surface code (here eleveation) is stored. It then
displays is as a 3-D VIEW and lays (drapes) a coverage down on top of it.
- Arc: arcedit
Arcedit: disp 9999
Arcedit: createcov elevpts lustrbuf
Arcedit: editf labels
Arcedit: get <r>
Arcedit: get lustrbuf
Arcedit: save
Arcedit: quit
Arc: build elevpts point
Arc: additem
Arc: additem elevpts.pat elevpts.pat lustrbuf-ID 4 5 b
Arc: additem elevpts.pat elevpts.pat lu-code 4 4 i
Arc: additem elevpts.pat elevpts.pat spot 4 12 f 3
Arc: INFO
- Enter User Name: ARC
Enter Command: DIR
Enter Command: SEL ELEVPTS.PAT
Enter Command: ITEMS
Enter Command: CALC LUSTRBUF-ID = ELEVPTS-ID
Enter Command: RELATE LUSTRBUF.PAT 1 BY LUSTRBUF-ID
Enter Command: CALC LU-CODE = $1LU-CODE
Enter Command: LI LU-CODE,SPOT
Enter Command: CALC SPOT = LU-CODE - 8000 (This creates a fake
code representing 'Elevation')
Enter Command: CALC SPOT = SPOT / 300
Enter Command: LI LU-CODE,SPOT
Enter Command: Q STOP
Arc: createtin <r> (Notice the arguments)
Arc: createtin elevtin
Createtin: cover elevpts point spot
Createtin: end (This creates a Triangular 'surface' from the
SPOT codes)
Createtin: end
Arc: arcplot
Arcplot: disp 9999
Arcplot: surface tin elevtin
Arcplot: surfacedefaults
(defaulting viewing altitude above the horizontal plane is 30 degrees,
default position on the horizontal plane is 215 degrees - 0 degrees is
6:00 o'clock, 90 degrees is 9:00 o'clock)
Arcplot: surfacedrape mesh fishnet
Arcplot: symbolset color
Arcplot: sd polygonsh landuse lu-code symtab.lu
Arcplot: linecolor 2
Arcplot: sd mesh fishnet
Arcplot: clear
Arcplot: sd arcs landuse
Arcplot: q
Arc: q
Chris Hanson (html 30/09/96)