I am not sure how useful this information is, or will be, but I have recently had some inquiries on how Chain Mail is made. So, this is my attempt to teach the basics online… here it goes:
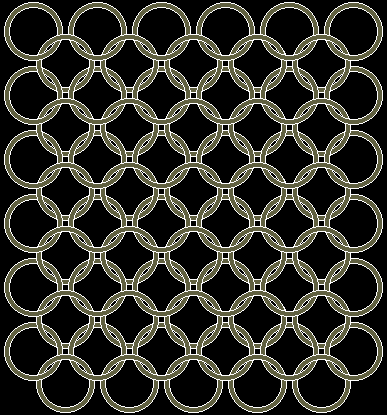
The basic pattern that I will be teaching here is the 4 in 1 pattern. This is a very simple pattern used by the Europeans (In specific, the English) during the 13th-16th centuries. There are other patterns out there (The 6 in 1 used commonly by the French of the same period) but they are more complex, and unless you wear the armor for protection, only make the suit heavier. The 4 in 1 in the pattern name is an exact way of representing the pattern of the Chain itself. For each ring in the pattern, there are 4 other rings going through it. Obviously, around the borders this is not possible but beginning with the row after the border and on, there will always be 4 rings (Or links) going through each other ring.
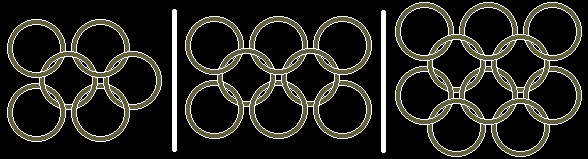
In the drawing below, you will see the beginning to the pattern, with a singular ring having 4 other rings going through it. I have heard story of people who use a smaller rod to put their rings on when linking them, I really haven’t found a need for this. I simply begin with the piece shown below, and just keep adding on.

The hardest part (and most painful) is the making the rings. I use 12 gauge galvanized steel wire. This should be easily purchased in a hardware store in lengths of 300 feet or so. Typically the wire is used for fencing (Like chain-link fence) but in our case it will be used for our rings. I used galvanized because it most accurately depicts the imperfections of medieval steel. Using stainless steel or something similar is quite fine, but for realism (i.e. The steel used in the period depicted was impure and thus gray in color) I would use the galvanized steel. There were, of course, suits made from very pure steel, and thus had a more metallic appearance than galvanized steel offers. Most persons I have found that make mail armor use 16 gauge wire, this is fine, but it is a smaller thickness than 12 gauge. I prefer to use the 12 gauge because the rings are thicker and fight together tighter while still using a fairly large ring size.
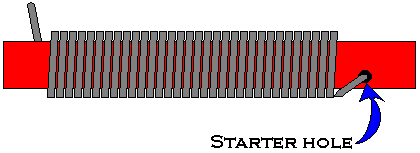
The next step in making the rings is determining your ring diameter. I use a 5/16” diameter ring. Meaning that the measurement of the interior diameter is 5/16”. You may ask how I make the rings to this perfect diameter… the diagram below should explain. Purchase a 5/16” diameter steel rod. It should only cost $3 or so. It is easiest if you drill a hole completely thorough one end of the rod (As per the diagram) but you CAN (However painful it may be) hold the wire with a pair of pliers. You simply begin to wrap the wire around the metal rod ensuring that each wrap is butted up against the previous wrap. Continue this as long as you may, and you should end up with something that resembles a condensed spring. After removing the coil from the rod, you can begin to cut the individual rings. To cut them, I use a small pair of bolt cutters. Something like this should be easily purchased from your local hardware store or even Sears. Cutting them is simple, cutting the next ring right next to where your last cut was ensures that your rings are a full 306 degrees.
There are simpler ways to wrap the wire if you are even slightly mechanically inclined. Making a hand crank device allows you to easily and quickly make coils, and any thing such as this speeds up the process.
Once you have cut rings, you can begin to piece together the armor. I believe that the process of making the rings is the longest and most tedious, so generally, I make as many rings in one sitting as I can. Having a bag full of rings with me allows me to work on patches while I sit and do nothing. I use two pairs of pliers to bend the links into place, ensuring that the ends of the loop touch.
In the picture below, you will see the beginning stages of the process starting with a singular 4 in 1 loop. To continue, add rings in both directions. The pattern should present itself easily to you, but in case, I have included a sample drawing of a section of 4 to 1.
That is all there really is to it. Making the links that you have now into a Hauberk or something similar is up to you… trial and error. Just remember to leave the armor loose fitting or else you may have a hard time getting in and out of it! Remember… this doesn’t stretch!