LT1 and T-56 Conversion for 2nd Gen Camaro
Pre-'87 350ci and T-56 Conversion
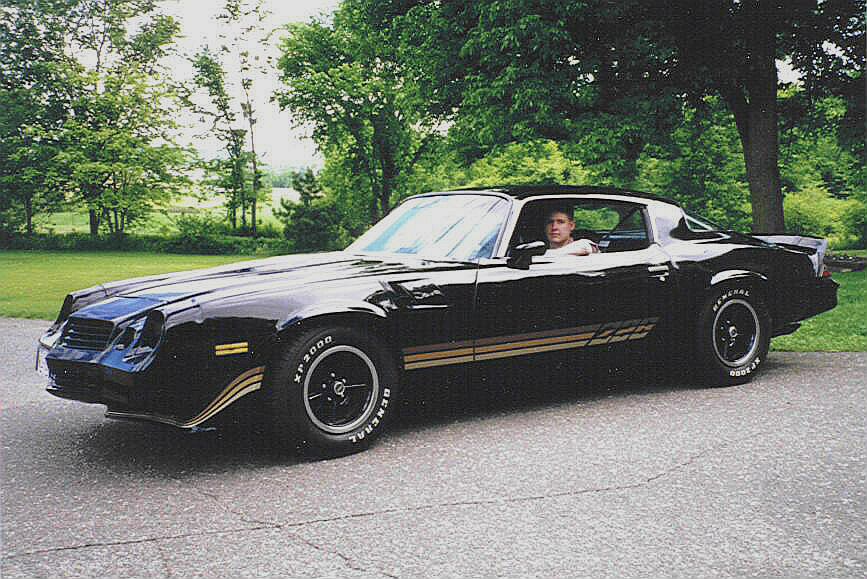
I built this page to help document my conversion of a 1981 Camaro Z-28 from a 350/TH350 automatic to a 1997 LT1 with six speed tranny. I got the engine and transmission from a guy in Denver that had a crashed WS6 Firebird. I got the engine, tranny, and anything I wanted from the car for $4000. Everything has about 30,000 miles on them. The engine bolted right in using my old mounts. I modified my TH350 tranny mount a little to fit the T56. I have picures of that later. For GM parts, GM Parts Direct is cheapest. When I needed them in a hurry, I got them at the parts department of local dealerships.
The Pre-87 350ci and T-56 conversion is towards the bottom of the page.
Many questions I had about the conversion were answered by Tyler Beauregard and members of the www.CamaroZ28.com Message Board. THANKS!
Updated 13 November 2004
Engine in Car
Here is a picture of the engine installed in my car.
Engine Bay
The passenger side has a real close fit where the spark plug wires wrap around the brackets. I haven't had any trouble with rubbing yet. I'll keep an eye on it. I will eventually redo the front suspension with Performance Suspension Techonology products. When I have the upper control arm out, I will shave some of the bracket to make more room.
Close Fit
Air Conditioner Delete Pulley
The air conditioner on the bottom passenger side of the engine will hit the subframe. I heard it is possible to use corvette brackets to move everything to the driver side and up. I do not have air conditioning on my car, so I replaced it with a pulley. GM part number is #10115875. The serpentine belt is the same. I bought a Dayco Kevlar belt for longevity.
Delete Pulley Picture
Radiator and Fans
I used the radiator from the WS6 Firebird donor car. This was very conveniant since all the hoses plugged in correctly. I had to cut a hole in the bottom of the support bracket for the drain spout (or at least I think that's what is). The radiator will fit best if installed at an angle like it was orignally in the Firebird. My father made braces to hold it out of plastic chunks he had lying around in the shop. He had two on the bottom and two on the top. The original top plate was tapped and threaded to extend the brackets out to the radiator. This let it lean back more and ease the tension on the hoses going to the pump.
Radiator
Fabricated Radiator Mounts
Cut Drain Hole
The radiator bottom needs to be slip forward in order for the driver side bottom hose to clear the power steering box without crimping.
Hose Clearing Box
The hoses that go to the heater core are two different sizes and they match the outlet/inlet of the pump perfectly. I also used the electric fans from the donor car. The wire harness I bought from Tuned Port Induction Specialties didn't have provisions for the fans, so I wired them to a switch I had previously installed in my dash with a 25amp inline fuse. I turn them on and off manually, but I like that. On the fans, the light blue wire was the positive(+) for the low speed fan, and the grey wire was the positive for the high speed fan. Ideally I would have a switch for each fan, but I don't. The switch is rated at 30amp/12volt.
Dash Fan Switch
Power Steering
I had Whistler Bearing in Colorado Springs do some custom work for my power steering. The pressurized hose in my camaro was from a '79 caprice. The hard line part of it was bent in a sideways "Z" shape. It came up from the box, down 45-degrees, and then straight up again. The "Z" section was cut right before it turned up again, so it ended up pointing down at 45-degrees. A fitting was braized to that end.
I also had the pressurized hose from the donor car. The hard line runs down the passenger side to underneath the engine, and turns into a hose from there. I had a new hose put on that was 4-6" longer than the original, and the end of the hose matched the fitting from the chopped "z".
Box, Custom Hose Top View
Bottom View
I ran the return line back under the front of the engine over to the passenger side.
Return Line
Hoses Bundled
The power steering pump has a remote resivoir. I got a new one; GM part #26019594. The 5/8" hose that goes from the resivoir to the pump needs a 90-degree bend in it to clear the upper control arm. I bought a 5/8" coolant hose with the bend from from Pep Boys. The hose extended about two inches after the bend, so I trimmed some of that off and the hose fits fine. My father fabricated a bracket for the resivoir. He's a genious.
Resivoir to Pump, Close Quarters
Resivoir Mounted
Transmission
Since I had 4.10:1 gears in the rear, I went with the T56 transmission. I modified the TH350 crossmember by first carefully cutting off the "tab" that the transmission rubber mount bolted to. I then welded two steel plates (1/4" or 3/16", I can't remember right now which but I'll check the next time its on a lift) and a piece of square tubing underneath the crossmember. I welded the tab onto the front of the square tubing. It looks crude, but its strong and I had limited material. You might get a little more road clearance by using angle-iron and trimming it to the bottom of the tab.
Mount Picture 1
Mount Picture 2
Since I had an automatic, I had to cut a hole in the tranny hump for the stick. I made it big enough to install/remove the stick and plate from inside the car. I used the rubber boot from the donor car. I attached that with its self-tapping screws. All I had to do was drill holes for the screws. The automatic center console's hole for the automatic shifting linkage has enough room for all gears with the stick. When I put the console back in, I pushed it as forward as possible before tightening the back screws. I will make a cutsom vinyl boot to cover the hole soon.
Stick
I got the 6-speed knob from Jegs.
Driveshaft
My original driveshaft had to be shortened because the driveshaft from the donor car was too short. I measured from the end of the tailshaft to the center of the u-joints, 47 3/4", and gave that dimension and my driveshaft to the local driveline specialist. Within a day my driveshaft was shortened, balanced, and fit perfectly in my car.
--Option--
I have not tried this myself yet, but it is also possible to use a Ford Mustang 5.0 aluminum driveshaft. Old driveshaft 2.76" diameter....Ford driveshaft 3.52" diameter.
Summit Racing part#: FMS-M4602G ~$159.95
You'll need the front 27-spline yoke from your Camaro driveshaft, and swap it into the Ford Driveshaft using conversion U-joints:
Spicer: 5-212X
Neapco: 2-1569
Rockford Driveline: K212
NAPA: 355 ~$20.99
Get 2 U-joints, one for the front and one for the rear. Have them pressed in and you're good to go!
Clutch and Brake Pedals
If you are converting from an automatic, get a set of clutch and brake pedals for the year of YOUR Camaro. I found a set at a Camaro junk yard in Colorado Springs. If you had a stick in your car originally, get rid of the Z-bar linkage.
Fuel Pump
I bought an external, inline fuel pump and rubber mount bracket from TPIS (part numbers #300-177 and #300-205 respectively). I got 10 feet of 3/8" high pressure fuel hose from Whislter Bearing. I wanted to mount the fuel pump in the easiest location, so I put it under the passenger seat where the original hard fuel lines have a few inches of hose. I know this is far away from the tank, and the pump is a pusher, so I was worried at first. But after driving the car for a coule weeks, I have had no trouble with fuel starvation. It is kind of annoying hearing the buzz when stopped, but I can handle it until I put an in-tank pump in. Origianlly I fed the return line to a Tee before the filter to the pump instead of back to the tank. However, do not do that! Feed the return hose to the original return line. Otherwise the pump will suck air from the return hose stop sucking fuel from the tank. It happened to me. These are the pictures before I fixed it.
Fuel Pump Mounted
Clutch Actuator
The hydraulic clutch actuator can be mounted to the firewall without making a bracket. However, after a few months like this, the firewall gave and the rod bent. This is what it looked like before.
Actuator Hole
Interior Shot of Actuator Mounted
The correct way to mount it is with a bracket. I bought mine from a man in California. It was made for a 1st gen, so I had to modify it slightly.
Bracket Pic
The bracket also came with a tab to weld to the clutch pedal to space the bolt. I welded the bolt head to the tab so I don't have to worry about getting a wrench in there when if I need to take it out again. The center of the bolt head is directly aligned with the front edge of the pedal. This is 1 3/4" from the center of the pedal pivot point.
Pedal 1
Pedal 2
The steering column needed to be ground for clearance of the actuator cylinder.
Steering Column 1
Steering Column 2
I needed to make 3/4" plastic spacers to raise the actuator to the proper position.
Spacers
The brake booster needed to be notched as well.
Brake Booster
This is what it looks like bolted into position, minus the booster.
All Mounted
This allows full swing of the clutch pedal to the floor, light but firm pedal pressure, as well as the clutch pedal being more in-line with the brake pedal. Works great!!
Wiring
Since my engine is a '97, I needed to get the coil from a 1994-5. The plug on the coil was different, and the 94-95 coil has like a spark plug type. So I had to cut the "old" coil wire end off and crimp on a spark plug end. Luckily, the ignition control unit mounted above the coil was the same. If you have a 94-95 engine, you don't have to worry about this.
Modified Coil Wire
I bought a wiring harness from TPIS, and it was worth the money. However, I recommend that you request connectors for the speed sensor to the ECM, output wire for the speedometer, and primary/secondary fan control wires. Mine didn't have these, but I firgured out how to add them. Its not worth the hassle though, just buy the harness with these extra connectors.
There is a cap in the center of the firewall which I removed and fed all my wires through for the passenger and engine compartment. I fed the ECM plugs to the passenger side because I will eventually mount the ECM above the glove box behind the dash pad. There is a lot of room up there, if you ever looked.
Wires Through Firewall
Interior Wires
I bought a digital speedometer from Jegs. I removed the intrument cluster and then removed the speedometer from the plastic housing. Using a Dremel tool, I cut out the back of the housing so the new speedometer will slide all the way through and be flush with the tach gauge. This will also allow the clear cover to be reattached to the front of the cluster without interference. When the back of the housing is cut out, a couple of the light bulbs will no longer be used. My gauge has red digits, so I put red bulbs in for the other dash background lights. It all turned out nicely.
Cluster Front View
Cluster Back View
Your car will run MUCH better if your speed sensor is first connected to your ECM. + POS goes to RED 32, and - NEG goes to RED 31. The speedo signal out to your speedometer is BLACK 8. I drove my car with the speed sensor hooked directly to the speedometer and with it hooked to the ECM. Trust me, it runs 10 times better when going through the ECM. The ECM uses the speed sensor to tailor the fuel maps, so make sure your gear ratio is properly programmed too.
I had my ECM programmed by Andrew Mattei at a very competitive price. I also got an adapter cable from him at AKM Cables. He was very helpful answering all my ECM questions. Thanks Andrew! Once the ECM is reprogrammed, you cannot use a GM codereader that just bridges A and B connections to flash the check engine light. I don't know why, but it doesn't work. You can, however, get a free program for your laptop that you can read the data stream and display the error codes. I am still getting error codes that are kicking on my fans. They have something to do with auto tranny shift points, but I'll troubleshoot it some more and update it here.
In the mean time, here is a picture of the ECM mounted under the dash. I just cut some aluminum tubing for spacers to bolt it above the glove box. As you can see in the picture, I only used two bolts and mounted it to the plastic glove box frame. I think it rests a little on the metal strap that goes around the box, but it's been there for 6 months and I don't hear any rattling.
Mounted ECM Under Dash
Alternator
Talk about a headache! I went through 4 alternators before figuring that thing out. I kept blowing the diodes. Why? There is a single small red wire that plugs into the alternator near the bottom back that needs a voltage source with ignition on. This is for the voltage regulator. I initially wired mine directly to my fuse block. Apparently, the 12V signal is too strong and will blow the diodes quickly. So what you need to do is put a 10-ohm resistor inline with that wire. Get the heavy duty ceramic one from radio shack. The smaller amp resister will melt.
Picture of Mounted 10-ohm Resistor
Exhaust
At first I ran just the stock manifolds...that's it. Although I enjoyed setting off car alarms with my rumble, it gets loud. I took my car to two different exhaust shops, and both couldn't bend pipes around the subframe connectors. The stock manifolds point right down to them...
Darn 80's subframe
So what I did was take the Flowtech Afterburner headers off a 350 that I built and bolted them onto the LT1. The headers are made for the 1981 Camaro, so they have "O" ports. The LT1 heads have "D" ports. I knew this when I bolted them on, but they line up fairly well and I haven't had any trouble with them. My father cut holes for the O2 sensor bungs and welded them in for me. Right after the headers I got Cherry Bomb glass packs. They're cheap and they sound great! From the glasspacks, the tubing goes straight back to their respective rear exhaust section (the stuff behind the original muffler). I bought a new rear exhaust section from GTC, the pair for ~$50.
Pre-'87 350ci and T-56 Conversion
This is my current setup.
Chevy 350ci w/Vortech heads, 268XE, Performer RPM, Holley 650DP. Even with the Holley, I'm still getting over 20mpg on the interstate with 4.10 gears and T-56. The transmission and clutch actuator instructions in the previous section still apply.
These are Summit Racing part #'s and how much I paid for these parts at the time:
Centerforce Flywheel, interally balanced: CTF-700107 ~$338.39
Centerforce Dual-friction Clutch: CTF-DF039020 ~$539.95
(Not required) Small Starter: SUM-820323 ~$146.99
Future Dec. '04 mods will include Global West upper control arms and Del-a-lum bushings, Carrera Shocks coil-over conversion, Autometer Gauges in custom bezel, and a revised/new T-56 crossmember.
How's my page? Email me if you want something added, or if you just want to compliment/critique it.