|
Country
Wall Hanging Quilt Tutorial |
 |
|
Country
Wall Hanging Quilt Tutorial |
|
|
Country Quilts were a must for our Pioneering families. Not only were they made
to go on the beds, they were also used as Wall decorations. They were made with love and great creativity was shown in their design. I finished my Quilt with a "Gold Satin" edge. If you would like to do the same, right click on the tile and save to your hard drive. |
 |
|
This tutorial was designed in PSP 6.02 and can be completed in other versions
with some adjustment. Use your creativity and have fun. Copyright © by Harold E. Jones .. 2001 - 2002. |
|
| Level of difficulty: Intermediate |
|
|
1. Open new image, width="350" height="350", 16.7 million colors, Transparent.
Click on the "Color Options pallet." 2. Go to "View/Rulers" and click Ok. [If you do not already have "Rulers" on your PSP Desktop] Go to "View/Grid" and click Ok. I find it is easier to be more precise when designing your gaphics if you have both the "Rulers" and "Grid" activated. |
|
|
3. Click on the "Flood Fill Tool" 4. Go to "Image/Plug-in Filters/Texture/Texturizer." When the Texturizer Options Pallet opens, choose the following settings: "+ 100% -; Texture=Sandstone; Scaling=85%; Relief=2." Click Ok. |
 |
| 5. Go to "File/save as/" and save your work as "home1.psp." Save your work often and always in ".psp" extension until the final "save as." | |
|
6. Click on the "Layers Option Pallet." 7. Click on the "Text Tool" 8. While the letter "H" is still selected ["Marching Ants" surrounding] move the "H" until the bottom right hand corner is at co-ordinates W=150 x H=160. Deselect. [Go to "Selections/select none" or press control and "d" keys.] |
 |
| 9. Go to "File/save" and save your work in ".psp" extension | |
|
10. Click on the "Layers Option Pallet." 11. Click on the "Text Tool" 12. While the letter "M" is still selected ["Marching Ants" surrounding] move the "M" until the bottom right hand corner is at co-ordinates W=160 x H=290. Deselect. [Go to "Selections/select none" or press control and "d" keys.] |
 |
| 13. Go to "File/save" and save your work in ".psp" extension | |
|
14. Click on the "Layers Option Pallet." 15. Click on the "Text Tool" 16. While the letter "E" is still selected ["Marching Ants" surrounding] move the "E" until the bottom right hand corner is at co-ordinates W=280 x H=290. Deselect. [Go to "Selections/select none" or press control and "d" keys.] |
 |
| 17. Go to "File/save" and save your work in ".psp" extension. | |
|
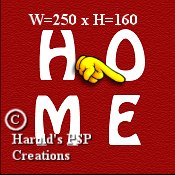
18. Click on the "Layers Option Pallet." 19. Click on the "Text Tool" 20. While the letter "O" is still selected ["Marching Ants" surrounding] move the "O" until the bottom center is at co-ordinates W=250 x H=160. |
 |
| 21. Go to "File/save" and save your work in ".psp" extension. | |
|
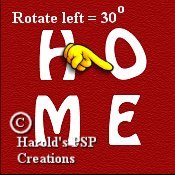
22. Go to "Image/rotate" and choose "rotate left/free/30 degrees." Deselect. [Go to
"Selections/select none" or press control and "d" keys.]
23. Click on the "Magic Wand Tool," |
 |
| 24. Go to "File/save" and save your work in ".psp" extension. | |
|
25. Click on the "Flood Fill Tool" 26. While the "O" is still selected go to "Edit/copy." Deselect. 27. Go to "Edit/paste/paste as new layer." Go to "Image/mirror." |
 |
| 28. Go to "File/save" and save your work in ".psp" extension. | |
|
29. While this second "O" is still selected [the "Marching Ants" still surrounding],
click on the "Mover Tool" 30. Click on the "Layers Option Pallet" |
 |
| 31. Go to "layers/merge/merge visible." Turn all the layers on again. Make sure that you are still on the new "merged layer." Right click on this layer and in the box that "pops up," click on "properties" and rename the layer, "Heart." There should be 5 layers. Click Ok. | |
| 32. Go to "File/save" and save your work in ".psp" extension. | |
|
33. Click on the "Layers Option Pallet" 34. Click on the "Magic Wand Tool," |
 |
|
35. Click on the "Flood Fill Tool" 36. Left click inside the "Marching Ants" on the "H" and the pattern will "flood fill" the "H" shape. |
|
| 37. Go to "File/save" and save your work in ".psp" extension. | |
|
38. Click on the "Layers Option Pallet" 39. Click on the "Magic Wand Tool," |
|
|
40. Click on the "Flood Fill Tool" 41. Left click inside the "Marching Ants" on the "M" and the pattern will "flood fill" the "M" shape. |
|
| 42. Go to "File/save" and save your work in ".psp" extension. | |
|
43. Click on the "Layers Option Pallet" 44. Click on the "Magic Wand Tool," |
|
|
45. Click on the "Flood Fill Tool" 46. Left click inside the "Marching Ants" on the "E" and the pattern will "flood fill" the "E" shape. |
|
| 47. Go to "File/save" and save your work in ".psp" extension. | |
|
48. Click on the "Layers Option Pallet" 49. Click on the "Text Tool" |
 |
| 50. While the phrase is still selected ["Marching Ants" surrounding] move it to the center of the heart. | |
| 51. Go to "File/save" and save your work in ".psp" extension. | |
|
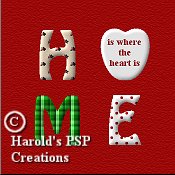
52. Click on the "Layers Option Pallet" 53. Go to "layers/merge/merge visible." Turn layer1 on again. Make sure that you are still on the new "merged layer." Right click on this layer and in the box that "pops up," click on "properties" and rename the layer, "Home." There should be 2 layers. Click Ok. |
|
54. While still on this "Home" layer, click on the "Magic Wand Tool,"
55. Go to "Image/effects/inner bevel" and select the following settings. |
 |
|
56. Inner bevel: "Preset=Pillow; Bevel= |
|
| 57. Go to "File/save" and save your work in ".psp" extension. | |
|
58. Click on the "Layers Option Pallet." 59. Open the "gold_satin2.jpg" tile or choose your own to make a border for your Quilt. 60. Click on the "Flood Fill Tool" |
 |
|
61. Left click anywhere on the "border" layer and the pattern will "flood fill" the layer.
62. Go to "Selections/select all," then "Selections/modify/contract" and when the "Contract Options" box opens, select contract by 30. Click Ok. 63. The "Marching Ants" will move in toward the center by 30 pixels. Hit the "Delete" key and the center of the "gold satin" pattern will disappear, leaving a 30 pixel border around your Quilt. Do not deselect. |
 |
| 64. Go to "File/save" and save your work in ".psp" extension. | |
|
65. While the "Marching Ants" are still active on the inside edge of the Border, you may
want to apply an Inner Bevel. Go to "Image/effects/inner bevel" and I used the same settings
as before. Deselect.
66. Go to "layers/merge/merge all flatten." Go to "Selections/select all." Now go to "Image/effects/buttonise" and choose Height=2; Width=2 and click Ok. 67. Go to "File/save as" and save your work in ".jpg" extension and name it "Quilt. |
| Congratulations! You have finished. |
| This tutorial is written by Harold E. Jones.
Other than for personal use, No part of this tutorial maybe copied or reproduced
For further information, please E-mail me. |