|
Pot Pourri
Sachet Tutorial |
 |
|
Pot Pourri
Sachet Tutorial |
|
|
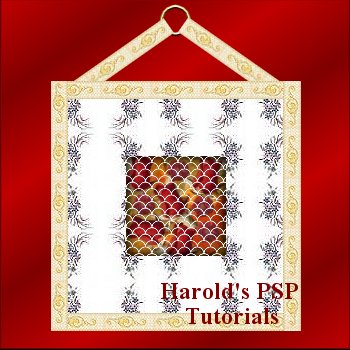
Pot Pourri Sachets were a way for Victorian Ladies to sweeten rooms in their
homes with the aromas of flowers and herbs.
You will need these four tiles for this lesson. Right click on each tile one at a time and save to your hard drive. |
|||
 |
 |
||
|
This tutorial was designed in PSP 6.02 and can be completed in other versions
with some adjustment. Use your creativity and have fun. Copyright © by Harold E. Jones .. 2001. |
|||
| Level of difficulty: Intermediate |
|
|
1. Open new image, width="250" height="250", 16.7 million colors, White. I have chosen
white so as to make it easier to see your work.
Click on the "Color Options pallet." |
|
|
2. Click on the "Flood Fill Tool" 3. Go to "File/save as/" and save your work as "sachet1.psp." Save your work often and always in ".psp" extension until the final "save as." |
 |
|
4. Open new image, width="250" height="18", 16.7 million colors, Transparent. Now open
the "potribbon.jpg" image.
5. Click on the "Flood Fill Tool" |
|
| 6. Go to "File/save as/" and save your work as "ribbon.psp." | |
|
7. With the "ribbon" image still activated. Go to "Selections/select all." The "Marching
Ants will surround the "Ribbon."
8. Go to "Edit/copy." Click on "copy." Activate the "sachet1" image. Go to "Edit/paste/paste as new layer." The "ribbon" will appear on the "sachet" image. 9. While the "Ribbon" is still selected ["Marching Ants" still active], click on the "Mover Tool" |
|
|
10.Go to "Edit/paste/paste as new layer." The "ribbon" will appear on the "sachet" image.
While the "Ribbon" is still selected ["Marching Ants" still active], click on the
"Mover Tool" 11.Go to "Edit/paste/paste as new layer." The "ribbon" will appear on the "sachet" image.
While the "Ribbon" is still selected ["Marching Ants" still active], go to
"Image/rotate/left 90 degrees." Click on the "Mover Tool"
|
 |
|
12.Go to "Edit/paste/paste as new layer." The "ribbon" will appear on the "sachet" image.
While the "Ribbon" is still selected ["Marching Ants" still active], go to
"Image/rotate/left 90 degrees." Click on the "Mover Tool" 13. Go to "Layers/merge/merge visible." Go to "Image/effects/buttonise" and apply the following settings. Opacity=100; Height=2; Width=2. Click Ok. Click on "File/save" and click Ok. This will update your "sachet1" image still in .psp format. |
|
|
14. Open new image, width="350" height="350", 16.7 million colors, transparent. Make sure
the "Layers Option Pallet" 15. Click on the "Flood Fill Tool" |
|
|
16. Activate the "sachet1" image. Go to "Selections/select all." The "Marching
Ants will surround the "Sachet." Go to "Edit/copy." Deslect. The "Marching Ants will
disappear. You can minimize the "sachet" if you wish to clear space on your work area.
17. Activate the "color" layer on the "ppourri" image. Go to "Edit/paste/paste as new layer" and the "sachet1" will appear in the center of the "ppourri" image. You now have 3 layers, "layer 1," "color" layer and the new "layer 3." Make sure that you are still on the new "layer 3." Right click on this layer and in the box that "pops up," click on "properties" and rename the layer, "sachet." Click Ok. |
 |
|
18. Go to "selections/rectangle." |
 |
|
19. Add a new layer and name it "pourri." Open the "potpourri.jpg" image. Go to
"Selections/select all" click Ok. Go to "Edit/copy" and click Ok.
Return to the main image "ppourri1." The "Marching Ants" in the center of the image should still be active. Go to "Edit/paste/paste as new layer" and click Ok. The "Rose Pot Pourri" image will fill the center of the image. Do not deselect. Go to "File/save" and click Ok. |
 |
|
20. Add a new layer and name it "cutout1." Go to "image/effects/cutout." Use the following
settings. "color=black, Opacity=70, blur=15, vertical=4, horizontal=4." Click Ok.
Add a new layer and name it "cutout2." Go to "image/effects/cutout." Use the following settings. "color=black, Opacity=70, blur=15, vertical=-4, horizontal=-4." Click Ok. Do not deselect. The "Marching Ants" in the center of the image should still be active. Go to "File/save" and click Ok. |
|
|
21. Add a new layer and name it "lace." Open the "potlace.jpg" image.
Return to the main image "ppourri." The "Marching Ants" in the center of the image should still be active. 22. Click on the "Flood Fill Tool" Do not worry about the "Black" in the center of the lace. We will fix that now. |
 |
|
23. Click on the "Magic Wand Tool" 24. Go to "Edit/cut" and press Ok. All the "Black centers" will disappear leaving just
the "white lace." Deselect.
|
|
|
25. While the "sachet" layer is still active, click on the "Mover Tool"
26. Add a new layer and name it "ring." Click on the "Color Options pallet."
|
|
|
27. Click on your "Preset Shapes Tool," 28. Click the left mouse button and start at co-ordinates width=175 x height=30 and drag
down until you have a circle 30 pixels in diameter.
|
 |
| 29. Go to "Image/effects/sculpture" and apply the following settings: "Gold; Size=100%, Smoothness=10; Depth=3; Ambience=0; Shininess=46; Color=white; Angle=315; Intensity=30; Elevation=56." Click Ok. Deselect. The "Marching Ants" disappear. | |
|
30. Add a new layer and name it "left tie." Open the "ribbon.psp" image that you made.
Go to "Edit/copy." Return to the main image and activate the new layer "left tie." Go to
"Edit/paste/paste as new selection."
Go to "Image/rotate/rotate left 35 degrees. Click on the "Mover Tool"
|
|
|
31. Click on the "Selection Tool" 33. Make sure that you are still on the "left tie" layer. Click on the "Magic Wand Tool"
|
 |
|
34. Go to "Edit/paste/paste as new layer." Go to "image/mirror" and click Ok.
Click on the "Mover Tool" 35. Make sure the "Layers Option Pallet" |
|
|
36. If you are satisfied with the "Dark Red" as a background for you finished "Sachet,"
now is the time to complete your work. Go to "layers/merge/merge all flatten." Click Ok.
Go to "File/save as" and save as a .jpg extension.
If you want to have a different type of background for your "Sachet," delete the "color" layer. Activate the transparent or "layer1," and "flood fill" with a pattern of your choice. Then go to "layers/merge/merge all flatten." Click Ok. Go to "File/save as" and save as a .jpg extension. |
|
Congratulations! You have finished. Now you can use your talents and design many other different shaped "Pot Pourri" Sachets. |
| This tutorial is written by Harold E. Jones.
Other than for personal use, No part of this tutorial maybe copied or reproduced
For further information, please E-mail me. |