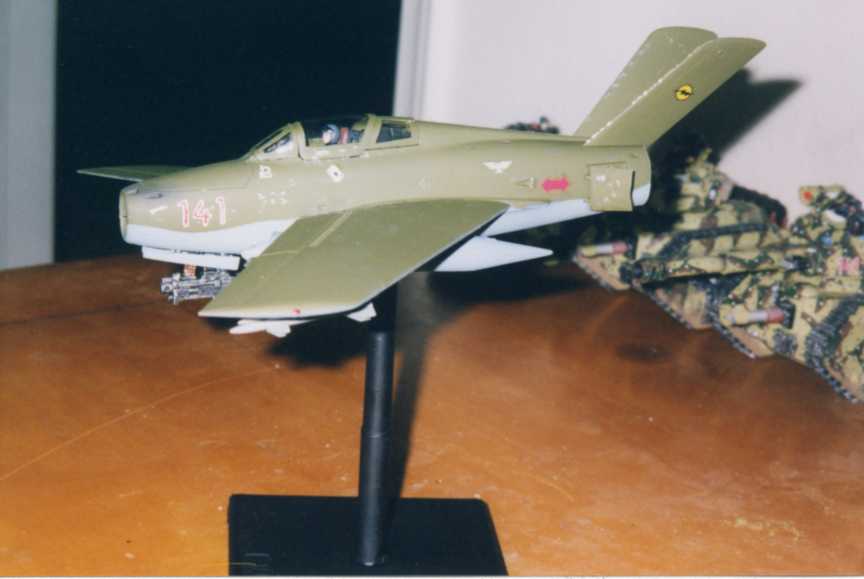
Don't feel like plopping down $84 buck for an Imperial Lightning huh? Neither did I brotha. So I sat and contemplated how the heck to do this without getting a massive migraine about scratchbuilding. I've never really scratchbuilt, I didn't know how to scratchbuild, ah, but the light bulb goes off and I get inspired.
So, I hop on down to the local hobby shop with a pic of the FW lightning in my hand and began to find a model. After minutes of peering over the racks, my eyes widen as I have find the perfect model. I chose the 1/48 scale Monogram F-84 Thunderstreak. It has a stubby lil nose and about the right shape for converting.
The first step was to build the cockpit and wheel well. After the halves of the fuselage were glued together, I sawed off the tail about three to four inches behind the cockpit, removing the rudder. I made two slots about an inch apart from one another on the top of the fuselage at the rear. The stabilators were converted to upright rudders and attached slightly canted to the side. Looking at the wings, they were fairly easy to convert. I glued them together normally but reversed the sweep in order to get the wings to go forward. With a little bit of putty, they looked pretty good.
As for engines, I took the external drop tanks and slid a 50 gallons drum barrel from a tank accessory kit over the nacelle of each one and glued into place. The tanks were then moved from their normal hard points on the wings, to each side of the fuselage. I drilled a small hole in the bottom of the model for the stand. I found an old Heavy bolter from my Space Marine attack bike kit I had in my bitz box and placed it,. upside down, inside the wheel well. Pretty nifty! I then found a couple of hunter-killer missles and placed them on the old drop tank hard points on the underside of the wings. Last but not least, I used a plastic 3.5" floppy disk case as a base.
The aircraft was sprayed with Dark green and the under belly is sky blue. The gun openings for the bolters were given the black pastel treatment and chipped paint around the walkways was simulated with specks of Testor's aluminum paint. Voila! There you have it. A very easy conversion that is easy on the pocketbook. Yeah, I know, it may not be the real thing, but there's a since of pride in doing it yourself. Plus it still has GW parts hanging off of it :) I hope this will inspire some people to do it yourself, it's fun and easy and again, if you have questions, please contact me.
Blake
|

