
Multiple Frame Display Image Tutorial
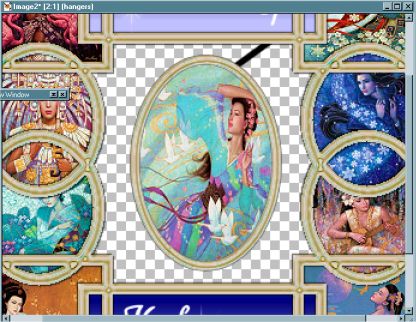
Example below
For this tutorial you will need
Jasc Paint Shop Pro click here for a 30 day
free trial.
Blade Pro or Super Blade Pro, you can get Super Blade Pro
here, I have no idea where
anyone can get the original Blade Pro anymore.
This tutorial was inspired by a tutorial
called "Picture
in Textured Frames".
The end result from her tutorial and mine look similar, but there are major
differences
and the technique's used to achieve the results are completely different.
Part One. Making the Frames
Make a new image, transparent, 400 X 400, 16.7 million colors.
Add a new layer.
Turn off your background layer and leave it turned off throughout the entire
tutorial.
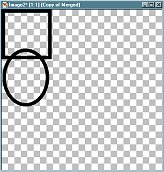
With layer one active -
grab your presets shapes tool with these settings and make a a square shape in
the top left hand corner.

Add a new layer.
Change your shape to ellipse and draw out an ellipse anywhere on the canvas,
then using your mover tool
position it like below.
Now merge the layers that have the square and ellipse on them.
(Remember your background layer is turned off at all times already.)
I named this layer "shapes 1".
Duplicate the "shapes 1" layer and go to "image, flip."
This gives us our entire left side.
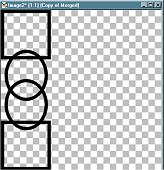
Merge the "shapes 1" and the duplicate of "shapes 1" layers
and rename it to "left side."
Then duplicate the "left side" layer and go to "image,
mirror." This gives us both sides
completely done and in position.

Merged the "left side" layer and
"duplicate of left side" layer together, renaming this layer
"sides".
Now for the top shapes, just add a new layer naming it "top shape", and made a long rectangle at the top.

Now duplicate the "top shape" layer and go to
"image, flip."
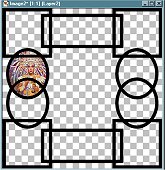
Making sure your very bottom layer, the white background layer is turned
off, merge all visible layers
and rename this layer, "frames."

Part Two. Filling the Frames
The first thing to do here is to fill in each shape with the image of your choice.
So.... open the images you want to fill the ellipse frames
with.
You can use pictures like me, or fill each frame with a different gradient or
pattern, the choice is yours.
Make sure you are on your "frames" layer.
Using the magic wand, click inside one of the oval shapes, (hold down the shift
button
and click in the small parts of the oval that run into the square at the top and
the other ellipse
at the bottom) then click on the image
you want to place inside the oval, and go to "edit, copy"
Go back to your frame image with the inside of the 1st oval
still selected and go to "selections, modify, expand by 1.
ADD A NEW LAYER,
and go to "edit, paste into selection."
Continue repeating the red text step above until all the areas are filled,
filling some areas with
a gradient or pattern rather than pictures.

Once you have them all full, turn off your frames layer, (and the very bottom
background layer should still be turned off)
and merge the remaining visible layers that have what you filled each shape with
on them.
Rename this layer "fills."
This is what your layer palette should look like at this point.

With the fills layer activated go to "Layers, arrange, move down."
This will move the fills layer below the frame shapes layer.
Now activate your frame layer.
With your magic wand, click on any one of the frames in the black area. This
will select the entire
frame image.
Set your foreground color to white and pour white in, changing the frames to
white from black.
Leave selected.
Now, what I did was apply a blade pro preset, but you could do most anything
here, pour in a gradient,
or pattern and then apply an inner bevel or drop shadow, however you want to do
it is fine.
After the blade pro preset I added a slight drop shadow as well. (Don't add the
dropped shadow if you want to save
this as a transparent .gif at the end.)
If you want to add text just make a new layer and apply
your text.
Still with your background layer turned off, merge all visible layers.
Rename this layer, "outside."

Part Three - Inside Frame and Main Image
Grab up your preset shapes tool again, the same settings as
before and chose the
shape of your preference. You could use pretty much shape for this frame.
Add a new layer name it "inside frame."
Draw out a good sized shape into the center of your frame image.
You can move it into the center with your mover tool since it's on it's own
layer,
and you can use your deformation tool to shape it just so if you need too.
Grab your magic wand tool and click inside the oval, or
whatever shape you have used.
Go to selections, modify, expand by 1.
Click on the image you want to fill the frame with, and go to "edit,
copy."
Now back to your frame image, add a new layer named "inside pic" and
go to "edit, paste into selection."
Go to layers, arrange, move down.
Now click on the layer named "inside frame" which
should be your very top layer at this point.
Go to selections, select all, selections, float.
Like before, pour white over the black of the frame.
And now apply the same blade pro preset as you did on the outside frames, (or
whatever it is
you applied to the outside frames).
With the background layer still turned off, also turn off
the "outside" layer and merge visible the rest of the layers.
Rename this merged layer, "inside".
Now click on the bottom most layer, and add a new layer,
name it "hanger1."
Click on your draw tool with these settings,

With your foreground color set to
white and your background set to null draw an angled line
from behind the inner frame to under the top rectangle like below.
I made mine black just so you can see it better in the screenshot, yours will be
white.
Go to selections, select all, selections float, and apply your blade pro preset to the line twice.
Add a new layer named "hanger 2" and repeat the instructions in the purple text above once.
Turn off all the layers except for the hanger1 and hanger 2
layers and merge visible.
Rename this layer, "tophangers."
Now duplicate this layer and go to "image, flip."
Add a new layer.
Now with your draw tool again, draw a line from the center
of the middle frame out to
the side frame on the left side.
Selections, select all, selections, float, and apply the blade pro preset twice.
Now duplicate this layer and go to "image,
mirror."
There's the suspending hangers for the inside picture and frame.
Turn off all the layers except for the hanger layers and merge visible.
Part Four - Adding a background or making it transparent.
If you want to add a background and outer frame to the
entire image follow the
instructions below in the green.
If you want to make it transparent so
it will go on any background
follow the instructions below in the dark purple.
With the bottom background layer
still turned off go to layers, merge visible layers.
Go to, image, canvas size and put in 425 for new width, and 425 for new height.
Put a check in both Center image horizontally and center image vertically.
Turn layer one on and pour in
whatever you want for a backdrop, a gradient, solid color,
whatever. If you want to add a texture to the backdrop, do so now.
Click on your top merged layer and apply a dropped shadow.

Apply the dropped shadow again, this time with the
vertical and horizontal at minus one.
Merge all layers, flatten.
Image, add borders, symmetrical of
10.
Click on the border you just made with your magic wand so it's selected and
apply your blade pro preset.
That's it, your done!

If you want to save this as a tube so
you can use it anytime on any background,
turn your bottom layer on, and go to "layers, merge, merge visible."
Now go to "file, save as" name your image, and for the file extension,
make sure you have "Paint Shop Pro Image" in the "save as
type."
At the end of your file name you can either leave it as .psp or you can type in
.tub,
either way it will remain transparent and ready to be applied to any background.
If you want to save it as a .gif
image, which is also transparent but is a file type
that can uploaded to the web and applied to any background also without having
to apply the
background first in PSP, do this.
(First off, if this is how you want
to save it it's not a good idea to have any added drop shadows
because they will appear very black in this format.
Turn your very bottom layer on, and
merge all visible layers.
Save it as a .psp file to the folder of your choice.
Open your animation shop, what
version doesn't matter.
Go to "file, open" and open the image you just saved in .psp format.
Go to "file, save as" name your file....gif will be the default
extension that comes up so you don't have
to worry about that. Choose a folder to save it too and click "save."
Continue to click "next" on the options that come up until it's
finished.
That's it, your done!
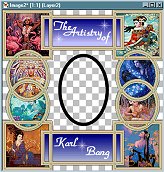
The one below is a transparent .gif

I hope you have enjoyed this tutorial!
Return to Tutorials Page 1 2 3
Overall Graphic Site Map Homepages
I run a PSP list called Free2PSP!
Come on over and join us
in our PSP adventures!
Two other great PSP Lists
I belong to are
FlyByNight Graphics
PSPMadeEZ
|
This
tutorial is ©Val's Dream. |
Page Created on Feb. 27th, 2002
![]()