 |
|
|
|
|
|
|
|
|
|
|
|
|
|
|
|
|
|
|
|
|
|
|
|
|
|
|
|
|
|
|
|
|
|
|
|
|
|
|
|
|
|
|
|
|
|
|
|
|
|
|
|
|
|
|
|
|
|
|
|
|
|
|
|
|
|
|
|
|
|
|
|
|
|
|
|
|
|
|
|
|
|
|
|
|
|
<bgsound src="darkeyes.mid"> |
|
|
|
 |
|
|
|
I had a dear grandmother-in-law who shared with me her gift for making intricate
embroidered works of art. This page is not meant to be a primer for cross stitch, there are far better souces that teach cross stitching. This is only to show you one version of building these intricate patterns . |
|
|
|
 |
|
Ukrainian embroidery can be done on any evenly woven fabic and is basically simple cross stitching. The pattern begins in the center of the fabric piece. To find the center, fold the fabic in half lengthwise, and then again crosswise. Mark the center.
Your design will begin with a single cross stitch in the center and then a cross stitch at each corner of the first stitch, as I show in the picture at the left. The color choices are yours but I generally will pick a dark color to define my pattern. |
|
|
|
|
|
 |
|
|
|
A contrasting color is then used to surround the center stitch. My personal preference is for a bright color. Additiional stitches in the orgiinal dark color are then placed to surround the second color. This use of the original dark color to surround each additional color is the basic "trick" for this type of embroidery. This is what brings the pattern "to life". |
|
|
|
|
|
 |
|
|
|
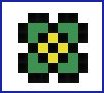
A third color is then added and surrounded by the original dark color. This is where you can begin to be creative. The stitches can be placed anywhere you want them to be as long as they are equal on all four sides of the center pattern. For the sake of simplicity, I chose to make a green square and surround it with the black. |
|
|
|
|
|
 |
|
|
|
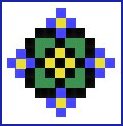
You can see how I have fit my fourth color, blue. into my pattern. I decided to create a "flower" pattern with the four blue stitches surrounding a single yellow stitch in the center. |
|
|
|
|
|
 |
|
|
|
Once again, the original dark color is used to surround the new colors. |
|
|
|
|
|
 |
|
|
|
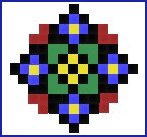
Another color or stitch pattern can be added ... again equally on all four sides. I choose red and these three stitches is a "V' pattern will give me the a heart in my design. |
|
|
|
|
|
 |
|
|
|
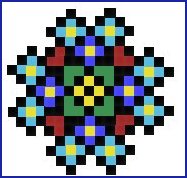
Once I surround the red "hearts" with my dark color, the heart shape is noticable. I then added light blue "flowers" to each of the four sides. |
|
|
|
|
|
 |
|
|
|
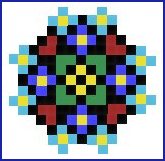
Once again, the colors are surrounded by the original dark color. The fun of this type of embroidery is that there is no pattern to follow and no stitchs to count from a pattern. The designs come from your own creativity. Each design you do will be uniquely your design. You can create pilow covers or various edgings for other projects by utilizing these design elements. I have samples on the Ukrainian Backgounds page of how I took parts of this simple design and used them in different ways. |
|
|
|
|
 |
|
|
 |
|
|
|
|
|
|
Another version of my "hearts and flowers" design. I could use this in a repetitive manner and create a pillow cover that would have a "quilt" feel to it. Or I could continue to add design elements to each of the four sides, creating an entirely different design. |
|
|
|
|
 |
|
|
|
 |
|
 |
|
 |
|
 |
|
|
|
 |
|
|
|
 |
|
 |
|
 |
|
|
|
|
 |
|
|
|
|
|
 |
|
|
 |
|
|
 |
|
 |
|
|
|
|
|
|
|
|
|
|
 |
|
 |
|
|
|
|
|
|
|
 |
|
|
 |
|
 |
|
|
|
|
|
|
|
|
|
|
|
 |
|
|
 |
|
 |
|
|
|
|
|
|
|