(Created with Paint Shop Pro v6.02)
Level of Experience: Beginner
~*~ This is my first tutorial, so please bare with me... ~*~
Level of Experience: Beginner
~*~ This is my first tutorial, so please bare with me... ~*~
Alright, now that you are a tube expert... *LOL* Go ahead and open the image that you wish to watermark. Make sure that it is set for 16 million colors. If it isn't, just click on 'Colors' and then on 'Increase Color Depth' to set it to 16 million colors. Depending on how large your image is, you may also want to zoom in on it a bit so that you can see what you're doing.
Add a new raster layer to your image using the following settings: layer is visible, mask is enabled for the layer, mask is also locked with the layer, AND (this part is key!) the Blend Mode should be set to Soft Light!
NOTE: If your image is not at 16 million colors, you will not even have the option to add a raster layer. It will be 'greyed out' on your list.

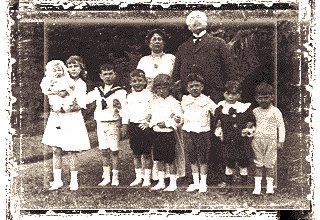
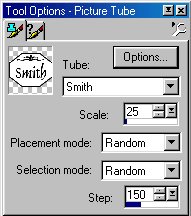
Select the 'Picture Tube' tool.  Now make sure that your 'Tube Options' toolbar window is open. Scroll through the list until you come to the tube which you created in part 1 of this tutorial. (your 'frosted watermark' tube...) Depending on the size of your image to be watermarked, you MAY need to resize your tube. In this case, I used my tube at only 25% of full scale.
If you have JUST created the new raster layer, it should still be the active layer. If it isn't, though, you will need to make it the active layer first. Now just stamp the tube onto your image. =) You should already be able to see how it will look; pretty good, huh? Use the 'Mover' tool  to position your tubed watermark where it looks good to you. It works the best over a dark portion of your image, though.
NOTE: When working on a lighter image, you will probably have better luck by setting the Blend Mode to Hard Light!

Now just merge the layers, and re-save the image with your newly created watermark embedded in it! Excellent job! =)
Please click HERE to see my other watermarking tutorial.
This tutorial was created on 9/8/00.
Disclaimer(s):
This tutorial was written ENTIRELY by me. Should it happen to resemble any other written tutorial, it is purely a coincidence. (I'm sure that there are only so many ways to create a watermark...) Any comments, suggestions, etc. should be directed to me at gigipo@hotmail.com. Thank-you.
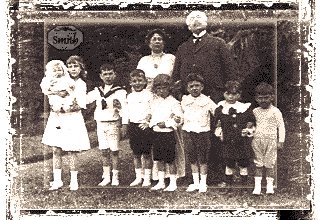
The antique photo used in this tutorial is a royalty free image obtained from http://www.freeimages.com. I am not in any way associated with them; I just chose this as a random image to work with.