 |
|
|
|
|
|
|
|
|
|
|
|
|
|
|
|
|
|
|
|
|
|
|
|
|
|
|
|
|
|
|
|
|
|
|
|
|
|
|
|
|
|
|
|
|
|
|
|
|
|
|
|
|
|
|
|
|
|
|
|
Cutting A Scroll Head |
|
|
 |
|
| There are several ways of cutting a scroll head and I've used a good many of them. I hope to eventually post a few articles on those proceedures but for now, I'm going to show you how I cut most of my scroll heads. |
|
|
|
|
 |
|
|
|
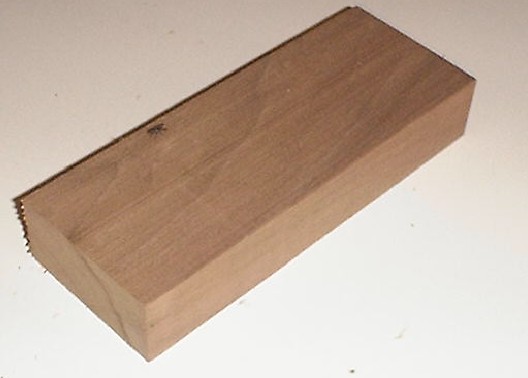
I start with a blank that measures 1 1/2" x 3" x 8". Just exactly how you cut this blank is really unimportant as long as the corners are good and square and the grain runs along the length of the blank. |
|
|
|
|
|
 |
|
|
The first step is to lay out the pattern of the scroll head on the blank. I have a template I use for this. I should really pain the template red as I never seem to put it away and I'm constantly looking for it in the shop. Maybe red would make it easier to find. |
|
|
|
|
|
 |
|
|
I then cut the string throat in the blank using a router table and a 3/4" straight bit with a 2" cutting depth. This is usually a special order bit as not many wood stores carry this bit on stock.
Notice the stop clamped in place on the table fence. I only need the throat along part of the head so this is set to stop me at the right point.
Make several small cuts. Only cut 1/8" to 1/4" with each cut. Taking excessive material out with each cut will wear your bit out quicker and can also cause the bit to chatter which creates a rough cut. |
|
|
|
|
 |
|
|
This is what the blank will look like after you cut the string throat. Now it's time to cut out the notch where the fret board will eventually meet the scroll head. |
|
|
|
|
 |
|
|
|
|
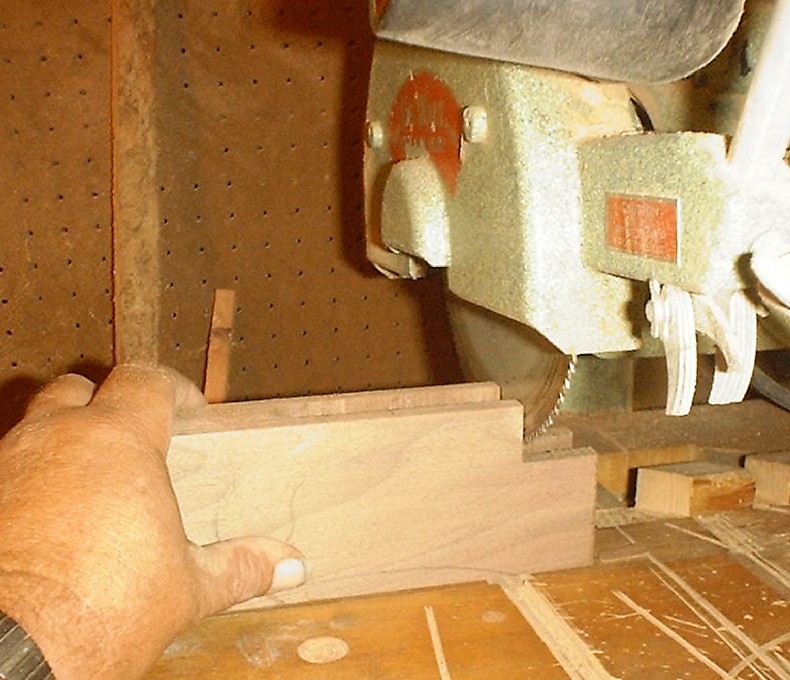
I use a radial arm saw to cut the fret board notch out of the blank. I also use a standard ATBR blade as opposed to a dado blade as a dado blade can at times be violent with a cut and split the now thin walled piece of wood. I just make several passes with the saw.
The depth of the cut depends on the side width you plan to use. On most dulcimers, I use a 2" side so I want 2" of material left between the bottom of my cut and the bottom of my blank in the area where the side will eventually be connected to the scroll head. |
|
|
|
 |
|
|
You now have the the throat and notch cut into the blank and it's time to cut the final shape. |
|
|
|
|
|
 |
|
|
|
|
|
|
My design has a part of a 1 1/4" hole designed into it.I've found that it's easier to just drill that hole (using a drill press) and cut to it rather than take the time to cyut it out. I use a common paddle bit to do this. Since any bit will tear the wood when it comes out, a paddle bit is good for this as it has a long tip and just as soon as the tip breaks through the wood, I can use that small hole as a guide, turn the head over and finish drilling the hole from the other side. This eliminates that tear out. |
|
|
|
|
|
 |
|
|
The lines are faint and hard to see but if you look close, you can see how the hole works into my design.
Now it's time for the final cutting and sanding. |
|
|
|
|
|
|
 |
|
|
|
The final cutting is done with a band saw. |
|
|
|
|
|
 |
|
|
|
|
Which is followed by sanding on the end table of the edge sander. |
|
|
|
|
|
|
 |
|
|
|
And more sanding on the oscillating spindle sander. |
|
|
|
|
|
 |
|
|
And now we have a scroll head. |
|
|
|
|
|
|
|
| We're not finished though. We still have to cut the slots in the scroll head for the sides and do any decorative work to the scroll head we want. Please click on next below to go on to the next step. |
|
|
|
 |
|
|
 |
|
|
|
|