
 Mega
Auction Plus! Surplus Auction's Biggest Auction Yet!
Mega
Auction Plus! Surplus Auction's Biggest Auction Yet!
Tips and Tricks
The 10 Minute
Bishop Neckline
Attaching
Smocked Insert or Skirt using Fusible Webbing

The 10 Minute
Bishop Neckline
I learned the following easy method of tying off
a bishop-style neckline from the Bishop dress course taught by Polly Hogshead
at her shop, Calico House, located in the delightful borough of
Scottsville, Virginia.
Try this method and you'll never use a bishop
neckline guide again...
-
On the wrong side of the garment, pull out pleating
threads from 1-2 pleats to allow for the placket seam allowance.
-
On one side of the center back opening
only, knot the pleating threads two together.
-
From the other side of the center back opening, pull
the pleating threads one at a time until the knots are flush against the
first pleat on the other side of the placket opening. Pull the pleats up
tight against the knotted side.
-
Aligning the raw edge of the knotted side of the
neckline at zero on a ruler, pull the other side of the neckline until
it measures the length of the finished neckline. (Be sure to allow for
placket underlap in your measurement).
-
Approximately 2-3" from unknotted edge, use a pin
to pull up 3/4" of slack in the pleating thread for row 2 (this allows
for the approximately 1 1/2" increase in neckline circumference between
rows 1 and 2). Tie together the pleating threads for rows 1 and 2, taking
care to leave the slack in row 2.
-
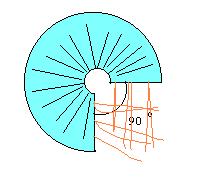
Flair neckline to 270 degrees. Use a 90 degree square
corner of a book or paper to gauge the space between the center back edges
(remember, 270 degrees plus 90 degrees equals 360 degrees or a circle!).
-
Tie off the remaining pleating threads. Turn garment
to the right side and even out the pleats.
a bishop neckline fast and easy.
Attaching
Smocked Insert or Skirt using Fusible Webbing
-
When pleating skirt or yoke, pleat three more rows
than needed (2 above and 1 below). Row 1 is used to keep the pleats
running straight into the yoke. Row 2 is a guide for piping.
The last row is an anchor for the smocked rows above it. For an insert,
pleat 4 extra rows (2 above and 2 below).
-
On ironing board block smocked piece to fit the yoke.
Align center fronts of yoke and skirt or insert. Pin pleated piece
right side up to ironing board.
-
Cut a strip of fusible webbing (like "Stitch Witchery")
the length of the yoke. Then cut this strip in half down the length
so that you end up with two pieces 3/8" by length of the yoke.
-
Place one piece of webbing on pleated piece between
rows 1 and 2. Pin piping on top of webbing using row 2 as a guide.
Steam using up and down motion of iron to attach.
-
Pin the second piece of webbing on top of the attached
piping. Pin yoke on top (right side down) aligning center fronts.
Steam in place. Machine stitch close to piping. Trim seam to
1/4".
 This page hosted by
  Get your own Free Home Page