Pohutukawa Border Background
How I Did It - With Paint Shop Pro 5
Note: This was created in January 1999. These instructions apply to later versions of PSP also.
I had some fun creating my Pohutukawa Border Background, which you can see on my Christmas page, so I thought I would share with you how I did it. Right here I should point out that I am not a great graphics designer, and my experience with Paint Shop Pro 5 is fairly basic.
This pre-supposes that you have a working knowledge of the PSP5 tools and how to use them.
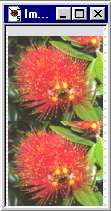
First off, I had to get my Pohutukawa flower - I scanned in this photo

From this photo I selected just one flower like so -

Since I wanted my border to be 95 pixels wide, I resized it to be 95 wide, keeping the width/height ratio. It ended up 85 pixels high.

Now, to just use it as a repeating image down a border is not going to work very well - this is what several of them together looks like -
Not too bad, but there is a distinct unmatched join between them, what I wanted was a seamless border. This is where the layers in PSP5 come into play. There are probably other ways to do make the join seamless, but this is the way I did it.
First of all I opened a new image window 95 pixels wide and 180 pixels high.
|
I then selected the original border image and copied it [Edit - Copy]. Select the new empty window and paste as new layer. Do this twice, so you now have the background layer and 2 image layers. Have the Layer 1 image at the top. |

|
|
Now slide them together (they are different layers remember) |
|
All work is done on the Layer 2 (bottom) image only. Using
the clone tool, copy from the leaf in the lower right corner and make
a new leaf at the top to match the leaf on the upper image.
Extend the red flower patch up over the top image.
Left side, copy white marks on bottom of image to top, and match up with
marks on upper image.
Using the same technique blur the remaining join.
Now compare the two. 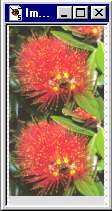
Next, turn off Layer 1. The extra bits that have been added out of the top of the image need cutting off and putting on the bottom. Use the Selection tool and select this part.

|
Cut it off [Edit-Cut], then paste it back as a new layer. Move this new part down to the bottom of the image. |

|
Combine Layers 2 and 3. Have only these layers visible - [Layers-Merge-Merge Visible]. With the Magic Wand select the blank areas above and below then invert selection so only the image is selected. Copy and Paste as new image. This is your border image, with matching top and bottom edges. |

|
To make the complete border background graphic, I created
a new image 1200 x 85 and filled it with a solid colour - in this case
#DFE8D3. Next, I added a small amount of noise - [Image - Noise - Add]
Uniform/7%.
Then copy the flower image and paste it as a new layer onto the background
image. Move it to the left end. Now add a couple of vertical lines to
the edge and it's all done.
For a great Paint Shop Pro tutorial go and have a look
at this
Web Graphics on a Budget
Return to CL Main Page
Return to Site Index
Visit other places in my Heartland Home
If you came in on a Webring, and are ready
to leave,
go here to continue your journey