
Thanks to Christa Lewis for showing me how to make the Star Card & Anon. for the instructions that I've modified :-)
You will need:
2 pieces of heavy card (5 cm squared)
2 pieces of speciality paper to cover card (9 cm squared)
eg. Mulberry paper or paper you have stamped up
5 pieces of paper, plain or coloured for pages (9 cm squared)
1 ribbon (40 cm)
1 bead or button
glue stick
rubber stamps
Instructions:
Using glue stick, glue card squares to centre of wrong side of
the speciality/stamped paper. Ensure to glue over the whole
surface.
Trim the corners of the speciality/stamped paper, but not the
card, then glue and fold down. Don't worry if this side is not
fully covered as the inside papers will cover it up.
Rub glue stick from corner to corner (diagonally) on both cover
pieces. Half your ribbon and place centre of ribbon between the
two covers, keeping them about 5cm apart. This forms the Star
Card's hinge. Smooth ribbon onto glue lines and put aside to dry.
To make pages:
Fold the paper in half lengthwise, crease.
Open paper and fold in half crosswise, crease.
Open paper and turn over. Fold in half diagonally, crease.
Turn paper over. With thumb and middle finger, press creased
triangles together until they touch, then press front to back to
form a square. Note that the page has a free end and a folded
end.
Fold the rest of the papers to make up the rest of the star card.
Decorate the inside of each page. If you want to decorate the
outside edges, decorate only the creased squares - the uncreased
squares will be glued together and you won't see the images.
To assemble the
Star Card:
Place one page (folded back into the square) on a flat surface.
Apply glue stick to the entire surface, place another page on it,
matching folded corners and making sure that edges are aligned.
Continue stacking until all five pages are glued together.
Then apply glue to the bottom half of the cover and centre paper
stack on top. Be sure that the folded corners are closest to the
ribbon hinge. Last, apply glue to the top cover and place on top
of the pages, making sure the entire book is aligned.
Thread a button or bead onto the ribbon. Tie a knot near the free
end and top keep the button/bead from slipping off.
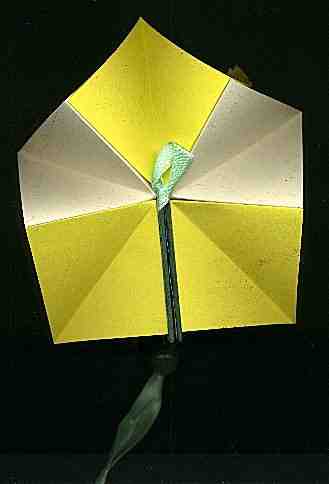
To display pull button down towards knot, open up Star Card and push button up to other side. Great one to hang off the Christmas Tree.
 |
 |
||
Front View of Opened Star Card |
Back View of Opened Star Card |
The measurements are just a guide, you can adjust them to make a smaller or larger star card.
NOTE: The edges may have excess glue, pull gently apart and allow to dry.