|
 |
 There are many types of bases that you can use for bases for your globes. For this globe, I've chosen to use a dingbat font, "Fleurons" at pt. 48. If you have the plug-in, Blade Pro, make sure that you type the dingbat in white. Once you have added your dingbat, go to Selections on your menu bar and promote to layer. If you want to use your plug-in, now is the time. I used Blade Pro set at subdued gold. Many times as I did with this, I like to use the inner bevel effect. I try different settings and use what looks best to me. If you like, you can also select a fancy font, capital letter work nicely, and many of those will work nicely as a base also. Don't be afraid to experiment a little. You're likely to come up with some very unique results. You always have your "Undo" option. *smile* There are many types of bases that you can use for bases for your globes. For this globe, I've chosen to use a dingbat font, "Fleurons" at pt. 48. If you have the plug-in, Blade Pro, make sure that you type the dingbat in white. Once you have added your dingbat, go to Selections on your menu bar and promote to layer. If you want to use your plug-in, now is the time. I used Blade Pro set at subdued gold. Many times as I did with this, I like to use the inner bevel effect. I try different settings and use what looks best to me. If you like, you can also select a fancy font, capital letter work nicely, and many of those will work nicely as a base also. Don't be afraid to experiment a little. You're likely to come up with some very unique results. You always have your "Undo" option. *smile*
|
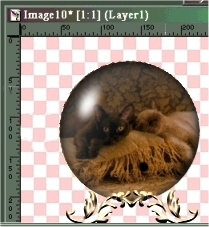 After you have gotten the effects on the ding bat or the font the way you like it, go to Layers on your menu bar and choose Duplicate. Now go to Image and click on mirror. You now have the other side of your base. Move the base halves around under the globe until they are positioned in a way that gives the appearance of a stand holding up the globe. To make your base one piece, open your Layer Palette and hide all layers except your base halves. When you've done that, you will merge them to become one layer. After you have gotten the effects on the ding bat or the font the way you like it, go to Layers on your menu bar and choose Duplicate. Now go to Image and click on mirror. You now have the other side of your base. Move the base halves around under the globe until they are positioned in a way that gives the appearance of a stand holding up the globe. To make your base one piece, open your Layer Palette and hide all layers except your base halves. When you've done that, you will merge them to become one layer.
|
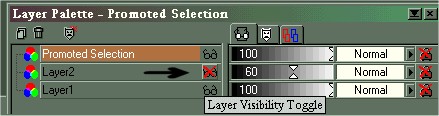
Now you need to go back to your Layer Palette and change your globe layer view to invisible. Then you will add another raster layer like you did for the globe. You want to make sure that this layer is under the layer witht the globe. In your Layer Palette you will be able to see where your layers are and move the new one to the correct position. This layer is for your sparkles or whatever tube you choose for the animation. You will be doing this step at least three times and putting sparkles or whatever on a layer will make it easy to remove the first set so that you can put the next set on. It will be more clear as we go.*smile* |
 You will need to consider what colors will show up nicely on the image that you are working with in the globe when choosing a tube. Of course you will need to resize your tube to a smaller size. The size will be up to what you think is best. Once you have found the tube and the size you want, radomly put them around on the layer you added within the image. Be as sure as you can that the tubes are all inside the edge of the image. When you have enough tubes to your liking, go to your Layer Palette and make your globe visible again. Now to to Layers on your menu bar, go to merge and be sure to choose merge visible. Now copy and paste as a new image and you will have an image for your first frame. Just leave that image for over to one side for now and go back to the original image. Go to Edit and undo merge visible, undo layer view, now go to Layers and delete the layer that you put your tubes on. Now add a new raster layer. The new layer should automatically go into the same position as the layer you just deleted, so you won't have to make sure it's under the globe layer. Just radomly place your tubes again, make your globe visible again, merge visible, copy and paste as new image. Go back to the original image and repeat the process one more item, and copy and paste as new image. Make sure that all three of your images are the same size. Make a note of the size because you will need it later. You will need to consider what colors will show up nicely on the image that you are working with in the globe when choosing a tube. Of course you will need to resize your tube to a smaller size. The size will be up to what you think is best. Once you have found the tube and the size you want, radomly put them around on the layer you added within the image. Be as sure as you can that the tubes are all inside the edge of the image. When you have enough tubes to your liking, go to your Layer Palette and make your globe visible again. Now to to Layers on your menu bar, go to merge and be sure to choose merge visible. Now copy and paste as a new image and you will have an image for your first frame. Just leave that image for over to one side for now and go back to the original image. Go to Edit and undo merge visible, undo layer view, now go to Layers and delete the layer that you put your tubes on. Now add a new raster layer. The new layer should automatically go into the same position as the layer you just deleted, so you won't have to make sure it's under the globe layer. Just radomly place your tubes again, make your globe visible again, merge visible, copy and paste as new image. Go back to the original image and repeat the process one more item, and copy and paste as new image. Make sure that all three of your images are the same size. Make a note of the size because you will need it later. |
One image at a time, you will now go to File on your menu bar, go down to Export, Tansparent Gif. The Transparent GIF Saver will open and it would be a good idea to click on the Partial Transparency tab and down where you see, Yes, blend with background color, make sure the color is close to the color of the background of the page your globe will be on, if you know. When I'm not sure of that,I pick a medium shade of gray that seems to work for a lot of backgrounds. Name your file and repeat this proceedure for the other two images. I named mine cat1, cat2, and cat3.

|
You're ready to make your globe animated! Go to File and choose Run Animation Shop. Once that is open, run the animation wizard, fill in the size of your image that you made note of earlier, next choose Transparent, next choose Upper left corner of the frame and With the canvas color, next choose Yes, repeat the animation indefinately and then decide on the length of time for each frame, next add the images you've just made and finish!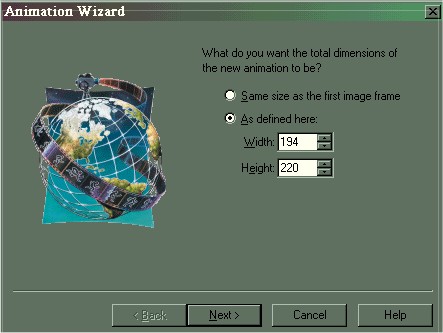 |
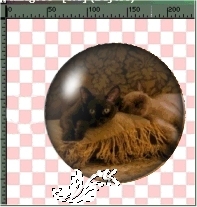
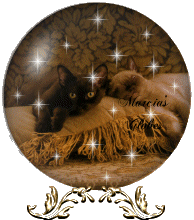
Your end product should look like this. To see the animagion, click on View, then choose animation. If you are satisfied with the results, save your animation. You've made your first globe!
 |
|
|
|

Get your free pages today! |

|