I know most,
if not all of you have been frustrated in painting your lovely
Sisters of Battle miniature's eyes. You'd spend a significant
amount of time painting up their armor, backpacks and weapons
which all look magnificent from a distance until you bring it
closer and see how all that hard work will go to naught because
you couldn't get the eyes right.
Well, fret
no more. In this article, I will share with you one of the discoveries
I have made in the struggle for decently-painted Sisters of Battle.
Since not all of us have steady hands of a professional miniature
painter, the biggest challenge to painting decent eyes is how
to get that precious black eye shadow around without slipping
up. Here's my first step:
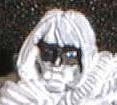
1)
After applying the base coat (white paint in this case), determine
the right color combinations for your mini's eyes and hair. I
usually go for natural combinations such as in this case, blue-blonde,
brown-black, green-red, etc.
Of course,
I'm not saying you should restrict yourself to that but it helps
a lot so since members of the Adepta Sororitas are supposed to
maintain a strict code of conduct that includes proper appearance.
Nothing too heretical mind you. If you're using another color
for base coating, paint the facial area white first.
After that's
done, paint a thin line on the model's eyes that will be the color
of the iris. Its easier to paint over a white undercoat because
you can see the borders around the eye sockets and can position
your brush tip better.
Since there's
not much paint, its also easy to clean up mistakes by rubbing
the model's face with a cotton swab of rubbing alcohol and doing
the procedure all over again. I don't recommend painting over
mistakes at this point as it is easy to accumulate paint and lose
that very important facial detail.
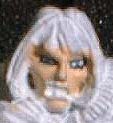
2)
The next step is the all-important black mask that will serve
as the model's eye shadow. Carefully paint around the model's
eyes with black paint. Make sure you don't use too much paint
on your brush tip because it may run over the the eyes and ruin
everything. This is the easiest way to define the size and shape
of the model's eyes because you have more control painting around
the eyelids.
Caution must
still be taken so that you should keep the eyes level. Its quite
easy to get carried away painting around the model's eye sculpting
details. Remember that not all miniatures come off the molds exactly
aligned. Some may require you to adjust the eye position a little
so that it will look right. Oh, and do wait for the paint to dry
first before moving on to the next step.
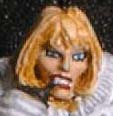
3)
The next step is to paint the flesh on the model's face and around
the eyes. Once again, be careful not to have too much paint on
your brush tip that may spread onto the eyes. Leave just enough
black lining around the eyes to be noticed and you've got instant
mascara!
You can also
vary the thickness of the lines along the eyes from model to model
but should you make a mistake and paint over the black lining,
you can re-apply black paint over the area you wish to correct
and finish it off again with flesh paint.
I recommend
that you do not do this more than twice on the same area because
there might be too much paint on it already and it will show.
In this case, you will have to start over again in order get it
right.
4)
The final step would be to paint on the hair and other facial
details. In this case, I applied a light wash of Snakebite Leather
paint on the model's facial recesses and dry brushed with Elf
Flesh. The blonde hair was achieved using Bleached Bone with Snakebite
Leather wash and Bleached Bone drybrush.
Voila! The
face is done and all you have to do now is complete your masterpiece
by finishing the rest of the body and base.