
A simple how-to on creating a partial mask with slush/slip/mask latex.
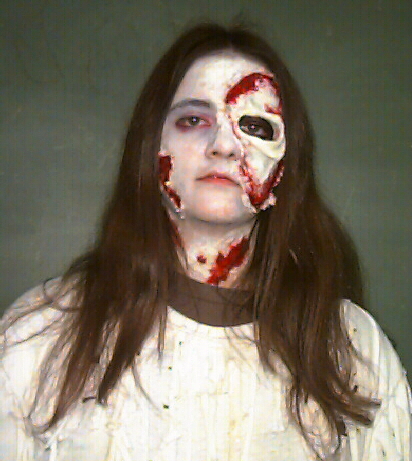
This simple half mask of a skull, by Rebecca Burt, brought lots of good comments this Halloween.
The photo isn't clear, but it looked great.
Basic Slush Latex 101
Slush latex, also known as mask and slip latex, is a thick cream colored liquid with a strong ammonia smell. Unlike foam latex, it doesn't need to be oven baked and will dry by air into an opaque rubber-like material similar to a rubber band. This kind of latex can be purchased at most costume stores and from any make-up supplier including Burman, Ben Nye and Graftobian (at various prices). Slip latex can be molded in many materials including plater, hydrocal, and plastic molds, but for our how-to we'll be using the easy to find plaster of paris. Slip latex is easy to use, and this how-to will give you the simplest and cheapest way to make a partial mask or appliance. Once you have tried it this way you may decide to upgrade your materials or try more complex work.
Materials
For this how-to you will need:
You first job is to sculpt what it is that you want to make. Take your
life cast and stick the clay to the area you're going to work on.
Sometimes it won't want to stick to the plaster, but if you feater the
edges well it will usually stay put. Start by 'roughing' your creation,
that is making the basic form with lumps of clay. Then when you have
the basic shape work on making it into the form you want and adding the
detail you want. You can use your hands, store bought sculpting tools,
or anything you have around the house that will help you add shape or
detail. Some things your might find halpful as tools are: screwdrivers,
exacto knives, pencils of different sharpness, cutlery, needles, wire
brushes, sticks, etc. You can add texture by using texture stamps,
sponges, leaves, rocks, crumpled paper, feathers, etc. If you want a
smooth surface, getyou fingers wet and smear (try not to leave finger
prints) or use the quick touch of a lighter or candle (the black they
leave won't hurt anything).
The sculpting of your creation is very important, so make sure you
have it exactly how you want it before continuing.
Making the Negative
When you are done your sculpture it is time to make the negative mold.
Use the tin foil to make a tub the size & depth (nose to back) of your
life cast (or at least large enough for the area sculpted). Try to make
the walls of the tub thick and the corners fairly sealed so you don't
make too big of a mess. Carefully use a Q-tip of a paintbrush to coat
your sculpture and lifecast with the liquid dish soap. This will make
it easier to remove later, make sure that any plaster areas of your
lifecast are coated extra well. Mix up your plaster of paris to a
yogurt-like consistancy, no thicker or it widamage your sculpture. Pour
the plaster into the foil tub carefully, leaving a little room from
the top. The tub might leak a little but that's ok, the tub will very
likely overflow when yuou put in your scupture so make sure you have your
cleanup stuff nearby. Carefully pick up your lifecast and press it
face down into the tub, far enough to cover the sculpture but keeping
the back half above the plaster. The plaster should be thick enough
to hold the lifecast/sculpture in place, but if it isn't keep it in
place with your hands until the plater solidifies enough. Make sure
that the nose doesn't hit the bottom of your tub or your mold could
come out deformed. Let the mold sit until it is dry, a few hours at
least. After it has solidified enough you can peel away the tin foil
to help the underside dry faster.
When the mold has dried, carefully remove the lifecast (you might
have to pry a little). If any clay is still in the mold work it out
carefully with you hands or a sculpting tool. If your mold has very
find work, you may have to melt out some of the plasticine using a
lighter, oven or microwave, just be careful! Peel off the rest of the
clay from your lifecast as well, and clean it as best you can with a
little soap and water or alcohol. Now you have a finished mold
(negative) and your lifecast (positive). It's a good idea to let the
mold sit for a while after cleaning so that you can be sure the inside
is dry.
Pouring the latex
First you have to prepare the mold. Use the dish soap again, just light
coats though, and coat the lifecast and mold. Make sure that it is just
a coat and there are no pools of soap in the negative. After the soap,
carefully dust both sides with talc or baby powder. Now the mold is ready
for use.
Start out by using a Q-tip to fill the smallest areas of your negative
mold with latex. Try to get rid of any air bubbles by rocking the mold
and blowing on the surface of the latex. Now use the Q-tip, or pour a
little from your latex container into the negative to coat the rest of
the surfaces. Fill any deeper areas of the negative that aren't part
of the positive (wherever things stuck out of your sculpture). When the
mold is well coated pour in a little more latex and rock the mold to get
rid of air bubbles. Now carefully set your lifecast into the mold and
press it down into place. Some latex should squirt out around the edges
of the mold. Sit the mold somewhere to dry and leave it to dry. The
face mask in the picture took about a day and a half to dry, smaller
objects will dry quicker and larger will dry more slowly. The mold
should be kept at room temperature to dry the best (cooler temperatures
slow the drying process). Do not bake the mold!!
Removal
When you believe the mold has sit long enough (the longer it sits the
better guarantee that it will be dry) then carefully pry the lifecast
loose and set it to the side. The latex piece will be finished in the
mold. If the piece is still wet, just press the lifecast back down and
leave it longer, the finish on the back of your piece will be lumpy from
opening, but the front should be just fine. If it is done the latex will
be rubbery and can be pulled from the mold carefully. Work it out from
tight spots if you can, but you may have to break the mold to get it out.
Molds with many fine parts are usually only one use, so be extra careful
not to damage the latex piece. As you pull out the latex us a little talc
or powder, this will stop the latex from sticking to itself which it will
tend to do.
Once you have the piece out, dust off any excess powder and set it in
place in your lifecast. Latex pieces can deform if not kept in the proper
shape on a lifecast. You can repair any visible air bubbles with a
little latex and a toothpick, letting it dry while sitting on the lifecast.
Note - If your mold is still good, you may notice after a few days that
it has grown mold of it's own. Don't worry, it happens sometime when
using these super-cheap materials. Simply clean off the mold with a soft
cloth or Q-tip and some alcohol and it should be fine.
Painting
If you decide to paint your lifecast and don't have specialty latex paints, then this technique will work (but may create a gravelly look, usually not noticable though). Take whatever color of acrylic paint that you chose for your piece and put some out on a tray or piece of paper. Mix in some rubber cement or contact cement and paint this mixture onto your piece. You have to work fairly quickly, only mixing small amounts at a time, because the rubber cement dries quickly. This paint mixture works fairly well, but don't use expensive brushes with it because it will destroy the brush you use. after the surface is painted you can use normal make-up and paint to finish it off exact. For a good gory look, paint your bloody areas with rubber cement paint in red and then when it's dry paint on some corn syrup blood. It will dry shiny red (but stay a little sticky) and looks really good.
Finished
Now your appliance is done! You can use any adhesive, including
spirit gum, to attach it to your subject. Latex pieces can be reused
over and over if cared for properly.
Keep these guidelines in mind:
Good luck with your projects!