by Rebecca Burt

Spruce up your projects with some teeth or fangs with our easy-to-follow
directions.
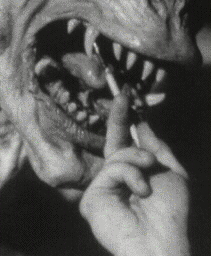
Casting Teeth
|
Materials:
- Alginate
- Tin Foil
(or tooth trays if you have some)
- Plaster
- Small paintbrush
(it can be a cheap one)
- Mixing Bowl
- Paper towels or napkins
|
|
- Unless you have tooth trays, use the tin foil to make some temporary
ones. Make a "U" shape about the same size as your top teeth and about 1
wide, then set it in your mouth and use your fingers to work it into a
trough shape around your teeth. Pull it out of your mouth and pull the
trough a little wider so there's room around your teeth when you put it
in your mouth. It should look somewhat like a mouth guard does (like for
boxing).
- Mix up about a tablespoon of alginate and drop it into the tray, the
tray should be about 2/3 full.
- Shove the tray over your teeth, making sure that you keep alginate
around all the sides of your teeth - especially the bottom of your tray,
don't bite down too hard or there won't be any alginate between your
teeth and the tray bottom. Work over a sink and lean forward a little so
excess alginate doesn't run down your throat. You can spit out some
excess as long as you don't move the tray around much.
- Let the alginate set. It only takes a few minutes and you should be
able to feel it go rubbery with your tongue. Then carefully pull out the
tray (over a sink because you'll probably drool some). Spit out any globs
and rinse out your mouth to get any little bits, alginate isn't dangerous
at all but it's slimy feeling.
- Carefully rinse out the tray and dab the water out with a paper
towel.
- Mix up about a tablespoon of plaster and use the paintbrush to coat
the inside of the alginate mold, getting into all the cracks and crannies.
Fill the mold with plaster and gently tap and rock it to get rid of any
air bubbles. Let the plaster dry.
- Carefully peel out the plaster copy of your teeth. It will be very
exact replicas of your teeth. If the alginate is still ok, we suggest
making another 1 or 2 plaster copies (they break easily).
Easy Custom Fangs
These fangs won't last long because they tend to be very brittle, so if
you will be using this technique for a longer term project, make several
pairs and be ready to make more if you need to.
Materials:
- Tooth cast
- Fimo, Sculpty, or other oven bake polymer clay (clear, white, or
cream colored)
- Paint (craft paints work) or Tooth dyes for color (optional)
- Oven or Oven Toaster and Cookie Sheet or Casserole Dish
(just to put the teeth on while they're baking)
- Take your Fimo and work it in your hands until it's warm and soft.
Make several smal balls about the size of a pencil eraser.
- Use these small balls over the plaster positive of your teeth to
form your fangs. Try to keep the edges smooth and make sure that the
clay fits over the front of the tooth and up at least half way on the
back (to keep it on). Shape the clay however you want the teeth or fangs
to look, keeping in mind that you have to shape them so that they don't
interfere with your gums and allow you to close your mouth.
- Smooth out any fingerprints on your final model or add texture if wanted.
- Take the positive with the teeth on it and put it on a cookie sheet
in a preheated oven as directed on the clay's packaging. Bake until
finished. Check regularly to make sure the fangs aren't burning!
- Carefully wiggle the fangs off of the plaster positive. The plaster
may break, but try not to tear the fangs. If you have problems removing the
fangs and need to try on another positive, try smearing a little petroleum
jelly on the plaster before attaching any Fimo.
- Test the fangs over your own (or your subject's teeth) teeth. If
there are any sharp edges use sandpaper to dull them. Then use paint or
tooth stain to color the fangs as needed. The small acrylic craft paints
from craft supply stores usually work fine, but you migh need a few coats
before you get proper coverage. If the paint won't stop peeling off when
your fangs get wet, try coating them with a paint sealer or clear nail
polish.
- Your fangs are now done. They should fit perfectly over your own
teeth and feel fairly comfortable. If they don't stay in place by
themselves, use a little spirit gum (put on wearer's teeth and fangs,
allow to dry fully, then stick together) or denture adhesive to hold the
fangs/teeth in place. Don't bit down too hard on your fangs or eat with
them in, because they're pretty brittle and one may come loose and be
swallowed.
Quick Fake Gold Tooth
Materials:
- Gold Candy Wrapper ("Kisses" work great)
- Spirit Gum
- Mechanical Pencil with an Eraser
- Take your candy wrapper and smooth it out, the smoother it is the
better it will look later. If it has one side that's paper you have to try
to pull a small square of the metal part off. Usually the easiest way is
to burn the paper off with a lighter. Kisses work great because they don't
have any paper and are ready to go.
- Cut a small square piece out of the metal wrapper a little bigger
than the tooth you want covered.
- Dry the tooth and brush a little spirit gum on to it, brush some
spirit gum on the duller side of the square you cut as well and let both
dry a little until tacky.
- Center the square over the tooth and push it into place. Use the
mechanical pencil to fit it over the tooth exactly - the eraser to smoth
any flat edges and the pencil end (with no lead) to push it down around
the edges and gums. When it's all smoothed on you're done. The tooth is
pretty durable and should last a few hours (or you can peel it off) but
don't eat with it. If you want a different colored tooth use a different
colored wrapper.
A Tray Tip: Courtesy of jlewis
Impression plates can be made easily out of matboard. Custom fit the
trays to your jaw by simply measuring your jaw by biting the surface and
tracing. Then measure the distance from bottom of your teeth to about a
fourth inch above gumline and add that to the edges of your tracing. You
can make a tray that is very similar to what you see in the dentist's
office.
A Toothy Tip:
Courtesy of Chris S.
I made a pair of very realistic vampire teeth myself using dental acrylic
that I got from The Monster Makers on-line. I recommend this to the
plaster or sculpy because the coloring is the same as real teeth. This
is the same acrylic they use on dentures and runs for less than $20.
I've made three pairs in total and I'm happy with the results. Good luck,
and I hope this tip will help with your projects.
Have something to add?
Do you have an easy how-to or tip to add to this list? If so
e-mail us!