Astronomy
February 19, 2003
One of the hobbies we have been exploring is Astronomy. It all started with Joanne's Mom giving us a family gift. After several clumsy attempts at stargazing, we acquired a little knowledge, made a few upgrades and are now enjoying sights that are out of this world!

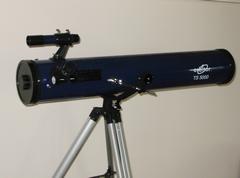
We received an Orbitor TS 5000 telescope as a family gift.
After putting everything together, it was time to try out the new toy. Find a star. Point at it. Nobody move. Hey, it still just looks like a small dot of light. We needed help from an expert!

So, we planned a night out with a man who spends most of the time with his head above the clouds. Darryl Archer not only gave us a lot of amazing facts, he actually demonstrated some of the unbelievable things you could see in the night sky. And, by the way, you're supposed to take the ENTIRE front cover off :)

The Orbitor is a 5 inch reflecting telescope. It is essentially a long tube with a concave mirror at the bottom. Light enters the open end and is reflected back up to a 45 degree mirror and out through an eye piece.

The first challenge was the stability of the mount. The original mount was flimsy and very difficult to keep steady. Again, Darryl came to the rescue. "Let's build a Dobsonian mount", says he. After a few hours at his shop, we magically assembled the stand above out of 1/2 inch plywood.
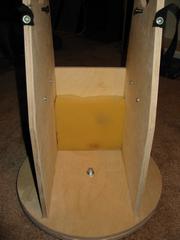
This Dobsonian mount consists of three sides of plywood mounted on two plywood circles. See the link at the bottom of this page for some alternate on-line instructions. I added a piece of foam to avoid banging the scope when swiveled completely upright.
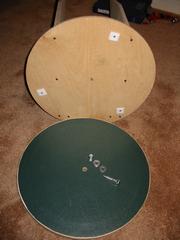
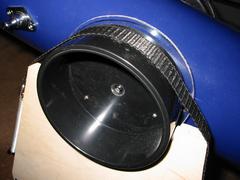
We glued some Arborite to the top of one of the circles, and screwed three squares of teflon on the bottom of the other. A bolt and locknut holds the pieces together through the hole in the center of the circles.

Three hockey pucks adorn the bottom of the stand. Once assembled, the circles provide a solid base and give smooth side to side movement for your telescope.
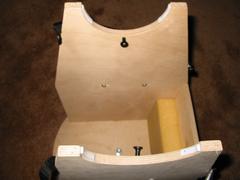
We then cut the top of the side panels to conform to the PVC caps used to mount the scope.

Small Teflon strips provide a smooth up and down glide for following your favourite star.

Replace the existing scope mounts with two 4 inch PVC caps. We added a clear plastic flange to stop any side to side shifting on the mount.
By using a nylon strap, you can add a little pressure to the mount to ensure the scope remains solidly in the position you set it.

A spring provides the necessary tension and makes it easy to detach the scope from the mount.

This is what the entire assembly looks like when put together. Now for some warm weather, so we can apply a coat of paint.

The telescope also came with a low quality finder scope. In this picture we've replaced the view finder with a Telrad viewfinder. I picked up this used one for about $40.00
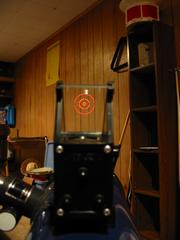
The telrad uses an angled piece of glass to create the effect of projecting a bullseye on the sky. Unlike the original finder, it does not have any magnification, but is very easy to use to quickly locate your visual target.
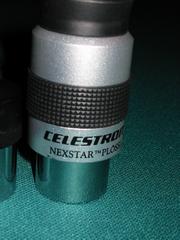
The next upgrade was a quality lower magnification eye-piece with a large field of vision. Most of your observing will be done with lower to mid range magnification, providing much brighter and crisper image and a more satisfying view. This Nexstar Plossl 32mm cost about $95.00.

Above is a comparison of the new eye piece with the 5mm and 20mm pieces that came with the scope. Although the Plossl is the eye piece of choice, the high powered lenses are useful for planetary viewing or close ups of the moon.

The scope also came with a Barlow lens, an erecting eye piece that provides some magnification and inverts the image, and an electronic eye piece for viewing via a video signal.

It takes about an hour for your eyes to completely adjust to the dark. Once adjusted, regular light can ruin your sensitivity. The last handy gadget we assembled was an LED flashlight.

The LED flashlight is bright enough for reading charts, yet the red light won't compromise your night vision.

By cutting up a bit of foam and high jacking an old carrying case from one of the kids, everything can be safely transported to your favourite stargazing spot.

The real key to having a great time scanning the skies is a little expert advice. Apart from taking advantage of Darryl's vast store of knowledge, Joanne picked up this book for me as an early Christmas present. It's an awesome read, both very informative and practical.

We copied a few charts and laminated them to take out into the night with us. It was amazing how, after a few nights of poring over the charts, I stepped outside and found that someone had organized the sky into easily recognizable patterns!
The photos on this page have been drastically reduced in size and quality from the originals for speedy loading from the Internet. To request the originals, or provide feedback on this page simply email Howard or Joanne Lenos at howjo_gang@yahoo.com