 |
|
|
|
|
|
|
|
|
|
|
|
|
|
|
|
|
|
|
|
|
|
|
|
|
|
|
|
|
|
|
All you need to determine how your whitetail measures up. |
|
|
|
The Tools You'll Need
Two quarter inch by six flexible steel tape measures (one lip end and one ring end)Ā Thin, flexible steel cable, three to four feet long (bicycles brake or gear selector cables without housing work nicely)Ā Two alligator clips Roll of half inch masking tape Carpenter's folding ruler, with slide end Erasable pencils Copies of the official scoring forms (from B&C: 888-840-4868)
|
|
|
|
Note: If a demensions nudges past the 1/16 mark between eights, round up to the nest eighth.Ā Be sure to keep all right and left antler measurements seperate.
1. Establish Baselines: To qualify as measurable, any projection has to meet two requirements: 1) It must be at least on inch long from the tip to it's juction with any other antler structure; and 2) at the point must be longer than it is wide. So initial step in measuring whitetail antlers is to establish "baselines" for all possible points and to "qualify" suspect points.Ā Determine point bases by draping the quarter-inch tape over the point at its juncution with the other antler structure and marking the baseline so that it coincides with the edges of the host beam or point.
|
|
|
|
|
|
 |
|
|
|
|
|
2. Identify Non-Typical Points: ĀĀ If an antler point is measurable it must then be classified as typical or non-typical.Ā All typical points project from the top -- not the sides or bottom -- of the main beam; and they may not branch form other points.Ā The final point count for each antler includes all measurables points -- typical and non-typical -- plus the main beam tips.Ā Look at both sides of the rack and match up points by their location.Ā If extra points along the beam tips create obvious mismatches from side to side, these may be non-typical.Ā Missing or broken-off points can also cause mismatches and reduce the final score.Ā Mark all abnormal points on a typical rack with pieces of masking tape.Ā Later, as the points are measure and recorded, the tape can be removed to help keep tack of which points have been measured. |
|
|
|
 |
|
|
|
|
|
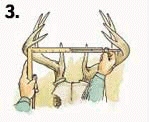
3. Inside Spread: Ā The inside spread is the only spread measurement that counts in the final score.Ā Taken with the carpenter's rule betweenĀ the inside of the main beams at their widest point, this measurement's path must be perpendicular to the center line of the the skull and parallel to the top of the skull plate.Ā The inside spreads credit may be equal to, but may not exceed, the longer of the main beam measurments.Ā If it does, the longer beam measurements becomes the spread score.Ā The other two spread mesurments -- tip-to-tip (B, in panel No.6) and greatest spread (C) -- are supplementary data (as is the number of points); they simply add numerical perspective to the overall size and configuration of the rack. |
|
 |
|
|
|
|
|
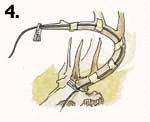
4. Beam Length: Measure the main beam from tip to burr by carefully taping the cable along the outside center line of the antler.Ā Use alligator clips to mark the ends of the cable.Ā Then stretch the cable along the tape to record the distance between the clips.Ā If there's a question about which path should be taken on a curving beam ( or point, for that matter ), measure both sides and record the longer dimension.Ā If bumps, bulges, ridges, and other points interfere with the measurement path, take the shortest route around them. |
|
|
|
 |
|
|
|
|
|
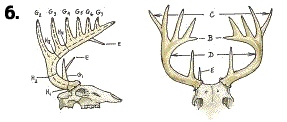
5. Points: Next are the point measurements.Ā Using the lip-end tape, measure from the tip of each tine to the baseline pencil marks ( made in Step 1 ).Ā Begin with the first typical point or brow (G-1, in Panel No. 6), and measure each of the typical points on both antlers.Ā Then measure the non-typical points (E). |
|
|
|
 |
|
|
|
|
6. Circumference: The final dimensions to meausure are the circumferences of the main beams. Two standards apply:Ā Circumferences are always read at the narrowest place within the designated locations, and four measurements must be made on each antler.Ā Except for the first circumference, these measurements are made at locations along the main beams between the typical points.Ā The first circumference ( H-1) is takenĀ at the narrowest place between the antler and burr and the first point or brow tine; the second circumference, H-2, comes between G-1 and G-2; the third, H-3, is between G-2 and G-3; and H-4 is taken between the third and fourth typical points.Ā Use the flexible quarter-inch steel tape for these meauserments, not the cable.Ā The latter can slip in between bumps on the beam and cause illegitimately low measurments to be registered. |
|
|
|
|
|
|
 |
|
|
|
|
|
|