CCD Webcam Image Processing Tutorial
|
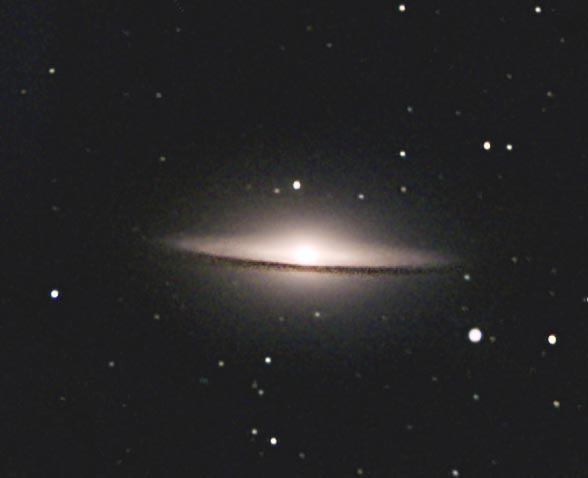
 A single raw frame
|
1: Stacking the raw frames
The first step in image processing is to select the best raw frames and combine them. I use a free tool AwiRaw for browsing through the individual frames of an .avi file and de-selecting those with blurred stars etc. Then I save the rest as one new color .avi file which I will use for the actual processing.When a color .avi file of the best raw frames have been made, it is loaded into a stacking program. Images could be aligned and stacked by hand in Photoshop but it is very time consuming and there are a some great tools available to do the job. I use the free program Registax for this task.
After having aligned and stacked the frames of the color .avi file I get a combined image which is nearly free of noise.
It is important to save the combined image with the highest possible bit depth so we can have the largest possible dynamic range to work with in the further porcessing. I save the image as 16 bit TIFF.
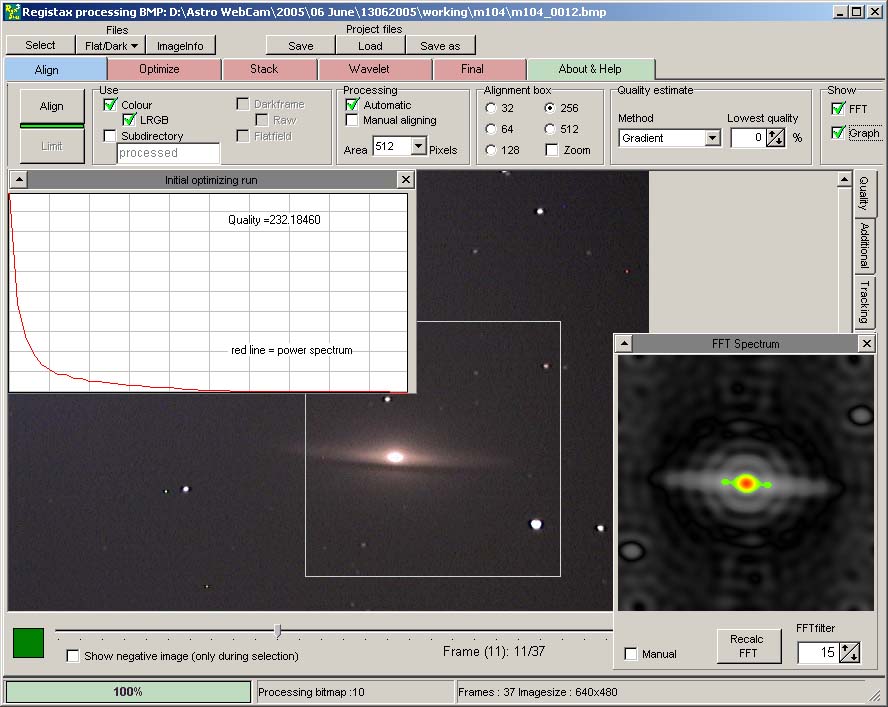
Registax alignment process |
 Stack of 37 raw frames, produced by Registax
|
2: Flattening the image
The stacked image is a great improvement over the raw frames, but this is only the beginning - there is much more to get from it. First the background has to be flattened. Every camera will produce slight variations in the background light levels across the field. In my cam there is a soft bluish glov coming from an internal amplifier circuit in the upper left corner of the ccd chip. Fortunately this is easy to fix thanks to the excellent program PixInsightIn PixInsight the variations of the background can be removed from the image using the Dynamic Background Extraction (DBE) tool. This tool has numerous options and variables, but basically one specifies a number of sample points spread out over the image and the background variation is then computed as a separate image. It is important not to place sample points in the areas of the image which contains part of the object or any bright stars. In the screenshot below I have avoided the galaxy itself and covered the edges of the image where I know the true background should be essentially black.

PixInsight Dynamic Background Extraction dialog |

Setting sample points for Dynamic Background Extraction |
After the background variation has been extracted into a separate image, the stacked image is simply divided by the background image and the result is an image with an essentially flat background.
|
PixelMath dialog to divide the stacked image with the extracted background |
3: Adjusting curves
Now when the background has been flattened the next step is to bring out the fainter details of the image. This is done by curve adjustment, and PixInsight provides a nice and easy-to-use curves tool. With curves it is possible to brighten the darker levels of the image while preserving those which are already bright.For this purpose it is important that the saven combined image has the largest possible bit depth, as individual brightness levels will be greatly scaled in some parts of a typical deep sky image. If the bit depth is not large enough the result may contain abrupt changes in brightness across areas which should otherwise be smooth, such as the galactic envelope which fades smoothly into the background.
When adjusting curves it is also important not to overexpose the bright parts of the image, while still bringing out the typical faint outher envelope of the deep sky object. Every image will require different settings, but after a little experimentation it should be relatively straight forward.

PixInsight curves adjustment dialog |

Image after curves adjustment |
4: Sharpening
After the curves adjustment it is now time to enhance the details of the image. I usually apply some unsharp masking in Photoshop. Again the settings for unsharp masking will vary depending on the source image. After some tinkering with the setings the result looks like this:

Photoshop unsharp masking dialog |

After unsharp mask and removal of artifacts |
5: Removing artifacts
At this point in the processing there will usually have appeared some artifacts such as rings etc. around the brightest stars, as well as the characteristic colored trails from the cameras hot pixels as a result of the stacking/alignment. These can safely be removed as they do not represent any real properties of the imaged object. I normally paint these over by hand in Photoshop, using a small brush with the nearby background color.Another handy tool is SCNR in PixInsight which removes the green noise in the image. As only a few deep sky objects contains true green colors, any high levels of green is usually due to noise. The image may not look green at all but there will be some noise present particularly in the green channel, which is easily removed with SCNR.
|
Typical trails from hot pixels |

PixInsight SCNR dialog |
6: Adjusting colors
Next step is to adjust the colors, although it doesn't have to be done exactly at this stage. It appears easier for me to apply the last steps of the process when I know what the final color tones of the image will be like. In this case I have chosen to reduce the overall redishness of the image, and also to increase the background intensity so the image will be viewable on average monitors. The increased background level reduces the overall dynamic range however, so it's a matter of taste weather or not this should be done. I personally prefer that the image can be vieved with a reasonable amount of details in an average room, without having to shut the curtains and dark-adapt for 15 minutes...

Photoshop color balance dialog |
After color and brightness adjustment |
7: Noise reduction
The unsharp masking has greatly enhanced the details in the dust lane, but unfortunately also enhanced some of the background noise as well. I use a couple of tools for noise reduction, primarily PixInsights SGBNR process and NeatImage. For this image I have used SGBNR, and again the settings are highly dependant on the source image. Some experimentation will pay off here.
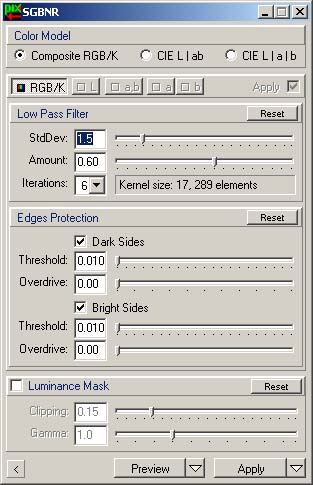
PixInsight SBGNR dialog |
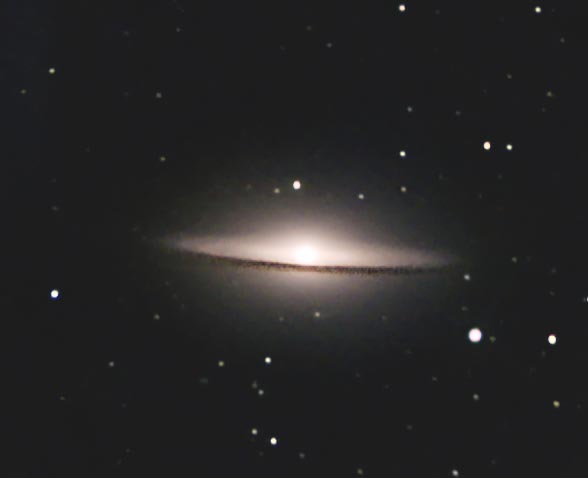
After SGBNR process in PixInsight |
8: Final tweaks
The original image has been greatly enhanced, and the last step I did in this case was to apply a slight gaussian blur in Photoshop to soften the galaxys diffuse glow, while using the history brush to still keep the details of the dust lane intact. The final result is here:
 Final result
|