FRAMED MEI TAI - in unnecessary detail
Tired of ads? Me too. This page is moving to http://babywearing.dictumsapienti.com/diy/framedMT.html, update your bookmarks or whatever. :)
Let us assume that you have already read some directions for making a Mei Tai, and all you want to know is how to give it a "framed" front panel. (If this is not the case, go read sleepingbaby.net first for some simple directions.)
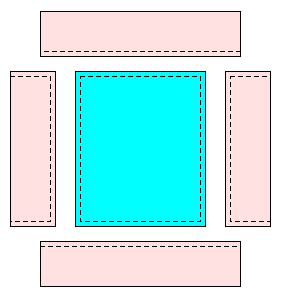
Instead of cutting a single body piece for your top layer, you will assemble it from 4 rectangles of your "frame" fabric and 1 rectangle of your "fancy" fabric. When it is pieced together, you want it to be the same size as your other body piece(s), and you will treat it just like a normal body piece.
CUTTING
Wash and dry your fabric before cutting it.
Suppose that you were going to cut your normal body pieces to a size of 20" wide and 22.5" high (the same as the directions at sleepingbaby.net). To construct a framed body piece with a 4" frame, assuming a 1/4" seam allowance, here is what you would need:
Note that the frame will be a bit thinner when the MT is finished, because the seam allowance for sewing the whole MT together will be taken out of that 4" of frame (e.g., a 1/2" seam allowance for sewing the MT together would give you a frame that is 3.5" wide.)
4" is a number I picked at random for this example, so please do not feel constrained to use these specific measurements; you can calculate new values based on a fatter or thinner frame or a different body size, or you can calculate backwards from the desired size of the fancy piece, or you can make a mock-up from construction paper without doing any math. Just make sure that you have accounted for the seam allowances. You can also vary the thickness of the frame's top and bottom and sides independently of one another (e.g. thin sides, medium-size top, and tall bottom). Your MT need not be rectangular, either; you can design one with a convex curved top, or concave curved sides.
SEWING
Iron your fabric first if it is wrinkled or creased.
Sew the sides on: line up a side piece and the fancy piece, with "right sides together", and sew a straight seam, 1/4" from the edge.
Press the seams with the iron to make them flat. (Do not slide the iron around; pick it up and put it straight down, so that the fabric is not being stretched out of shape at all.) When pressing a seam, press both seam allowances to the same side (either towards the frame or towards the fancy piece; this is a minor detail but it is nice to be consistent.)
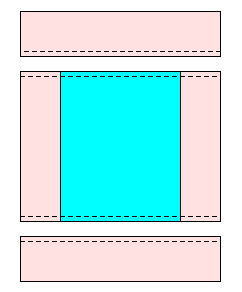
Then, sew the top and bottom on. Press the seams.

Now you have your framed top layer and can carry on with your regular Mei Tai directions.
last updated Sun Sep 11 13:31:39 EDT 2005